


|
|
User's Guide 1.1 |
|
When you open the SAS Information Delivery Portal, your organization's public portal appears. This view of the portal is the same for all users. When you choose the Log On tool and enter a valid user name and password, your own personal portal appears. Using the Personalize tool, you can modify this portal to meet your individual needs. The changes you make affect only your personal view of the portal.
The Personalize tool can also be used to make role-based changes. These changes affect the portals of an entire group of users. Role-based changes can be made only by the user who is designated as the group owner for the affected group.
Note: Do not use the following characters in the Personalize windows: &, <, >, or ".
To use the Personalize tool:
Open the SAS Information Delivery Portal.
Log on with your user name and password. Your own personal portal appears. This is the portal you can customize to meet your needs.
Determine what changes you would like to make to your portal (or to your group's portals, if you are a group owner). Then click Personalize on the toolbar:

The Personalize window appears:
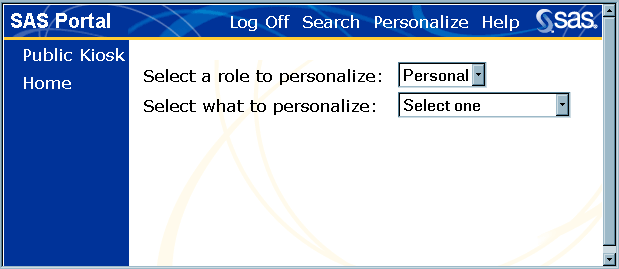
At the prompt Select what to personalize, select one of the following options from the drop-down list.
Desktop enables you to
specify which public, personal, and role-based windows are to be included on your portal
specify the order in which these windows appear in your desktop's navigation column
create new personal windows and modify existing ones.
For details, see Personalizing Your Desktop.
Windows enables you to
create new personal windows and specify their contents
modify or delete one of your existing personal windows
create new role-based windows for your group if you are a group owner, and modify or delete existing ones.
For details, see Creating and Editing Personal Windows or Creating and Editing Role-Based Windows. After creating a window, use the Desktop option to add the window to your desktop.
Lists enables you to
create new personal lists of applications, channels, documents, links, MDDBs, reports, tables, data warehouse views, or webEIS documents
modify or delete one of your existing personal lists
create new role-based lists of applications, channels, documents, MDDBs, reports, subscriptions, tables, data warehouse views, or webEIS documents for your group if you are a group owner, and modify or delete existing ones.
For details, see Creating and Editing Personal Lists or Creating and Editing Role-Based Lists. After creating a list, use the Windows option to add the list to a window so that it will appear on your desktop.
Links enables you to
create new links to internal or external Web addresses
modify or delete one of your existing personal links
create new role-based links for your group if you are a group owner, and modify or delete existing ones.
For details, see Creating and Editing Personal Links or Creating and Editing Role-Based Links. After creating a link, use the Lists option to add the link to a list so that it will appear on your desktop.
Documents enables you to edit information about your personal documents, or edit information about role-based documents if you are a group owner.
Note: Because of potential security issues, the Personalization feature does not allow portal users to add documents to the portal. For more information, see Adding and Editing Personal Documents or Editing and Editing Role-Based Documents.
webEIS Documents enables you to
add a webEIS document to your portal
add a role-based webEIS document for your group if you are a group owner.
For details, see Adding and Editing Personal webEIS Documents or Adding and Editing Role-Based webEIS Documents. After adding a webEIS document, use the Windows option to add the webEIS document to a window so that it will appear on your desktop.
Widgets enables you to
add widgets to your portal
add role-based widgets for your group if you are a group owner.
For details, see Adding and Editing Personal Widgets or Adding and Editing Role-Based Widgets. After adding a widget, use the Windows option to add the widget to a window so that it will appear on your desktop.
Applications enables you to
add applications to your portal
add role-based applications for your group if you are a group owner.
For details, see Adding and Editing Personal Applications or Adding and Editing Role-Based Applications. After adding an application, use the Windows option to add the application to a window so that it will appear on your desktop.
Subscriptions enables you to subscribe to (or unsubscribe from) a content channel or a publication channel. For details, see Managing Your Subscriptions.
Subscription Profiles enables you to set up a new subscription profile to use when subscribing to publication channels. You can also modify or delete one of your existing subscriber profiles. For details, see Managing Your Subscriber Profiles.
Account enables you to change your portal password. For details, see Changing Your Password.
When you select one of the previous options, the personalize screen refreshes and displays a set of controls, called a control panel, for performing the requested task. To proceed, follow the instructions in the links previously mentioned.
|
|
User's Guide 1.1 |
|