


|
|
User's Guide 1.1 |
|
Role-based windows are windows that are available only to the users assigned to a particular group. If you have authorization as the owner of a group, you can create and edit role-based windows for that group. After the group owner has created a role-based window, users in the group can add it to their desktops.
You can create three different types of role-based windows:
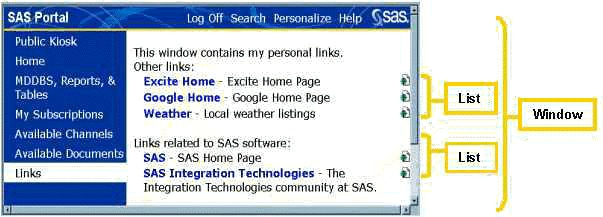
A window that contains one or more lists, as shown in this example:
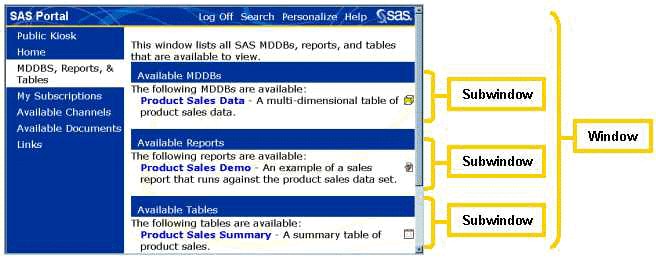
A window that contains one or more subwindows, as shown in this example:
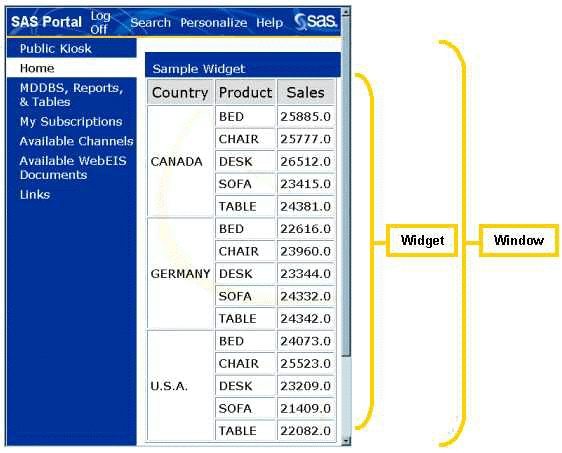
A window that is defined by a widget, which is a graphical user interface (GUI) component that displays information or accepts user input, as shown in this example:
To create a new role-based window:
If you have not already done so, open the SAS Information Delivery Portal, log on with your user name and password, and click Personalize on the toolbar. The Personalize window appears.
At the prompt Select a role to personalize, choose the group whose windows you are updating.
At the prompt Select what to personalize, choose Windows from the drop-down list. The portal Windows control panel appears, including a list of all the role-based windows that currently exist for the group.
Under Add a new <your group's name> window, click a radio button to indicate the type of
window you want to create.
Then click ![]() .
Fields appear to define the new window.
.
Fields appear to define the new window.
Fill in the fields as follows:
Click Next.
You can create three different types of windows:
If you are creating a window that is defined by a widget, choose the appropriate widget from the drop-down list.
If you are creating a window that is to contain one or more lists:
A list box is displayed showing the lists that are available to include in the window.
Note: If you need a list that is not available, you can create a new one (see Creating and Editing Role-Based Lists).
While holding down the CTRL key, highlight each list that you want to include in the window.
When you have highlighted all the desired lists, click Create Window. The portal Windows control panel reappears showing the new window you have created.
If you are creating a window that is to contain one or more subwindows:
A list box is displayed showing the available windows.
While holding down the CTRL key, highlight each window that is to be a subwindow of the new window.
When you have highlighted all the desired subwindows, click Create Window. The portal Windows control panel reappears showing the new window you have created.
You can now proceed by choosing another Personalize function, choosing another task, or opening another window.
After the group owner has created a role-based window, users in the group can add the window to the navigation columns of their desktops. For instructions, see Personalizing Your Desktop.
If you have authorization as group owner, you can edit or delete an existing role-based window for the group.
To edit or delete a role-based window:
If you have not already done so, open the SAS Information Delivery Portal, log on with your user name and password, and click Personalize on the toolbar. The Personalize window appears.
At the prompt Select a role to personalize, choose the group whose windows you are updating.
At the prompt Select what to personalize, choose Windows from the drop-down list. The portal Windows control panel appears, including a list of all the role-based windows that currently exist for the group.
Under Manage <your group's name> personal windows, find the window you want to edit or delete.
Then click ![]() to delete the window
or
to delete the window
or ![]() to edit the window.
If you click
to edit the window.
If you click ![]() , the window disappears immediately,
and you are finished.
If you click
, the window disappears immediately,
and you are finished.
If you click ![]() ,
the Update Window control panel appears.
,
the Update Window control panel appears.
Update the Title, Message, Description, and Keywords fields as necessary.
Click Next.
You can edit all three types of windows:
If the window you are editing is defined by a widget, select the appropriate widget from the drop-down list.
If the window you are editing contains one or more lists:
A list box is displayed showing the lists that are available to include in the window. The lists that are currently in your window will already be highlighted.
To keep the existing lists and add new lists, hold down the CTRL key and highlight each list you want to add. To replace the current lists, make your first selection without holding down the CTRL key; then hold down CTRL while you make any additional selections.
When you have highlighted all the desired lists, click Create Window. The portal Windows control panel reappears.
If the window you are editing contains one or more subwindows:
A list box is displayed showing the available windows. The windows that are already subwindows will be highlighted.
To keep the existing subwindows and add new ones, hold down the CTRL key and highlight each window you want to add. To replace the subwindows, make your first selection without holding down the CTRL key; then hold down CTRL while you make any additional selections.
When you have highlighted all the subwindows, click Create Window. The portal Windows control panel reappears.
You can now proceed by choosing another Personalize function, choosing another task, or opening another window.
|
|
User's Guide 1.1 |
|