|
|
Security
Scenario: Using the Xythos Administration GUI and SAS User Management Customization with the Portal
When you administer the SAS Information Delivery Portal, you might want to set up WebDAV folders that enable group-based access to content. Using the SAS Customizations extensions for the Xythos WFS WebDAV server, you can grant users and groups (that are defined on the SAS Metadata Server) read and/or write access to folders on the Xythos WFS WebDAV Server. For example, within the portal implementation, you might utilize the publish and subscribe capabilities to publish (write) and subscribe to (read) group folders on a DAV-based publication channel. For details about the SAS Publishing Framework, see the
Publishing Framework section in this guide, and
Publishing Framework in the SAS Integration Technologies: Developer's Guide.
The following scenario shows a portal's publish and subscribe setup for sales and executive teams that need different access to read (subscribe to) and write (publish) information that is stored in three different directories on the Xythos WFS WebDAV server. On the SAS Metadata Server, these teams are represented by two groups, Americas Sales and Sales Executives. In addition, the portal installation provides a group named Portal Admins, which has unrestricted access to the portal's metadata on the SAS Metadata Server. In this scenario, the Portal Admins group will also be given read, write, and delete access to all group-based directories on the Xythos WFS WebDAV server.
This publish and subscribe scenario has a requirement for three different content areas, or group folders on the WebDAV server:
- Catalog Sales: The
/sasdav/Catalog Sales directory contains catalog sales information. The Americas Sales and Sales Executives groups can both read (subscribe to) and write (publish) information.
- Field Sales: The
/sasdav/Field Sales directory contains direct sales information. The Americas Sales and Sales Executives groups can both read (subscribe to), but only the Executives group can write (publish) information.
- Sales Execs: The
/sasdav/Sales Execs directory contains executive-level sales information and only the Sales Executives group can read (subscribe to) and write (publish) information.
Note: The Portal Admins group can also read (subscribe to), write (publish), and delete information all of the above directories.
The following table summarizes this scenario's group-based folders on the WebDAV server, and the permissions for each user:
| Folder |
Americas Sales |
Sales Executives |
Portal Admins |
| /sasdav/Catalog Sales |
Read, Write |
Read, Write |
Read, Write, Delete |
| /sasdav/Field Sales |
Read |
Read, Write |
Read, Write, Delete |
| /sasdav/Sales Execs |
(none) |
Read, Write |
Read, Write, Delete |
To create this sample Xythos configuration, follow these steps:
- Install the Xythos WFS WebDAV server.
- Create users, groups, and logins on the metadata server.
- Create content folders on the Xythos server.
- Configure access permissions on the Xythos server.
Step 1: Install the Xythos WFS WebDAV server
Install Xythos WebFile Server and the SAS User Management Customization. For details, see the installation instructions on the Xythos Webfile Server CD.
Enter the following values in the SAS User Management Customization installation screen:
- Metadata Server hostname: your SAS Metadata Server machine name
- Metadata Server port: SAS Metadata Server port
- Metadata repository name: SAS Metadata Repository name (for example, Foundation)
- Unrestricted user: an unrestricted user (for example,
sasadm)
- To understand and set up unrestricted access and server administrative privileges, see
Overview of Initial Users and Groups in the
SAS Intelligence Platform: System Administration Guide.
- Password: password for the unrestricted user.
- Trusted user: the trusted user (for example,
sastrust).
- To understand and set up a trusted user for the SAS Metadata Server, see
Overview of Initial Users and Groups in the
SAS Intelligence Platform: System Administration Guide.
- Authentication domain for SAS Metadata server: an authentication domain (for example,
DefaultAuth)
- Authentication domain for WFS WebDAV server: an authentication domain (for example,
DefaultAuth)
Note: When you install the SAS User Management Customization, it is recommended that you specify the same authentication domain name for both the SAS Metadata Server and the Xythos WFS WebDAV server (for example, DefaultAuth). For details about when to specify different authentication domains for the SAS Metadata Server and Xythos WebDAV server, see the documentation for the SAS User Management Customization installation.
If you define a WebDAV server on the SAS Metadata Server, in the authentication domain field, specify the authentication domain that you specified for the Xythos WFS WebDAV server during the installation of the SAS User Management Customization.
Step 2: Create Users, Groups, and Logins on the SAS Metadata Server
Define the users, groups, and login credentials that will access the WebDAV server. When you define login credentials, you must specify the same authentication domain name that you specified for the Xythos WFS WebDAV server during the SAS User Management Customization installation. For this example, define the following users, groups, and logins:
| Group Metadata Identities |
User Metadata Identities |
Logins |
| User ID |
Authentication Domain |
| Americas Sales | salesusr | salesusr | DefaultAuth |
| Portal Admins | saswbadm | saswbadm | DefaultAuth |
| Sales Executives | execusr | execusr | DefaultAuth |
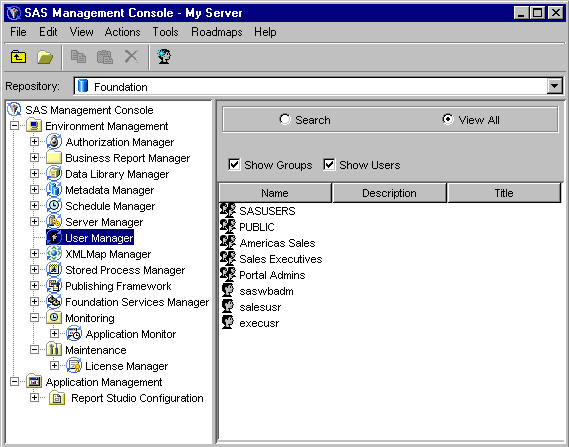
For details about configuring the metadata in SAS Management Console, see Defining Users, Groups, and Logins on the SAS Metadata Server.
Step 3: Create Content Folders on the Xythos Server
To create the content folders on the Xythos server, follow these steps:
- Open the Xythos Administration interface in your Web browser. The default URL is
http://localhost:8300/xythosadmin.
- Enter your Xythos administrator username (default = "admin") and password (default = (nothing)).
- In the
sasdav directory, create three subdirectories: Catalog Sales, Field Sales, and Sales Execs.
To create a subdirectory for sasdav, follow these steps:
- Click FILE SYSTEM
 Directory & File Admin. The Directory Administration page appears. Directory & File Admin. The Directory Administration page appears.
- Click Find Top-Level Directory to display a list of top-level directories that are defined on the server, and then select
/sasdav from the list.
- Click Add New Sub-Directory. The Add New Sub-Directory page appears.
- Specify a Name for the new subdirectory and click Create Directory to create the new subdirectory.
Note: Ignore any messages that state "The directory does not have an owner"—directory ownership is not a requirement for the SAS User Management Customization.
Step 4: Configure Access Permissions on the Xythos Server
To configure the access permissions for the content folders, follow these steps:
- In the Xythos Administration GUI, click FILE SYSTEM Directory & File Admin. The Directory Administration page appears.
- Click Find Top-Level Directory to display a list of top-level directories that are defined on the server, and then select
sasdav from the list.
- Set the access permissions for each subdirectory:
- Click
 for the subdirectory for which you want to set access permissions. The Directory Administration: Access Permissions page appears. for the subdirectory for which you want to set access permissions. The Directory Administration: Access Permissions page appears.
- Click Search for Users and Groups. The Find Users and Groups: Access Permissions page appears.
- Click OK to display a list of users and groups that are defined on the SAS Metadata Server.
- Select the check boxes for the
Americas Sales, Sales Executives, and Portal Admins groups, and then click OK to return to the Directory Administration: Access Permissions page.

- Set the access permissions as appropriate for the directory:
| Group |
Permissions for /sasdav/Catalog Sales |
| Read |
Write |
Delete |
Inherit Read |
Inherit Write |
Inherit Delete |
| Americas Sales |
Yes |
Yes |
No |
Yes |
Yes |
No |
| Portal Admins |
Yes |
Yes |
Yes |
Yes |
Yes |
Yes |
| Sales Executives |
Yes |
Yes |
No |
Yes |
Yes |
No |
| Group |
Permissions for /sasdav/Field Sales |
| Read |
Write |
Delete |
Inherit Read |
Inherit Write |
Inherit Delete |
| Americas Sales |
Yes |
No |
No |
Yes |
No |
No |
| Portal Admins |
Yes |
Yes |
Yes |
Yes |
Yes |
Yes |
| Sales Executives |
Yes |
Yes |
No |
Yes |
Yes |
No |
| Group |
Permissions for /sasdav/Sales Execs |
| Read |
Write |
Delete |
Inherit Read |
Inherit Write |
Inherit Delete |
| Americas Sales |
No |
No |
No |
No |
No |
No |
| Portal Admins |
Yes |
Yes |
Yes |
Yes |
Yes |
Yes |
| Sales Executives |
Yes |
Yes |
No |
Yes |
Yes |
No |
Note: In addition to the basic Read, Write, and Delete permissions, you should also set the corresponding inherit permissions. Inherit permissions apply to any new files that are created in the directory. For example, if a user has the Read permission for a directory, but does not have the Inherit Read permission, the user can read the directory itself, but cannot necessarily read the files in the directory.
- Click Save Changes to apply the new access permissions.
|