The DOCUMENT Procedure
- Syntax
 Procedure SyntaxPROC DOCUMENT StatementCOPY TO StatementDELETE StatementDIR StatementDOC StatementDOC CLOSE StatementHIDE StatementIMPORT TO StatementLINK StatementLIST StatementMAKE StatementMOVE TO StatementNOTE StatementOBANOTE StatementOBBNOTE StatementOBFOOTN StatementOBPAGE StatementOBSTITLE StatementOBTEMPL StatementOBTITLE StatementRENAME TO StatementREPLAY StatementSETLABEL StatementUNHIDE Statement
 - Overview
- Concepts
- Using
- Results
- Examples
Example 1: Rearranging Output with the Documents Window
Details
This example shows you
how to create a new ODS document by using the Documents window.
Much of what can be done in this interactive mode to rearrange and
rename output objects can be done with PROC DOCUMENT syntax. However,
the PROC DOCUMENT syntax actually parallels the process that you go
through in the interactive window. This means that study of the interactive Document window
will enhance your understanding of the PROC DOCUMENT syntax for accomplishing
the same end results.
You can accomplish the
same tasks shown in this example using PROC DOCUMENT syntax. Using
the GUI window is useful when you have a few documents that you need
to create and replay. However, if you use SAS Enterprise Guide (which
does not have the Documents window) or you
want to create an ODS document store as part of nightly production
processing, then the PROC DOCUMENT syntax enables you to accomplish
these creation, management, and replay tasks.
ods listing close;
proc sort data=sashelp.prdsale out=prdsale;
by Country;
run;
ods document name=work.prddoc(write)
proc tabulate data=prdsale;
by Country;
var predict;
class prodtype;
table prodtype all,
predict*(min mean max);
run;
ods select ExtremeObs;
proc univariate data=prdsale;
by Country;
var actual;
run;
ods document close;
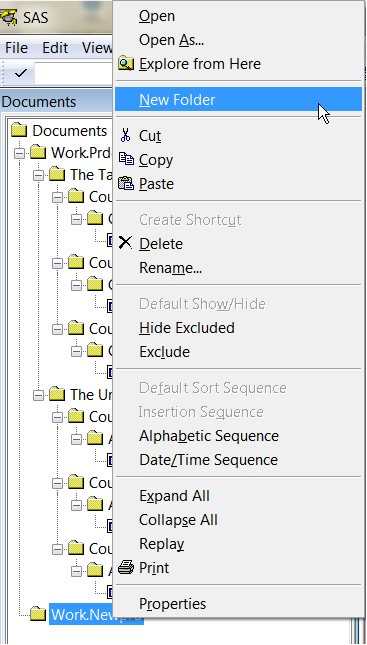
To create a new ODS
document, right-click the Documents folder
at the top of the Documents window and select New
Document from the menu.
Creating a New Document

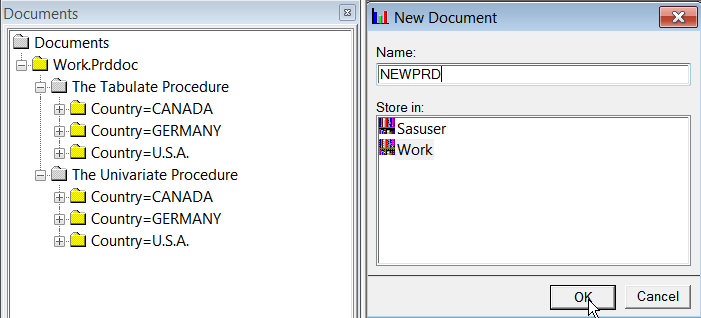
When the New
Document window appears, select a library to store the
new document and provide a name for the document (NEWPRD, for example).
Then click OK.
Naming a New Document
To create a folder
in the new document, right-click the folder that represents the new
document, and select New Folder.
Create a New Folder
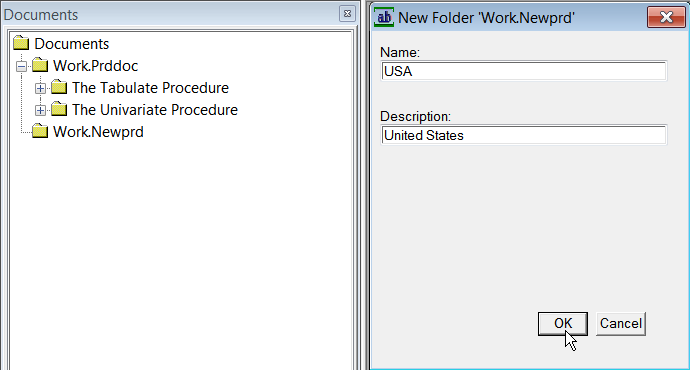
Enter the country and
the description in the New Folder window
and then select OK. If a Description value
is provided, that value will be used for the folder name. Note that
in the following figure, United States is used as the folder name,
not USA.
Name the New Folder
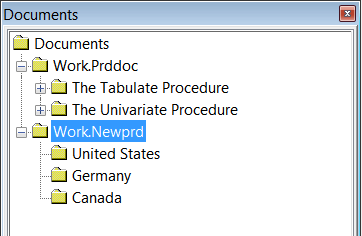
The folder with all
three countries is shown here. Even though the folders are expanded,
they have no objects, so there is nothing to show in the expanded
view.
New Document with New Folders
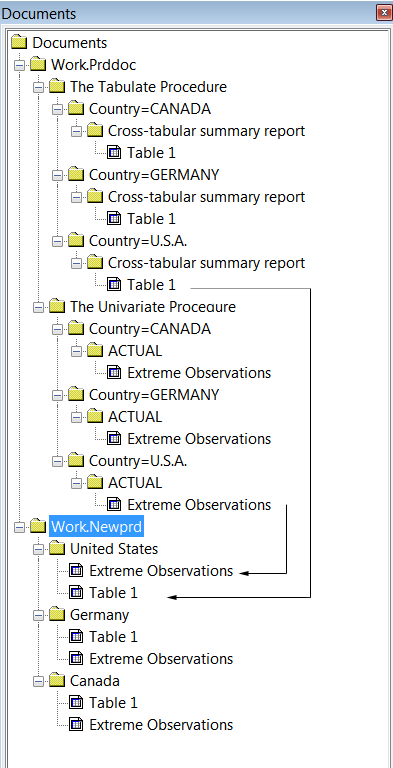
You can either copy
and paste or drag and drop from the original document store (Work.Prddoc)
to the new document, Work.Newprd.
Moving Output Objects