|
|
COM/DCOM
Using IT Administrator to Define a Server (COM/DCOM)
The SAS Integration Technologies Administrator provides a graphical user interface that allows you to create or modify a definition for a COM/DCOM server. (Alternatively, you can use the IT Administrator wizard to perform the initial creation. For details, see Using the IT Administrator Wizard to Define a COM/DCOM Server.)
Note: The following attributes which appear in the Commands tab of the IT Administrator interface are not used in Version 9 of SAS Integration Technologies
- Transaction Program Name
- Partner Logical Unit Name
If you are using Version 9, do not use these attributes for your configuration.
To define a COM/DCOM server object using IT Administrator:
Open IT Administrator. In the manager bar, select SAS Configuration. In the tree view, select the Servers folder (found under the SAS Servers folder); then select the New button ( ) on the toolbar. Alternatively, you can select File ) on the toolbar. Alternatively, you can select File  New Server from the menu bar. The following window appears: New Server from the menu bar. The following window appears:
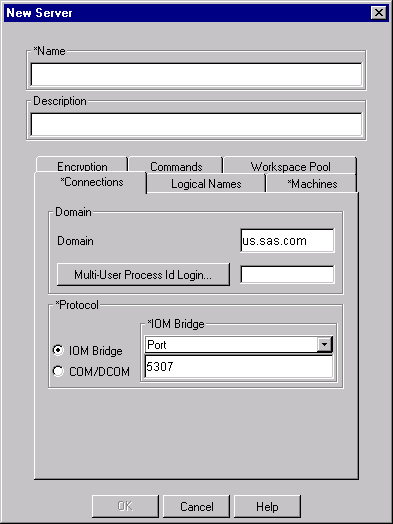
Enter the necessary attributes. The attribute fields that are marked with an asterisk (*) are required. The OK button will remain greyed out until you have entered all of the required fields. Select the Help button on any tab to display entry instructions. Brief entry instructions are provided below. For detailed information about a field, click on the corresponding attribute name, which is shown in parentheses. The appropriate definition on the sasServer Attributes List will be displayed. You can then use your browser's Back button to return to this page.
Enter a unique name (sasServercn) for the server. Optionally, enter a description (description). On the Connections tab:
Enter the Domain (sasDomainName). Select the COM/DCOM protocol (sasProtocol). From the pull-down menu that appears, select either Port or Service and enter either the service (sasService) or the port number (sasPort) in the field below the menu. The port number is required if the server will have Java clients.
On the Logical Names tab, select one more logical names (sasLogicalName) that this server is to be associated with. If you want to create a new logical name, select the Add button to create a new sasLogicalNameInfo object. For more information about logical names, refer to Assigning Logical Names.
On the Machines tab, select the Add button, and then enter the fully qualified host name (sasMachineDNSName) for the machine on which the server is to run. Repeat for each additional host machine. To change an entry, highlight the machine name and select Edit. To remove an entry, highlight the machine name and select Remove.
On the Encryption tab, select the Authentication (sasRequiredEncryptionLevel) and DCOM Security Service from the drop-down menus.
You can use the Workspace Pool tab to set up workspace pooling for the server. Specify the Maximum Workspaces per Workspace Pool (sasMaxPerWorkspacePool) and the Recycle Activation Limit (sasMaxPerWorkspacePool) in the fields provided. (Select the Default button if you want to reset the Recycle Activation Limit to its default value of 10.) Then select Leave running when idle (sas-ServerRunForever); or select Minutes until idle shutdown and enter the number of minutes (sas-ServerShutdownAfter)
after which an idle server should be shut down.
When you are finished entering information in the fields, select OK. The new server object appears in the tree view.
To modify a COM/DCOM server object using IT Administrator:
Open IT Administrator. In the manager bar, select SAS Configuration. In the tree view, find the Servers folder (found under the SAS Servers folder) and click the plus sign to open it. Select the server object that you wish to modify. The server's current attributes will be displayed in the property view in the right portion of the window. Select the appropriate tabs, and enter the necessary changes. For a description of the fields, refer to the sasServer Attributes List. When you are finished, select the Save icon ( ) on the toolbar; or select File Save from the menu bar. (If you skip this step, IT Administrator will prompt you to save your changes when you attempt to navigate to another object.) ) on the toolbar; or select File Save from the menu bar. (If you skip this step, IT Administrator will prompt you to save your changes when you attempt to navigate to another object.)
|