SAS® AppDev Studio™ 3.0 Developer's Site
| Pie Chart |
|
|
Data Source: JDBC
Please install the latest webAF template updates prior to building this example. For more information about the server-side example templates used by this example, see Web Application Example Templates and Built-in Web Application Templates and Options.
The following example is not meant to be a complete Web application, rather it is to show how to use a particular component(s). The example does not address the issue of immediately freeing up resources when the user navigates off the Web application or closes the Web browser. Any necessary resources created in the example will stay around until the associated HTTPSession times out. If this example is used in a multi-user environment, it is possible to exhaust the available resources until HTTPSessions time out and free up their associated resources.
Step 1: Create a project in webAF
- Create a new project named
PieChartJSP. - Select Web Application from the webAF Projects list.
- Accept the defaults as you
go through the Web App wizard until you have reached step #4 of the wizard.
At this step you will need to select Examples in the radio box titled Display list for. Choose JDBC TableView Servlet from the list box titled Type of initial content. - Continue accepting defaults as you complete the Web App wizard.
Step 2: Set up access to the data source
- Open the
JDBCDefaultExampleControllerServlet.javafile from the Files Tab of the Project Navigator.The
JDBCTableViewExampleControllerServlet.javafile contains servlet code to get a JDBC connection to SAS data and build a relational data model with a JDBCToTableModelAdapter. - You need to import the appropriate graphics
classes to create and define a PieChartTableDataModel that uses the data
that is available through the JDBCToTableModelAdapter.
Just below the existing import statements at the top of the
JDBCTableViewExampleControllerServlet.javafile, import the following classes:import com.sas.graphics.components.piechart.PieChartTableDataModel; import com.sas.graphics.components.AnalysisVariable; import com.sas.graphics.components.ClassificationVariable;
- To pass the PieChartTableDataModel to the JSP page, you need to add a global
Web application string to the global strings that are already defined in the servlet
code.
Scroll down to the global Web application strings and add the following string:
private static final String PIE_DATA_MODEL = "pie_data_model";
- Scroll down to the
jdbcQuerystring and change ENTER_QUERY_STRING_HERE to"select * from sashelp.retail where year gt 1990". - The code immediately beneath the
jdbcQuerystring creates the JDBCToTableModelAdapter. You must add similar code to create the PieChartTableDataModel. You must then set the JDBCToTableModelAdapter as the model for the PieChartTableDataModel, and finally assign variable roles to the chart data model.In the following code fragment, the code you must add is shown in bold. The code that is not bold provides a context that shows exactly where you should add your new code.
   //Set up the JDBC model adapter
   JDBCToTableModelAdapter adapter = null;
   if (session != null){
       adapter   = (JDBCToTableModelAdapter)session.getAttribute(SAS_MODEL);
   }
   if (adapter == null){
       try{
           //Create the model adapter and set it on the session
           adapter = new JDBCToTableModelAdapter(sas_JDBCConnection, jdbcQuery);
           if (session != null){
               session.setAttribute(SAS_MODEL, adapter);
           }
       }
       catch(Exception e){
           throw new RuntimeException(e);
       }
   }
   //Set up the PieChartTableDataModel
   PieChartTableDataModel dataModel = null;
   if (session != null){
       dataModel = (PieChartTableDataModel)session.getAttribute(PIE_DATA_MODEL);
   }
   if (dataModel == null){
       try{
           // Create a data model for the chart
           dataModel= new PieChartTableDataModel();
           if (session != null){
               session.setAttribute(PIE_DATA_MODEL, dataModel);
           }
       }
       catch(Exception e){
           throw new RuntimeException(e);
       }
   }
   // Set the table model adapter on the data model
   dataModel.setModel(adapter);
   // Assign variable roles to the data model
   dataModel.setCategoryVariable(
     new ClassificationVariable("Year"));
   dataModel.setResponseVariable(
     new AnalysisVariable("Retail sales in millions of $"));
}

//Forward the request to the JSP for display
RequestDispatcher rd =
	getServletContext().getRequestDispatcher("/JDBCTableViewExampleViewer.jsp");
rd.forward(request, response);
Step 3: Add components to the JSP file
When you used the WebApp Project Wizard to create this project, you selected
JDBC TableView servlet as the type of initial content for the project.
In response, the Wizard generated servlet code to build a relational data
model, and it generated an JDBCTableViewExampleViewer.jsp file
containing a <sas:TableViewComposite> element as the viewer for the
data model.
- Replace the <sas:TableViewComposite> element with a <sas:PieChart> element.
- To assign the data model to the Pie Chart,
you must use the <sas:PieChart> tag's model attribute to specify the
pie_data_model string you declared in the
JDBCTableViewExampleControllerServlet.javafile. You will also insert the tagging structure needed to suppress the legend. - Replace the existing <sas:TableViewComposite> tag structure in the
JDBCTableViewExampleViewer.jsp file with the following tag structure:
<sas:PieChart id="pieChart1" model="pie_data_model" >
   <sas:PieChartModel>
      <sas:LegendModel visible="false" />
   </sas:PieChartModel>
</sas:PieChart>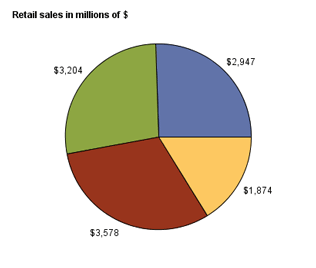
For more information and options, see Web Application Example Templates.
Step 4: Finish the project
- Build the project.
- Start the IOM Spawner by selecting Start Menu
![[arrow]](../images/arrow.gif) SAS AppDev Studio
Services
SAS V9.1
Start SAS V9.1 IOM Spawner.
SAS AppDev Studio
Services
SAS V9.1
Start SAS V9.1 IOM Spawner. - Start the Java Web server.
- Execute in browser.