Deploying SAS Visual Analytics Interactively
Installing and configuring SAS Visual Analytics interactively
with the deployment wizard consists of two main phases:
This section describes the installation pages and
some of the more important configuration pages that you encounter
during the configuration phase of a SAS Visual Analytics deployment.
The type and number of configuration pages that you get depend on
the prompting level and the contents of your SAS Visual Analytics
custom order. Configuration Options by Prompt Level lists which configuration options are available for each
prompting level. For information about all deployment wizard prompts,
see the online Help.
-
Providing installation information such as the following:
-
deployment type (planned or unplanned)
-
deployment plan location (if planned)
-
machine type (single machine, server machine, and so on)
-
SAS components to be installed on the machine
-
valid paths to any required, pre-installed, third-party software
-
-
Providing configuration information such as the following:
-
prompting level (Express, Typical, or Custom)
-
SAS components to be configured on the machine
-
configuration directory name
-
single sign-on preference (Windows only)
-
required user account credentials
-
server port numbers
-
To install and configure
SAS Visual Analytics interactively, complete these steps:
-
If you are using HTTPS self-signed or site-signed certificates, you must deploy SAS Visual Analytics in the following way:
-
Install SAS Visual Analytics and the trusted CA bundle.Run the SAS Deployment Wizard in install mode.
-
Add your self-signed and site-signed certificates to the trusted CA bundle.Use the trusted CA bundle tasks in the SAS Deployment Manager.
-
Configure SAS Visual Analytics.Run the SAS Deployment Wizard in configure mode.
For more information, see Add Your Certificates to the Trusted CA Bundle in Encryption in SAS. -
-
Make sure that you have reviewed all of the documents listed in Step 2: Check for Documentation Updates.
-
Verify that you have performed the previous required steps outlined in Preparing to Deploy SAS Visual Analytics.Note: A few pages into the SAS installation, the deployment wizard prompts you for paths to the required third-party software. The required third-party software must be installed on the current machine or the deployment wizard will not let you continue with the installation. In this situation, you need to end the deployment wizard session and install the required third-party software before you can continue.
-
If you are adding on SAS Visual Analytics or SAS Visual Analytics Administration and Reporting to an existing SAS 9.4 deployment, make sure that you first review Add on SAS Visual Analytics Administration and Reporting.
-
If you are deploying SAS LASR Analytic Server in non-distributed mode, you get fewer configuration prompts. You do not see any prompts about data providers and SAS High-Performance Computing Management Console. For a list of the prompts that you get, see Configuration Options By Prompting Level.
-
If you use any garbage execution scripts, temporarily suspend these scripts during deployment wizard. If any wizard temporary files are deleted during wizard execution, configuration failures can occur.
-
Review information about where to source certain SAS content repositories described in SAS Metadata Repository Considerations. -
Review information about deployment wizard configuration prompting levels described in Configuration Options by Prompt Level.
-
Log on to the machine on which you plan to install the SAS Visual Analytics server tier and middle tier (blade 0). Do not use
root. -
Start the SAS Deployment Wizard from the highest-level directory in your SAS Software Depot and use the command appropriate for your operating system:
Start-Up Commands for the SAS Deployment Wizard Operating SystemCommandWindowssetup.exeLinuxsetup.shNote: In SAS Visual Analytics 7.2 and later, the SAS Deployment Wizard automatically records your responses, regardless of whether you run the wizard with the-recordoption. This record of your wizard input is written to a file named ResponseRecord_yyyy-mm-dd-hh.mm.ss.log in one of the following locations:C:\Users\SAS-Installer\AppData\Local\SAS\SASDeploymentWizard(Windows) orhome-directory/.SASAppData/SASDeploymentWizard(Linux).You should see a welcome page similar to the following:
-
Choose LanguageSelect the language for the deployment wizard, and click OK.
-
From the drop-down list, select the language that you want the SAS Deployment Wizard to use when it displays text.For more information, see Locale and Encoding Considerations.
-
-
If you have more than one SAS software order in your depot, the wizard prompts you to select the order in which you want to deploy. When you are finished, click Next.
-
Select Deployment TaskSelect the deployment task that you want to perform, and click Next.
-
Select Install SAS Software.
-
-
Specify SAS HomeSpecify the location where you want to install SAS, and click Next.
-
If you want to specify a different location where SAS is installed other than the default, enter this path in SAS Home.CAUTION:The directory path for SAS Home cannot contain parentheses. Using parentheses cause SAS Environment Manager scripts to fail.Although your SAS installation directory (which the wizard refers to as SAS Home) and SAS configuration directories can share the same parent directory, one directory cannot reside inside another. Also, the SAS installation directory should not be a directory within your SAS Software Depot.CAUTION:There should be one SAS installation directory (SAS Home) per SAS deployment. Therefore, when deploying multiple tiers on the same host, the SAS installation directory location should always be shared. By contrast, when deploying different versions of SAS on the same machine, there should be a unique SAS installation directory for each SAS version.Note: On Windows, the deployment wizard prompts you for the SAS installation directory the first time you run the wizard. On any subsequent wizard sessions on this machine, the wizard uses the previously specified location for the SAS installation directory.
-
-
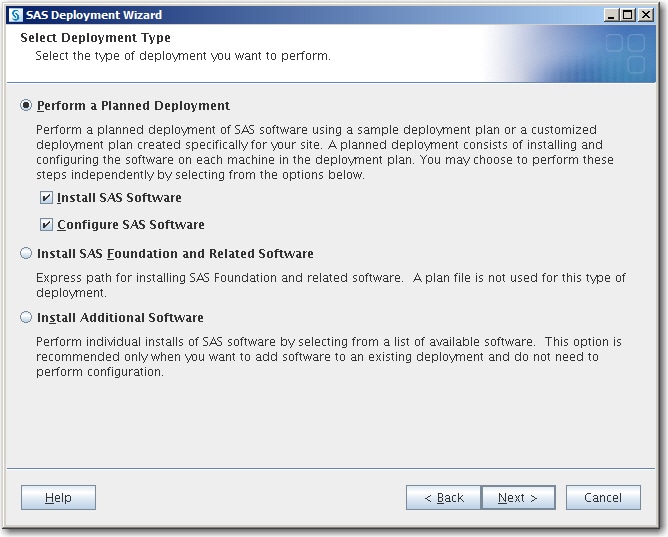
Select Deployment TypeSpecify the type of deployment that you want to perform, and click Next.
-
Confirm that Perform a Planned Deployment, Install SAS Software, and Configure SAS Software are all selected, unless you are providing your own Transport Layer Security (TLS) certificates.
-
-
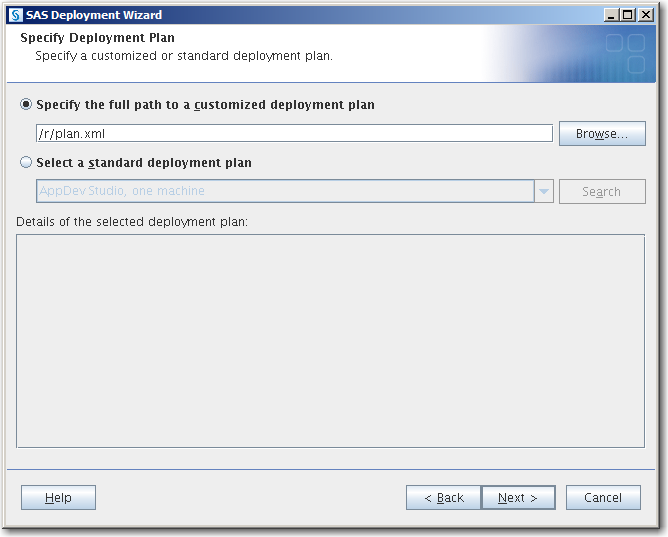
Specify Deployment PlanSpecify the type of deployment plan that you are using, and click Next.
-
customized deployment planChoose Specify the full path to a customized deployment plan, and click Browse to navigate to the plan file (plan.xml).
-
standard deployment planSelect Select a standard deployment plan, and the appropriate plan in the drop-down list.For more information, see About Deployment Plans.
-
-
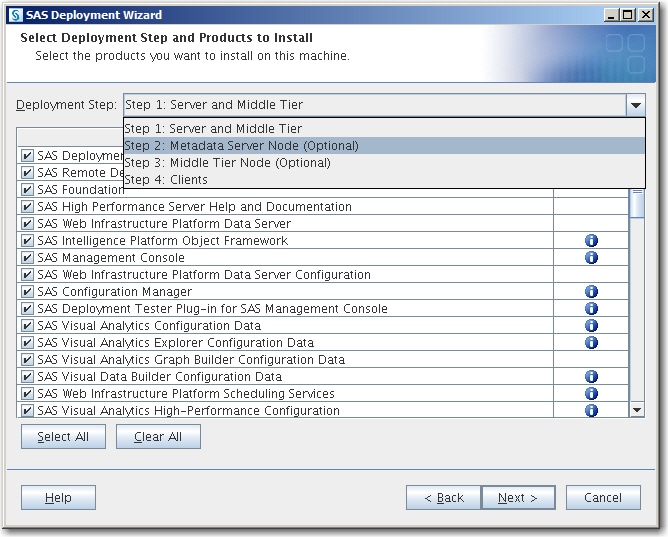
Select Deployment Step and Products to InstallSelect the machine on which you are installing software, and select the SAS products that you want to install. When you are finished, click Next.
-
In the Deployment Step drop-down list, select the machine on which you are installing software.Note: If you are deploying SAS on multiple machines, make sure that you are following the process described in Installation Order Rules for Multiple Machine Deployments in SAS Intelligence Platform: Installation and Configuration Guide.Note: When a machine has multiple deployment steps, the deployment wizard attempts to default to the correct step. However, in some cases, this can be difficult for the wizard to determine. Therefore, always be careful to choose the correct step and avoid merely choosing the default step.For information about SAS Web Parts for Microsoft SharePoint, see Deploying SAS Web Parts for Microsoft SharePoint in SAS Intelligence Platform: Installation and Configuration Guide.Note: Starting with SAS Visual Analytics 7.1, if the server tier and middle tier are deployed on separate machines, these machines are no longer required to use operating systems in the same operating system family (for example, Red Hat Enterprise Linux 6.1, x86, 64-bit, and SUSE Linux Enterprise System 11 SP1, x86, 64-bit are both in the same family). The SAS Visual Analytics 7.1. server and middle tiers—like the SAS Metadata Server and the SAS Web Infrastructure Platform—can be located on machines that use a different operating system family. For example, the SAS Visual Analytics server tier could reside on a Windows machine, and the SAS Visual Analytics middle tier could reside on a Linux x86 machine.
-
In the table, by default, all products that are displayed will be installed. Deselect any products that you do not want to install. When you are finished, click Next.Note: If you are deploying a middle-tier node machine, make sure that SAS Web Application Server Node Configuration is selected.Note: If you are deploying a SAS Data Management product, you should select a SAS Quality Knowledge Base product.
-
-
Specify SAS Installation Data FileSpecify the path to your SAS installation data file, and click Next.
-
Click Browse and locate your SAS installation data file.The SAS installation data file contains information about the software that you have licensed for the current machine.CAUTION:Be careful to use the correct SAS installation data file that contains the SAS products that you are planning to install. Using an incorrect file can cause installation failure for SAS add-on products or other errors later when attempting to run SAS. For multi-machine deployments, during the clients step, choose the SAS installation data file for the server machine that is associated with the clients being installed.
-
-
Select Language SupportSelect the languages for your SAS software to support, and click Next.
-
Click Clear All. (English remains selected as the default language.)
-
Add any additional languages that you want SAS software to support.By default, SAS attempts to support all languages for which your machine’s operating system is configured.
-
-
Select Regional SettingsSelect the language, region, and locale setting that affect how SAS displays text, numbers, currencies, dates, and times and how SAS sorts data. Then, click Next.
-
Accept the default value of English (United States), or select a different language, region, and locale in Language (Region) [Locale].
-
Select Configure as a Unicode server if you want to configure SAS as a Unicode server.For more information, see Locale and Encoding Considerations.
-
-
Select Authentication Type(Linux only) Specify the type of authentication for this machine, and click Next.
-
Select Use PAM Authentication if your system uses Pluggable Authentication Modules (PAM).In addition, you might need to update your PAM configuration files for SAS 9.4 to use PAM authentication. For more information, see the Configuration Guide for SAS Foundation for UNIX Environments.If you are uncertain whether your system uses PAM for authentication, contact your system administrator.Note: Do not select PAM authentication if you know that your system uses
/etc/passwordor/etc/shadowauthentication.
-
-
Specify Remote Communication ConfigurationSpecify the configuration for communication with the SAS Deployment Agent, and click Next.
-
If you want to change the default port (5660) for communication with the SAS Deployment Agent, enter the new port in Port.For more information, see SAS Deployment Agents.
-
In Specify how to secure the remote connection, make one of the following selections:
-
Select Generate credentials to secure the connection if you want the deployment wizard to create a self-signed certificate, generate a keystore, and import the certificate into the keystore.
-
Select Specify existing credentials to secure the connection if you have already implemented CA-signed, site-signed, or self-signed certificates. On the next page, the wizard prompts you for the keystore location and password.
-
Select Do not secure the connection if you do not want to secure SAS Deployment Agent communication or have not yet implemented certificates.You can set up certificates later on your own or by using the SAS Deployment Manager. Do not start the SAS Deployment Agent until you have completed the manual security configuration.
For more information, see SAS Intelligence Platform: Middle-Tier Administration Guide. -
-
-
Specify SAS Deployment Agent Keystore CredentialsSpecify the location and credentials for the keystore used to verify credentials for outgoing communications from your SAS Deployment Agent machine, and click Next.For more information, see SAS Intelligence Platform: Middle-Tier Administration Guide.
-
In Agent Keystore Location, enter your SAS Deployment Agent keystore file location (path and filename).
-
In Agent Keystore Password, enter the password that you used when you created the keystore using the Java
keytoolcommand. -
In Confirm Agent Keystore Password, re-enter the password.
-
-
Specify SAS Deployment Agent Truststore CredentialsSpecify the location of and credentials for the truststore used to verify credentials for incoming communications to your SAS Deployment Agent machine, and click Next.For more information, see SAS Intelligence Platform: Middle-Tier Administration Guide.
-
In Agent Truststore Location, enter your SAS Deployment Agent truststore file location (path and filename).
-
In Agent Truststore Password, enter the password that you used when you created the truststore using the Java
keytoolcommand. -
In Confirm Agent Keystore Password, re-enter the password.
-
-
Specify SAS Remote Deployment Agent Client Keystore CredentialsSpecify the location and credentials for the keystore used to verify credentials for outgoing communications from your remote SAS Deployment Agent client machine, and click Next.For more information, see SAS Intelligence Platform: Middle-Tier Administration Guide.
-
In Remote Client Keystore Location, enter your remote SAS Deployment Agent client keystore file location (path and filename).
-
In Remote Client Keystore Password, enter the password that you used when you created the keystore using the Java
keytoolcommand. -
In Confirm Remote Client Keystore Password, re-enter the password.
-
-
Specify SAS Remote Deployment Agent Client Truststore CredentialsSpecify the location and credentials for the truststore used to verify credentials for incoming communications to your remote SAS Deployment Agent client machine, and click Next.For more information, see SAS Intelligence Platform: Middle-Tier Administration Guide.
-
In Remote Client Truststore Location, enter your remote SAS Deployment Agent client truststore file location (path and filename).
-
In Remote Client Truststore Password, enter the password that you used when you created the truststore using the Java
keytoolcommand. -
In Confirm Remote Client Truststore Password, re-enter the password.
-
-
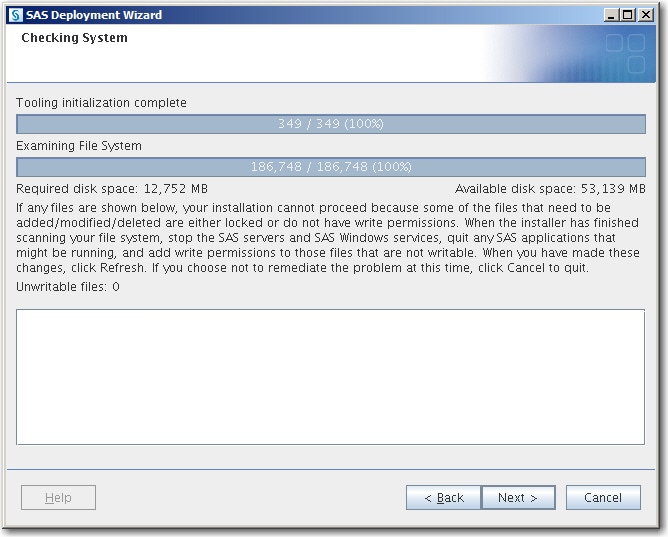
The deployment wizard scans your machine to determine whether any pre-existing SAS files are locked or do not have Write permission. If no action is required, click Next.
-
If the wizard lists any files in the text box, then while the wizard is running, quit SAS and add Write permission to the files listed. When you are finished, click Next.
-
-
If you use a third-party database, and SAS/ACCESS is a part of your order, select the software version for the third-party database.The wizard uses your selection to configure SAS/ACCESS for the correct version of the third-party database.Make sure that you perform any additional configuration on your system, such as installing the third-party database client and configuring the system environment for access to the native client libraries. For more information about the correct environment variables, go to SAS Install Center Documentation. Select an operating system and SAS version to locate the appropriate SAS Foundation configuration guide.
-
Review Required SoftwareReview the list of third-party software that is required for the SAS software that you are installing on the current machine, and click Next. (The list of third-party software depends on the SAS software that you are installing on the current machine.)
-
On the pages that immediately follow, be prepared to provide paths to these third-party applications. The number of wizard pages varies depending on the SAS software that you are installing on the current machine.Note: You must provide valid paths to the third-party applications or the SAS Deployment Wizard will not let you continue with the installation.For more information, see the following resources:
-
-
Specify Software LocationSpecify the installation directory for the required software, and click Next.
-
In the field, enter the installation directory for the required third-party software.
-
-
Select Configuration Prompting LevelSpecify the amount of information to provide to the SAS Deployment Wizard for configuring the SAS software that you are installing on the current machine. Select one of the three prompting levels, and click Next:
-
ExpressDisplays the minimum number of wizard pages needed to complete the SAS configuration.Note: When deploying the SAS middle tier, by default the SAS Deployment Wizard automatically configures your SAS Web Application Server. To disable this feature, run the wizard using either the Typical or Custom prompting level. Manually configuring your SAS middle tier is an advanced procedure and requires using other documents such as your Instructions.html file.
-
TypicalDisplays the basic set of wizard pages needed to complete the SAS configuration.
-
CustomDisplays all the wizard pages needed to complete the SAS configuration.Refer to Configuration Options by Prompt Level for more information about the SAS Deployment Wizard prompting levels.
-
-
Provide the remaining configuration information as the wizard prompts you for it.Note: This topic describes some of the more important pages that you encounter during the configuration phase of a SAS Visual Analytics deployment. The options for which the deployment wizard prompts you depend on which SAS products are identified in your deployment plan. In addition, in multiple-machine deployments, the options depend on which machine you are currently deploying. Configuration Options by Prompt Level lists which configuration options are available for each prompting level. For information about all deployment wizard prompts, see the online Help.Specify Configuration InformationSelect the path where the SAS Deployment Wizard will write SAS configuration files and logs and the level that you want to deploy. Then, click Next.
-
In Configuration Directory, enter the path for SAS configuration files and logs.In Linux environments, the SAS Installer generally overrides the default configuration directory with the site’s preferred location (for example,
/opt/sas/config). The installer must have Write permission on this path. -
In Configuration Level, enter the level that you want to deploy (for example, Lev1 = production).Note: The last digit of the default port number reflects the configuration level that you select in the deployment wizard. For example, when you select Lev1, the default port for the metadata server is 8561. If you select another level, such as Lev2, the wizard changes the default port to 8562.For more information, see Overview of the Configuration Directory Structure in SAS Intelligence Platform: System Administration Guide.Note: Although your SAS installation directory and SAS configuration directories can share the same parent directory, one directory should not reside inside another. Defining the configuration directory under the SAS installation directory or vice versa can lead to file permission issues because of the need to manage installed files differently from site-specific configurations.
Local Machine NameIdentify the local machine in various ways, and click Next.-
In Fully-qualified Local Host Name, enter the complete name of the local host.The fully qualified local host name typically takes the form of the local host name plus the domain name server (for example, MyMachine.example.com).TipIf you do not know the domain name server used at your site, check with your system administrator.
-
In Short Local Host Name, enter a short host name.The short local host name is the abbreviated, more common method of referring to the host, usually only a single word (for example, MyMachine).
Migration InformationSpecify the path to the migration package, and click Next.-
Select Perform Migration if you are migrating to SAS 9.4.Note: Ignore this page unless you are migrating.See the instructions in Overview of Migrating SAS Visual Analytics.
Authentication DomainSpecify the authentication domain SAS uses to authenticate logins to servers, and click Next.-
Accept the default value (DefaultAuth) unless you are planning to use a different SAS authentication domain for servers on this machine. For example, if the SAS Metadata Server is on Windows and the SAS Workspace Server is on Linux, the workspace server might be assigned to a SAS authentication domain named LinuxAuth.For more information, see Manage Authentication Domains in SAS Management Console: Guide to Users and Permissions.
Windows Options (run as server management scripts or Windows services)Select Windows options available for the Windows operating system, and click Next.-
In Server Operation Type, select how to run your SAS servers. They can be run using management scripts or they can be run as Windows services.If you select the management script option, then the user account that runs the SAS Object Spawner must be the administrator or a member of the Windows Administrators group. Or, it must have the following Windows local user rights on the SAS Object Spawner machine:
-
Adjust memory quotas for a process -
Replace a process
                                                                     level token
-
-
Select Create Windows Shortcuts to create shortcuts to start and stop your SAS servers.These shortcuts function whether the servers are running as Windows services or by using management scripts.
Integrated Windows AuthenticationIndicate whether you are using Integrated Windows authentication (IWA) for SAS client/server connections, and click Next.-
Select Use Integrated Windows authentication (single sign-on) to configure SAS Workspace Servers running on Windows or Linux to use IWA.IWA uses a single sign-on feature that allows a user’s identity, obtained from authentication to the user’s desktop, to be securely passed from the desktop to other processes such as the SAS Metadata Server and the SAS Workspace Server running on either Windows or Linux. The mechanism used is typically Kerberos, but on Windows, NTLM can be used.Note: If you choose to use IWA, you cannot also implement token-based authentication.You also encounter this page when deploying SAS Enterprise Guide and SAS Add-In for Microsoft Office. If you have not chosen IWA for the SAS Workspace Server, then choosing IWA for these clients has no effect.For more information, see Integrated Windows Authentication in SAS Intelligence Platform: Security Administration Guide. Also, see “Configuring Integrated Windows Authentication,” in the Configuration Guide for SAS Foundation for UNIX Environments.A metadata server running on Windows has IWA turned on by default. For more information, see SSPI System Option in SAS Intelligence Platform: Application Server Administration Guide.
Token-based authenticationIndicate whether you are using token-based authentication for SAS client/server connections, and click Next.-
Select Use SAS Token authentication to cause clients of the workspace server to request a token from the metadata server.SAS client applications obtain a connection to the metadata server and request a SAS token to connect to the workspace server. For the workspace server to be launched, a launch credential will be defined for the workspace server by the SAS Spawned Servers account.If token authentication is not selected, SAS uses host authentication. Clients provide either an IWA token or a user name and password to authenticate to the workspace server.For more information, see SAS Token Authentication in SAS Intelligence Platform: Security Administration Guide and see Host Authentication in SAS Intelligence Platform: Security Administration Guide.Note: If you choose to use token-based authentication, you cannot also implement IWA.
SAS Metadata ServerSpecify connection information for the metadata server, and click Next.-
In SAS Metadata Server Logical Name, enter the logical name of the metadata server. The maximum number of characters in the name is 60. Do not use special characters (for example, dashes, underscores, hyphens, and so on). Use only characters appropriate for an operating system subdirectory name. On Linux, avoid shell characters that might cause unintended side effects.By default, SAS prefixes the logical server name with the application server name (SASMeta). A logical server is a container for definitions of physical servers. A logical server can have one server component for each SAS server type.
-
In SAS Metadata Server Name, enter the name of the metadata server. The maximum number of characters in the name is 60. Do not use special characters (for example, dashes, underscores, hyphens, and so on). Use only characters appropriate for an operating system subdirectory name. On Linux, avoid shell characters that might cause unintended side effects.By default, SAS prefixes the logical server name with the application server name (SASMeta). A server name is the definition for a physical server. Servers are contained within a logical server (server component) that matches its server type (for example, a metadata server definition is contained in a logical metadata server).
-
In Host Name, enter the name of the machine on which the metadata server runs.
-
In Port, enter the metadata server listening port. If you choose to not accept the default value, refer to your completed Pre-Installation Checklist for the value that you should enter.For more information, see Overview of the SAS Metadata Server and Its Initial Configuration in SAS Intelligence Platform: System Administration Guide.
SAS Metadata Server: Override Backup LocationIndicate a different location for the metadata server backup directory if necessary. When you are finished, click Next.-
If you want to change the location of the metadata server backup directory, select Override the default SAS Metadata Server backup directory.When configuring a metadata server cluster, you must specify a network file system path accessible to all nodes in the cluster.For more information, see Backing Up and Recovering the SAS Metadata Server in SAS Intelligence Platform: System Administration Guide.
SAS Metadata Server: Repository ConfigurationSpecify the name and location of the metadata and foundation repositories, and click Next.-
SAS Metadata Server Configuration Directory is read-only. It identifies the parent directory under which the metadata and foundation repositories reside.After deployment, you should apply appropriate operating system security on this directory. For more information, see First-Priority Setup Tasks in SAS Intelligence Platform: Installation and Configuration Guide.
-
In Metadata Repository Root Directory, enter the location of the metadata repositories. This location must be specified as a path relative to the metadata server configuration directory above. All metadata repositories created during configuration are created as subdirectories in this location. Do not use special characters (for example, dashes, underscores, hyphens, and so on). Use only characters appropriate for an operating system subdirectory name. On Linux, avoid shell characters that might cause unintended side effects.
-
In Foundation Repository Name, enter the name of the foundation repository and the name of the subdirectory (relative to the Metadata Repository Root Directory) in which the foundation repository is located. The maximum number of characters in the name is 60. Do not use special characters (for example, dashes, underscores, hyphens, and so on). Use only characters appropriate for an operating system subdirectory name. On Linux, avoid shell characters that might cause unintended side effects.
SAS Metadata Server: Override Service Login AccountIndicate a different default service login user account for the metadata server. When you are finished, click Next.-
If you want to change the service login user account for the metadata server, select Specify the service login account for the SAS Metadata Server. The local system account is the default Windows service login user account for the metadata server.When configuring a metadata server cluster on Windows, you must specify the external user account that is used to start the server. This user account must be the same account that you specify to start the other nodes. The deployment wizard automatically grants the Log on as a service Windows user right if the user account does not already have it.For more information, see Backing Up and Recovering the SAS Metadata Server in SAS Intelligence Platform: System Administration Guide.
Deployment Accounts: Type of AccountsSelect which type of user accounts to use for initial deployment SAS identities, and click Next.-
Select Use SAS internal accounts when appropriate for SAS to use accounts known only to SAS.SAS creates and authenticates internal accounts in metadata rather than using an operating system account.Note: On Windows, whenever the deployment wizard prompts you for an external account, always enter a domain-qualified user account (for example, myDomain\myAccount).For more information, see Internal User Accounts.
External Account: InstallerSpecify the operating system account (external account) used to initialize the metadata server, and click Next.-
In External User ID, enter the user ID for the external account that you are using to install and configure SAS.Depending on the operating system, this account should meet the following requirements:Windows:Use a domain-qualified account that is available in the long term (for future SAS maintenance) and is a member of the Windows Administrators group.Linux:Use the same account on all machines on which you are deploying SAS. Do not use
root. -
In External Password, enter the password for the user ID.For more information, see Defining User Accounts.
Automatic Script Execution(UNIX only) Specify your preference for automatic script execution, and click Next.-
Select Run setuid.sh with my ID and password for the deployment wizard to attempt to run the script with the credentials that you provide.You see this page on Linux for SAS products that require that you run the setuid.sh script with sudo privileges. If you select this option, you are asked on a subsequent page for the sudo password (if you are deploying a metadata server, you have already provided this information). As it installs your software, the deployment wizard attempts to run the script with the credentials that you provided.If you do not select this option, you have to run setuid.sh manually during installation (and configuration if you have chosen to configure). Note that setuid.sh must be run as root in order to complete successfully. If you have any concerns about the deployment wizard running as root or you do not know the sudo information for the machine that you are installing on, you should not select this option.
Password for Current IDEnter the password for the current user ID, and click Next.-
In Password for Current ID, enter the password for the current user ID.On Linux, this page appears if you have indicated on the previous page that you want the SAS Deployment Wizard to run the setuid.sh script via sudo. If you have any concerns about the SAS Deployment Wizard running as root or you do not know the sudo information for the machine on which you are installing, you should go back and change your previous selection.
-
In Confirm Password, re-enter the password.
SAS Internal Account: Unrestricted AdministratorEnter the metadata password for the first unrestricted administrator identity, and click Next.-
In New Internal Password, enter a password for the internal account (sasadm@saspw) that the wizard will create to serve as an unrestricted administrator for configuring the metadata server.Note: Remember and record this password as you will need it in the future.
-
In Confirm New Internal Password, re-enter the password. Click Next.For more information, see Defining User Accounts.
-
Select Set passwords using the Unrestricted Administrator password if you want to reuse this password for the internal metadata server accounts and SAS Web Infrastructure Data Server accounts during this deployment. Selecting this option when running the deployment wizard with the Express prompting level reduces the number of configuration prompts.For more information, see Reducing the Number of Password Prompts.
SAS Internal Account: Trusted UserSpecify the metadata password for the Trusted User identity, and click Next.-
In New Internal Password, enter a password for an internal account (sastrust@saspw) that the wizard will create to enable SAS server and spawner components to communicate securely with each other.Note: Remember this password as you will need it in the future.
-
In Confirm New Internal Password, re-enter the password.For more information, see Defining User Accounts.
SAS BI Web Services: Authentication MethodSelect the method by which users of SAS BI Web Services are authenticated, and click Next.-
In Authentication Method, make one of the following selections and click Next:
-
SAS Authentication is managed by the metadata server.
-
Web Authentication is managed by the SAS Web Application Server using container-based authentication or a third-party product.Selecting Web Authentication has these effects:
-
Partially configures web authentication BI Web Services for Java. For more information, see Securing SAS BI Web Services for Java in SAS Intelligence Platform: Middle-Tier Administration Guide.
-
Has no effect on the BI web applications (such as SAS Web Report Studio, SAS Information Delivery Portal, and so on). You have to configure web authentication for these BI web applications.
-
Prevents you from setting up an anonymous web user (as this is incompatible with web authentication).
-
-
Anonymous Web AccessWhen using SAS authentication, you can select this option to set up a SAS identity for anonymous access to certain web services and web applications that support this feature. When you are finished, click Next.-
Select Enable anonymous web access to set up a SAS identity for anonymous access to certain web services and web applications that support this feature.SAS BI Web Services for Java and .NET, the SAS Stored Process Web Application, and SAS Visual Analytics Guest Access are the only components that support this feature.For more information, see PUBLIC Access and Anonymous Access in SAS Intelligence Platform: Security Administration Guide.
SAS Internal Account: Anonymous Web UserEnter the metadata password for the anonymous web access identity, and click Next.-
In New Internal Password, enter a password for the internal SAS account that the wizard will create to be used to grant clients access to applicable SAS Web Infrastructure Platform applications such as SAS BI Web Services and the SAS Stored Process Web Application.When SAS authentication is being used and the user has not preemptively specified credentials, the client is given access to these applications under the anonymous web access identity.For more information, see Using the SAS Anonymous Web User with SAS Authentication in SAS Intelligence Platform: Middle-Tier Administration Guide.Note: Remember this password because you will need it in the future.
-
In Confirm New Internal Password, re-enter the password, and click Next.
SAS Visual Analytics: Allow Guest AccessSpecify whether to allow anonymous access to a subset of SAS Visual Analytics resources and functionality, and click Next.-
Select Guest Access Permitted to allow guest access for participating SAS Visual Analytics applications.Guest access is an optional feature. All users who connect to a guest access URL are authenticated as the same service account (the SAS Anonymous Web User), which functions as the single surrogate identity for all connecting users. Guest access is not compatible with web authentication.TipIf you are unsure about whether to allow guest access in SAS Visual Analytics, you can create the SAS Anonymous Web User, and then easily add guest access after installation.For more information, see “Supporting Guest Access” SAS Visual Analytics: Administration Guide.
External Account: SAS Spawned Servers AccountSpecify the credentials used to launch the back-end SAS Stored Process Server and SAS Pooled Workspace Server, and click Next.-
In External User ID, enter the user ID to start the SAS Pooled Workspace Server and the SAS Stored Process Server.Note: On Windows, enter a domain-qualified user ID.
-
In External Password, enter the password for the external user ID.Note: Remember this password because you will need it in the future.For more information, see Defining User Accounts.
Create Common DirectoriesIndicate the common directories that you want the deployment wizard to create. On Windows, you can specify a data directory, and click Next.-
Select the appropriate check box to create common directories for server and spawner logs, user-specific files, data (SAS libraries for tables and cubes), and temporary work tables and files.When you select this option, the deployment wizard creates the specified directory (
Logs,Users,Data, andTemp) under the SAS configuration directory. -
In Data Directory, enter a location to contain SAS libraries for tables and cubes.This directory is required when configuring SAS BI Dashboard.
Enable FIPS-certified Encryption AlgorithmsIndicate whether you want to use AES encryption, and click Next.-
Select the check box to use the Advanced Encryption Standard (AES) algorithm to encrypt communications to and from a SAS Metadata Server. A block cipher that encrypts 128-bit blocks by using a 256-bit key, AES complies with Federal Information Processing Standards (FIPS).For more information, see FIPS 140-2 Standards Compliance in Encryption in SAS.
Server EncryptionSelect the encryption level and algorithm that SAS clients and servers use to connect to the SAS Metadata Server, and click Next.-
In Server Encryption Level, select Credentials to encrypt only login credentials. Select Everything to encrypt all communication with the metadata server.Selecting Everything can affect your SAS performance.
-
In Server Encryption Algorithm, you can specify an encryption algorithm other than SAS Proprietary. The other algorithms are RC2, RC4, DES, Triple DES, and AES.For more information, see Encryption Model in SAS Intelligence Platform: Security Administration Guide and SAS Proprietary Encryption in Encryption in SAS.
Client-side Credentials PolicySet the policy for client-side storage of credentials, and click Next.-
Select Allow users to save credentials in client-side connection profiles to allow users to save their user IDs and passwords in client-side connection profiles on the metadata server for desktop applications.When set, SAS enables OMA_SASSEC_LOCAL_PW_SAVE in omaconfig.xml.For more information, see Reference Information for omaconfig.xml in SAS Intelligence Platform: System Administration Guide.
Estimated System SizeSize your system configuration based on user number, system size, and workload size. Then, click Next.-
In Size Estimate, select Large System, and click Next.After you have finished deploying SAS Visual Analytics, you can change JVM settings and any other necessary parameters in the following file:
-
Linux:
SAS-configuration-directory/Web/WebAppServer/SASServer1_1/bin/setenv.sh -
Windows:
SAS-configuration-directory\Web\WebAppServer\SASServer1_1\bin
For more information, see Initial Sizing and Tuning Configuration Options for Deployments in SAS Web Applications: Tuning for Performance and Scalability. -
E-mail ServerSpecify e-mail server configuration information, and click Next.-
In Host Name, enter the host name for an SMTP e-mail server at your site. SAS uses this server to send alerts for system-related issues to an administrator (for example, the SAS Metadata Server detects a journaling issue).The deployment wizard uses this e-mail server as the default for the SAS Application Server to provide e-mail services to various SAS clients. For example, with SAS Data Integration Studio, you can use a Publish to Email transformation to alert users about various data changes. For the SAS BI Dashboard to send alerts by e-mail to dashboard users and administrators, the port and host name must be configured for the e-mail server.For more information, see Pre-installation Checklist for Ports for SAS and Managing Alert E-mail Options for the SAS Metadata Server in SAS Intelligence Platform: System Administration Guide.
-
In Port, enter the port that the SMTP e-mail server uses.For more information, see Pre-installation Checklist for Ports for SAS and Managing Alert E-mail Options for the SAS Metadata Server in SAS Intelligence Platform: System Administration Guide.
SAS Application Server: Server ContextEnter the name of the SAS Application Server context, and click Next.-
In SAS Application Server Context Name, accept the default (SASApp) or enter a different name of the SAS Application Server context for that the wizard will create in metadata.A server context is a SAS IOM server concept that describes how SAS Application Servers manage client requests. A SAS Application Server has an awareness (or context) of how it is being used and makes decisions based on that awareness. The server context name is prepended to all server names defined in the server context.Note: The server context name must be unique and cannot contain spaces.For more information, see Overview of SAS Application Servers in SAS Intelligence Platform: Application Server Administration Guide.
SAS Pooled Workspace ServerSpecify SAS Pooled Workspace Server information, and click Next.-
In Logical SAS Pooled Workspace Server Name, enter the name of the logical pooled workspace server to be stored in SAS metadata.
-
In SAS Pooled Workspace Server Name, enter the name of the pooled workspace server to be stored in SAS metadata.
-
In Host Name, enter the name of the machine on which the pooled workspace server runs. The machine name should match the name specified to the SAS Object Spawner.
-
In Port, enter the port on which the object spawner will listen for client requests to launch pooled workspace servers.For more information, see Overview of Workspace Servers and Stored Process Servers in SAS Intelligence Platform: Application Server Administration Guide.
SAS Web Infrastructure Platform Data ServerSpecify information for the SAS Web Infrastructure Platform Data Server, and click Next.-
In Host Name, enter the fully qualified host name of the SAS Web Infrastructure Platform Data Server or accept the default value.The default value is the host name where the deployment wizard is currently running. In most cases the default is correct. However, a machine can have more than one network interface card (NIC) or host name alias. If so, to determine whether the default is correct, see your Pre-Installation Checklist.
-
In Port, enter the TCP/IP port number on which SAS Web Infrastructure Platform Data Server listens or accept the default value.
-
In Data Server Administrator, enter the user ID for administering SAS Web Infrastructure Platform Data Server.
-
In Data Server Administrator Password, enter the password for the user ID associated with the SAS Web Infrastructure Platform Data Server administrator.Note: Remember this password because you will need it in the future.
-
In Confirm Password, re-enter the password and click Next.For more information, see Reviewing Third-Party Database Requirements.
SAS Remote Services Application: JVMSpecify the appropriate heap sizes for the SAS Remote Services application using the JVM option format, and click Next.-
In Initial JVM Heap Size, enter the appropriate initial heap size for the SAS Remote Services Application using the JVM option format.Note: SAS 9.4 no longer requires SAS Remote Services. However, some custom SAS applications still require SAS Remote Services. The deployment wizard deploys SAS Remote Services, but it is not automatically started by default.
-
In Max JVM Heap Size, enter the appropriate maximum heap size for the remote services application using the JVM option format.
-
In Additional JVM Options, enter any additional Java options that you want the SAS Remote Services JVM to use. For example, you might want to add
-Dmulticast_udp_ip_ttl=1to restrict multicast traffic to a single subnet based on your network topology.For more information, see SAS Web Applications: Tuning for Performance and Scalability.
SAS Web Server: Automated or Manual Configuration OptionIndicate whether you want the deployment wizard to configure the SAS Web Server automatically, and click Next.-
If you want to configure the SAS Web Server manually, clear Configure SAS Web Server automatically.Select this option for the deployment wizard to automatically build and configure the SAS web applications and configure a sample web application server for use with SAS 9.4. (To use this wizard feature, make sure that your web application server is not running before proceeding.)It is strongly recommended that you choose to automatically configure the SAS Web Server. If you need to make changes to the SAS Web Server after the automatic configuration, there are tools to help you reconfigure it.For more information, see Scripting Tool for SAS Web Application Server in SAS Intelligence Platform: Middle-Tier Administration Guide.If you choose not to automatically configure your web application server, you are still prompted for web application server information, and deployment stages such as Configure Products, Deploy Web Applications, and Start Web Application Servers will execute to create instructions for manual deployment. When configuration is complete, follow manual instructions on how to configure your server and deploy your web applications available at: http://support.sas.com/resources/thirdpartysupport/v94/appservers/index.html. (Select the product name of your web application server.)Note: Manually configuring your SAS middle tier is an advanced procedure and requires using other documents such as your Instructions.html file.
SAS Web Server: ConfigurationSpecify SAS Web Server configuration options, and click Next.-
The standard port for HTTP traffic is 80. If you want to change this for SAS Web Server, then specify a new port number in HTTP Port.Note: On Linux systems that you must start servers as root if you want servers to listen on ports lower than 1024. We recommend that you install and configure as a less-privileged user, and then start SAS Web Server manually as root.For more information, see Pre-installation Checklist for Ports for SAS and Managing Alert E-mail Options for the SAS Metadata Server in SAS Intelligence Platform: System Administration Guide.
-
The standard port for Transport Layer Security (TLS) traffic is 443. If you want to change this for SAS Web Server, then specify a new port number in HTTPS Port. (See earlier note.)
-
In Configured Protocol, select the communication protocol for SAS Web Server. There are two choices, HTTP (unsecured) and HTTPS (secured).If you select HTTPS, an X.509 certificate and RSA private key are required. The deployment wizard prompts you for the paths to these items on a later page. You can enter locations for these items or provide information to create them. For more information, see SAS Intelligence Platform: Middle-Tier Administration Guide.
-
In Administrator Mail Address, enter an e-mail address for e-mail to be sent to the SAS Web Server administrator.
SAS Web Server: Server Process for Handling ResponsesSpecify the user name and group name for the HTTPD response processes, and click Next.-
In User Name, enter the host system user name for the HTTPD response processes. Do not use the numeric user ID.On Linux, when the HTTPD listener process is run as root, it forks a set of child processes that handle the requests and respond to the client. For security reasons, these child processes must run with a more limited user ID and group ID.
-
In Group Name, enter the host system group name for the HTTPD response processes. Do not use the numeric group ID.
SAS Web Server: Location of X509 Certificate and RSA Private KeyIf you already have an X.509 certificate, enter their locations. When you are finished, click Next.-
In X509 Certificate, enter the path to the valid X.509 certificate with the DNS name of this machine as the Common Name (CN).
-
In RSA private key, enter the path to the RSA private key that is not protected by a passphrase.For more information, see SAS Intelligence Platform: Middle-Tier Administration Guide.
Web Application Server: Configure Internet Proxy ServerIndicate whether to configure an Internet proxy server and specify proxy information, and click Next.-
In Proxy Host, enter the fully qualified host name for the proxy server.If you are using SAS Information Delivery Portal RSS feeds, then you have to provide proxy server information.
-
In Proxy Port, enter the port that your site uses to access the Internet.
-
In NonProxy Hosts, enter the DNS names of all the machines that should not be accessed through the proxy server. Separate each machine name with a vertical line character (|). Use an asterisk (*) as a wildcard for an entire subnet. For example, *.subnet.com excludes all machines with a DNS name that ends with .subnet.com.If your site does not allow Internet access on production systems, see the configuration information available at this SAS website: http://support.sas.com/resources/thirdpartysupport/v94, and select your SAS Web Application Server.
Web Application Server: Multiple ServersIndicate whether to configure multiple SAS Web Application Servers on which to deploy SAS web applications, and click Next.-
Select Configure multiple servers to have the deployment wizard automatically configure multiple managed servers for you. The deployment wizard uses SAS best practices for choosing the server to deploy each application to.In some situations, it might be preferable to split the SAS web applications across multiple managed servers. This is usually done for performance reasons.If you choose to manually configure your SAS Web Application Servers, you are provided with recommended configuration settings in a generated instructions file (Instructions.html) when the deployment wizard completes.More advanced performance configuration considerations are documented in the SAS Intelligence Platform: Middle-Tier Administration Guide.
Web Application Server: Server ConfigurationSpecify SAS Web Application Server information, and click Next.-
In Server Name, enter a logical name for your server. A suffix is automatically added to the name to distinguish cluster members.For example, if the name SASServer1 is entered, the actual name is SASServer1_1. If the multiplier provided on the next page is greater than one, additional servers are created with unique suffixes. For example, if the multiplier is 2, then servers named SASServer1_1 and SASServer1_2 are created.
-
In Additional JVM Options, enter any additional Java options that you want the server JVM to use. These JVM options are tagged onto the end of the server's command line. Options that are hardcoded into the deployment wizard default set can be overridden in this way.
Web Applications: Automatic DeploymentIndicate whether you want the wizard to automatically deploy SAS web applications to the SAS Web Application Server, and click Next.-
Select Deploy web applications automatically for the deployment wizard to automatically deploy SAS web applications to the SAS Web Application Server.If you do not choose to deploy web applications automatically, manual deployment instructions are written to the Instructions.html file during the web application deployment stage.Note: Manually deploying your SAS web applications is an advanced procedure and requires using other documents such as your Instructions.html file.Regardless of whether you choose to automatically deploy your SAS web applications, when building web applications, the wizard automatically explodes web application archive files (EAR files).For more information, see Deploying Content Manually to the SAS Content Server in SAS Intelligence Platform: Middle-Tier Administration Guide.
Web Applications: White List of Sites Allowed to Link to This SAS InstallationEnter a comma-delimited list of additional known hosts and domains to trust, and click Next.-
In URLs White List, enter a comma-delimited list of additional known hosts and domains to trust in the following form:
http|https://host[:port]|domain/,
                                                         ...
The valid URLs whitelist can include just a list of host names to trust. The valid URLs whitelist can also include wildcards such as '*' for host name and domain.Note: The port number must be specified if the whitelisted site uses port numbers other than the standard 80 for HTTP or 443 for HTTPS.For example:https://myserver:443/,http://example.comFor security reasons, you must list any host name URLs for any site that could redirect browsers to your solution. This might include corporate sites linking to your solution for reporting purposes or single sign-on servers.For example, if https://corporatePortal.company.com/ links to your server, then enterhttps://corporatePortal.company.com/as one entry. This field enables you to add additional known hosts and domains to a preset list automatically created by the SAS configuration process.For more information, see Configuring the Cross Domain Proxy Servlet through a Whitelist in SAS Intelligence Platform: Middle-Tier Administration Guide. -
Select Enter advanced options for URL white list handling to display an additional page in which you can specify advanced options for the filter.
Web Applications: Advanced Options for Allowed URLs White ListEnter a comma-separated list of HTTP methods to exclude from filtering, and click Next.-
Select Enable restrictions to use the URLs white list. Deselecting Enable restrictions causes SAS to ignore all white list restrictions.For more information, see Whitelist of Websites and Methods Allowed to Link to SAS Web Applications in SAS Intelligence Platform: Middle-Tier Administration Guide.
-
In Disable restrictions for a comma-separated list of HTTP methods, enter a comma-separated list of HTTP methods to exclude from filtering (for example,
GET,OPTIONS,TRACE). -
In URL Overrides, enter a comma-separated list of specific URLs to override if you are using wildcards in the URLs white list.For example, suppose that you have added http://example.*.com to your URLs white list, but you want to block one URL from the domain. Therefore, you would enter the following exception in URL Overrides:
http://example.sales.com.
IP Multicast Version(UNIX only) Specify the IP version to use for the IP multicast address, and click Next.-
In IP Version, select the IP version appropriate for your system.The deployment wizard detects that the machine has an IPv4 address and an IPv6 address. If you select IPv6, you are confirming that all servers running SAS products are connected to an IPv6-enabled network and have IPv6-enabled network interfaces.For more information, see Multicast Address Considerations.
IP MulticastSpecify IP multicast information between SAS applications. Accept the IP multicast settings or enter new settings. If you choose to use an authentication token, you must enter token information. When you are finished, click Next-
In IP Multicast Address, enter a new multicast address.A multicast group communications protocol is used to communicate among middle-tier SAS applications in a single SAS deployment (the set of applications connected to the same metadata server). The combination of IP multicast address and multicast UDP port should be different for each SAS deployment and different from those used by other multicast applications at your site. The default values are most appropriate for deployments in a firewall-isolated data center environment.For more information, see Multicast Address Considerations.
-
In IP Multicast UDP Port, enter a valid UDP port for use on all the machines where a SAS middle-tier application is installed.
-
In IP Multicast UDP TTL, enter a valid multicast TTL property (default = 1, range = 0–255). This property affects the number of network hops a multicast packet takes before being dropped. This TTL value must be greater than or equal to the largest number of hops between any two servers running SAS products.
-
Choose Use an authentication token to connect to prevent access to the multicast group from unauthorized listeners. The authentication token can be any password-like string. You must provide the same authentication token string to each tier in the same SAS deployment (each tier associated with the same metadata server).
SAS Content Server: Repository DirectorySpecify SAS Content Server repository options, and click Next.-
In Repository Directory, enter the location on the disk for the SAS Content Server indexes and repository configuration file. You can click Browse to search for this location.For more information, see Administering the SAS Content Server in SAS Intelligence Platform: Middle-Tier Administration Guide.
-
Select Start initial node as clustered when this machine is (or might be) part of a clustered deployment.CAUTION:If you enable this option, you must also establish a central backup vault for the SAS Deployment Backup and Recovery Tool. Starting in the second maintenance release for SAS 9.4, a vault is no longer required for clustered SAS Content Servers.Deselect Start initial node as clustered when you are not deploying the SAS middle tier on a machine cluster. (This setting enables journaling and the necessary cluster synchronization processes.)If you redeploy the middle tier on a machine cluster in the future, you can manually set the Java system property
-Dcom.sas.server.isclustered=trueand restart the initial application server node. For more information, see Adding a Horizontal Cluster Member in SAS Intelligence Platform: Middle-Tier Administration Guide.
SAS Web Infrastructure Platform Database: Data ServerSpecify whether to use a third-party database for the SAS Web Infrastructure Platform database, and click Next.-
Clear Use SAS Web Infrastructure Platform Data Server to use a different database to store SAS Web Infrastructure Platform data.In SAS 9.4, the following third-party database management systems are supported: DB2, MySQL, Oracle, PostgreSQL, and SQL Server.
SAS Web Infrastructure Platform: Database TypeSpecify the alternate database that you want to use for the SAS Web Infrastructure Platform Database, and click Next.-
In Database Type, select one of the following supported databases: DB2, MySQL, Oracle, PostgreSQL, or SQL Server.Note: The database used by SAS Environment Manager, the SAS Deployment Backup and Recovery Tool, and certain SAS solutions, such as SAS Visual Analytics, will be PostgreSQL regardless of the database that you choose for the SAS Web Infrastructure Platform.For more information, see Reviewing Third-Party Database Requirements.
SAS Web Infrastructure Platform Database: Database Connection PropertiesSpecify connection information for the SAS Web Infrastructure Platform Data Server database, and click Next.-
Select Automatically create tables and load data to have the SAS Deployment Wizard automatically create tables and load the selected pre-existing database with initial data.If you are using MySQL, the SAS Web Application Server configuration process also creates a new MySQL database named according to the value specified in Database SID or Service Name on the SAS Web Infrastructure Platform Database: JDBC Properties page.
-
In Host Name, enter the host name where the database server is installed.
-
In Port, enter the port number to which the database server is listening.
-
Select Use Catalog to indicate that the database catalog needs to be specified to uniquely locate a table in the database.Select Use catalog if you are using MySQL or SQL Server.
-
Select Use schema pattern to indicate that the database schema needs to be specified to uniquely locate a table in the database.Select Use schema pattern if you are using Oracle or DB2.
-
In Directory containing JDBC driver JAR files, identify the appropriate JDBC driver JAR files and your selected RDBMS and version. Inappropriate or additional JAR files cause configuration failures, so copy the minimum required JDBC driver JAR files to this directory.
SAS Web Infrastructure Platform Database: JDBC PropertiesIf you selected a database server other than the SAS Web Infrastructure Platform Data Server, then the following fields are editable. If you are using the SAS Web Infrastructure database server, the database name and user ID are Read-Only. When you are finished, click Next.-
In Database Name, enter the name of the database that contains the SAS Web Infrastructure Platform Database tables.
-
In User ID, enter the user ID for accessing the database used with your SAS Web Infrastructure Platform Database tables. This user ID must have the ability to insert, update, and delete records.
-
In Password, enter a valid password for the user ID associated with the SAS Web Infrastructure Platform Database Server account. The deployment wizard uses this password to create the database server account.Note: Remember this password because you will need it in the future.
-
In Confirm Password, re-enter the password.
SAS Web Infrastructure Platform Database: Metadata PropertiesSpecify the metadata information for the SAS Web Infrastructure Platform Data Server database, and click Next-
The field on this page changes depending on the database type that you chose earlier.
-
In Catalog, enter the name of the database catalog to use to uniquely locate a table in the database.
-
In Schema Pattern, enter the name of the schema pattern to use to uniquely locate a table in the database.
-
SAS Web Infrastructure Platform Database: JDBC Driver ValidationDecide whether to enable dynamic validation of the JDBC driver’s connection to the database, and click Next.-
Select Validate the JDBC driver's connection to database to enable dynamic validation of the JDBC driver’s connection to the database.
SAS Environment Manager: Administration Database ConfigurationSpecify administrator credentials for the SAS Environment Manager database, and click Next.-
In User ID, specify the user ID for accessing the database used with your SAS Web Infrastructure Platform Database tables. This user ID must have the ability to insert, update, and delete records.By default, the SAS Environment Manager uses the Administration database on the SAS Web Infrastructure Platform Data Server. If you are using the SAS Web Infrastructure Platform Database Server, the user ID is Read-Only.For more information, see SAS Web Infrastructure Platform Data Server in SAS Intelligence Platform: Middle-Tier Administration Guide.
-
In Password, enter a valid password for the user ID.Note: Remember this password because you will need it in the future.
-
In Confirm Password, re-enter the password.
SAS Internal Account: SAS Environment Manager Service AccountSpecify the metadata password for the SAS Environment Manager service, and click Next.-
In SAS Environment Manager Service Account Password, enter a password for the SAS Environment Manager service account (sasevs@saspw).The password must contain at least six characters. Make sure that you enter the same password that was specified in any previous SAS Environment Manager configuration prompts.Note: Remember this password because you will need it in the future.This service account is required for the SAS Environment Manager and its agent to communicate while monitoring the processes in your SAS deployment. This internal SAS account has unrestricted administrative access rights to the metadata server.For more information, see SAS Environment Manager: User’s Guide.
-
In Confirm Password, re-enter the password.
Choose SAS Environment Manager: KeystoreIndicate whether to use the built-in or customized keystore, and click Next.-
By default, the SAS Environment Manager uses the trusted CA list supplied by SAS.If you want to use a different keystore, in the SSL Keystore list, select Use a customer-supplied JKS format keystore.For more information, see SAS Intelligence Platform: Middle-Tier Administration Guide.
SAS Environment Manager: Keystore ConfigurationProvide a keystore path, filename, and password, and click Next.-
In Keystore Path and Filename, enter a valid path and filename of the keystore that you are using when communicating with the SAS Environment Manager.For more information, see SAS Intelligence Platform: Middle-Tier Administration Guide.
-
In Keystore Password, enter a password for the keystore.Note: SAS Environment Manager requires that the keystore password and private key password be identical. For more information, see http://pubs.vmware.com/vfabric5/index.jsp?topic=/com.vmware.vfabric.hyperic.4.6/Configure_SSL_Options.html.
-
In Confirm Password, re-enter the password.
SAS Environment Manager: Database ConfigurationSpecify SAS Environment Manager database credentials. EVManager is a default Postgres database supplied by SAS that is used to store collected server metrics. When you are finished, click Next.-
In Database User, enter a user ID used for accessing the EVManager database.
-
In Database User Password, enter a valid password for the user ID associated with the database server account.Note: Remember this password because you will need it in the future.
-
In Confirm Password, re-enter the password.
-
In Database Encryption Passphrase, enter a valid passphrase key used for encrypting and decrypting the SAS Environment Manager database user password.The key must be at least eight characters long and can contain letters and numbers only.Note: Remember this passphrase because you will need it in the future.
-
In Confirm Database Encryption Passphrase, re-enter the passphrase key. Click Next.
SAS Environment Manager Agent CommunicationSpecify SAS Environment Manager agent information, and click Next.-
Select Establish secure communication to enable secure communication using Transport Layer Security (TLS) between the SAS Environment Manager and its agents.For more information, see SAS Intelligence Platform: Middle-Tier Administration Guide.
Choose SAS Environment Manager Agent: KeystoreIndicate whether to use the built-in or customized keystore, and click Next.-
By default, the SAS Environment Manager Agent uses the trusted CA list supplied by SAS.If you want to use a different keystore, in the SAS Environment Manager SSL Keystore list, select Use a customer-supplied JKS format keystore.For more information, see SAS Intelligence Platform: Middle-Tier Administration Guide.
SAS Environment Manager AgentProvide a keystore path, filename, and password, and click Next.-
In Keystore Alias, enter a valid alias for your keystore.Note: SAS Environment Manager requires that the keystore alias and its password be identical.
-
In Keystore Path and Filename, enter a valid path and filename of the keystore that you are using when communicating with the SAS Environment Manager.For more information, see SAS Intelligence Platform: Middle-Tier Administration Guide.
-
In Keystore Password, enter a password for the keystore.Note: SAS Environment Manager requires that the keystore password and private key password be identical. For more information, see http://pubs.vmware.com/vfabric5/index.jsp?topic=/com.vmware.vfabric.hyperic.4.6/Configure_SSL_Options.html.
-
In Confirm Password, re-enter the password.
SAS Environment Manager Enablement Kit Database CredentialsSpecify database connection information, and click Next.-
In User ID, enter the user ID for accessing the database used with SAS Environment Manager Enablement Kit.
-
In Password, enter the password for the user ID.Note: Remember this password because you will need it in the future.
-
In Confirm Password, re-enter the password.
SAS Visual Analytics High-Performance Configuration PropertiesSpecify properties to create a libref to reference the directory that contains uploaded and extracted SAS data sets, and click Next.-
In Uploaded SAS Dataset Libref Name, enter the libref name to reference the directory that contains uploaded and extracted SAS data sets. The maximum number of characters for a libref name is eight.
SAS Visual Analytics Data ProviderSelect the data provider to be used with SAS Visual Analytics, and click Next.-
In SAS Visual Analytics High-Performance Data Provider, select Non-distributed LASR, and click Next.
-
In SAS Visual Analytics High-Performance Data Provider, select the data provider to be used with SAS Visual Analytics.The supported values are co-located Hadoop; Hadoop, Greenplum, or Teradata with the SAS Embedded Process; and MapR Hadoop that is mounted on a shared NFS drive.TipIf you are planning to use SAS Visual Analytics with co-located Hadoop now or in the near future, select Hadoop (co-located HDFS). If you are not planning to use SAS Visual Analytics with co-located Hadoop, then select Hadoop (with SAS Embedded Process).For more information, see “Configuring Existing Hadoop Clusters” in the SAS High-Performance Analytics Infrastructure: Installation and Configuration Guide.Note: If you are using HANA or Oracle, make sure that you choose Greenplum (with SAS Embedded Process) and configure your provider after running the wizard, manually. For more information, see SAS 9.4 In-Database Products: Administrator’s Guide.This configuration page appears only when your SAS order also contains a license for the distributed SAS LASR Analytic Server. If your SAS order also contains a license for the non-distributed SAS LASR Analytic Server, you can select Non-distributed LASR.
SAS Visual Analytics High-Performance Configuration InformationSpecify configuration information for the SAS High-Performance Analytics environment, and click Next.-
In SAS High-Performance Analytics Environment Host, enter the fully qualified machine name in the cluster to which the SAS clients connect.
-
In SAS High-Performance Analytics Environment Port, enter the port number in the environment through which the SAS clients connect. (By default, the port is 10010.)For more information, refer to Pre-installation Checklist for Ports for SAS.
-
In Signature files location, specify the absolute path where the SAS LASR Analytic Server writes signature files.If you are using SAS LASR Analytic Server in distributed mode, specify a path located on the SAS High-Performance Analytics environment root node. If you are using a non-distributed SAS LASR Analytic Server, specify a path located on the local machine.It is important to carefully manage access to the signature files directory. User IDs under which certain activities are performed (for example, starting a server or loading data) must have Write access to the signature files directory. Access to a signature files directory can provide access to loaded data, so that the signature files directory should be protected against unauthorized access. For more information, see “Signature Files” in the SAS Visual Analytics: Administration Guide.
-
In Location of the TKGrid or TKGrid_REP Installation on the SAS High-Performance Analytics Environment, specify the absolute path to the TKGrid directory or the TKGrid_REP directory on the root node host (for example,
/opt/TKGrid).Specify the TKGrid_REP directory when you are feeding your SAS High-Performance Analytics environment with parallel loads from a remote (not co-located) data provider.TipBe sure not to leave any whitespace characters at the end of the path because whitespace characters can cause problems when you attempt to submit SAS LASR Analytic Server jobs later.For more information, see “Install the Analytics Environment” or “Configure for Access to a Data Store with a SAS Embedded Process” in the SAS High-Performance Analytics Infrastructure: Installation and Configuration Guide. -
In SAS High-Performance Computing Management Console URL, enter the URL used to access SAS High-Performance Computing Management Console. (By default, the URL is http://local_host_name:10020.)For more information, see the SAS High-Performance Computing Management Console: User’s Guide.
-
In Location for the SAS linguistic distributed binaries, specify the directory on disk that stores the SAS linguistic binary files. These binary files are required to perform text analysis on the SAS LASR Analytic Server with SAS Visual Analytics and to run PROC HPTMINE and PROC HPTMSCORE with SAS Text Miner.
SAS Visual Analytics Data Provider: HadoopSpecify Hadoop configuration information, and click Next.-
In Hadoop NameNode Host, specify the machine in the HDFS cluster that is the Hadoop NameNode.
-
In Hadoop NameNode Port, enter a port number for the HDFS NameNode service, which runs only on the NameNode in the HDFS cluster. This value maps to the Hadoop property
com.sas.lasr.hadoop.service.namenode.port.For more information, see the Configuration Guide for SAS 9.4 Foundation for UNIX Environments. -
In Hadoop NameNode Authentication Domain, enter the domain to use for identifying logins that access the Hadoop NameNode machine.The authentication domain is a metadata construct that pairs each login with the servers for which that login is valid. The authentication domain provides logical groupings for resources and logins in a metadata repository. This ensures that resources use the same authentication process.For example, when an application needs to locate credentials that enable a particular user to access a particular server, the application searches the metadata for logins that are associated with the authentication domain in which the particular server is registered.
-
In Library Name, enter the library name for the Hadoop library.
-
In Libref, enter the libref for the Hadoop library.
-
In Hadoop Path, enter the path to the database for the Hadoop data server.
SAS Visual Analytics Data Provider: GreenplumSpecify the requested Greenplum information to create a remote parallel connection with the SAS High-Performance Analytics environment, and click Next.-
In Greenplum Database Host, enter the name of the Greenplum Data Computing Appliance. Host name, fully qualified host name, or an IP address are valid values.
-
In Greenplum Database Port, enter the port for the database.
-
In Greenplum Database Authentication Domain, enter the domain associated with metadata identities that can access the Greenplum Data Computing Appliance.The authentication domain is a metadata construct that pairs each login with the servers for which that login is valid. The authentication domain provides logical groupings for resources and logins in a metadata repository to ensure that resources use the same authentication process.For example, when an application needs to locate credentials that enable a particular user to access a particular server, the application searches the metadata for logins that are associated with the authentication domain in which the target server is registered.
-
In Library Name, enter the library name for the Greenplum library.
-
In Libref, enter the SAS libref that points to the Greenplum library.
-
In Greenplum Database, enter the database name of the Greenplum database.
-
For more information, see “Configuring the Analytics Environment for a Remote Parallel Connection” in the SAS High-Performance Analytics Infrastructure: Installation and Configuration Guide.
SAS Visual Analytics Data Provider: Greenplum (Schema)Specify the requested Greenplum information to create a remote parallel connection with the SAS High-Performance Analytics environment, and click Next.-
In Greenplum Database Schema, enter the database schema name for the Greenplum database, and click Next.
-
For more information, see “Configuring the Analytics Environment for a Remote Parallel Connection” in the SAS High-Performance Analytics Infrastructure: Installation and Configuration Guide.
SAS Visual Analytics Data Provider: TeradataSpecify the requested Teradata information to create a remote parallel connection with the SAS High-Performance Analytics environment, and click Next.-
In Teradata Data Server Host, enter the name of the Teradata Managed Server Cabinet. Host name, fully qualified host name, or an IP address are valid values.
-
In Teradata Data Server Authentication Domain, enter the domain associated with metadata identities that can access the Teradata Managed Server Cabinet.The authentication domain is a metadata construct that pairs each login with the servers for which that login is valid. The authentication domain provides logical groupings for resources and logins in a metadata repository to ensure that resources use the same authentication process.For example, when an application needs to locate credentials that enable a particular user to access a particular server, the application searches the metadata for logins that are associated with the authentication domain in which the target server is registered.
-
In Library Name, enter the library name for the Teradata library.
-
In Libref, enter the SAS libref that points to the Teradata library.
-
In Teradata Database, enter the database name of the Teradata Data Server.
-
For more information, see “Configuring the Analytics Environment for a Remote Parallel Connection” in the SAS High-Performance Analytics Infrastructure: Installation and Configuration Guide.
SAS Visual Analytics Public Data Library: HadoopSpecify public data library configuration information for Hadoop, and click Next.-
In Library Name, enter the library name for the public Hadoop library.
-
In Hadoop Path, enter the path to the database for the public Hadoop data server.
-
In Libref, enter the SAS libref that points to the public Hadoop library.
-
For more information, see “Configuring the Analytics Environment for a Remote Parallel Connection” in the SAS High-Performance Analytics Infrastructure: Installation and Configuration Guide.
SAS Visual Analytics Public Data Library: GreenplumSpecify public data library configuration information for Greenplum, and click Next.-
In Library Name, enter the library name for the public Greenplum library.
-
In Libref, enter the SAS libref that points to the public Greenplum library.
-
In Greenplum Database, enter the database for the public Greenplum data server.
-
In Greenplum Database Schema, enter the database schema for the public Greenplum data server.
-
For more information, see “Configuring the Analytics Environment for a Remote Parallel Connection” in the SAS High-Performance Analytics Infrastructure: Installation and Configuration Guide.
SAS Visual Analytics Public Data Library: TeradataSpecify public data library configuration information for Teradata, and click Next.-
In Library Name, enter the library name for the public Teradata library.
-
In Libref, enter the SAS libref that points to the public Teradata library.
-
In Teradata Database, enter the database for the public Teradata data server.
-
For more information, see “Configuring the Analytics Environment for a Remote Parallel Connection” in the SAS High-Performance Analytics Infrastructure: Installation and Configuration Guide.
SAS Visual Analytics Data Provider: Hadoop PortsConfirm the various ports used for Hadoop, and click Next.-
In File System Default Port, enter the port used to access the NameNode default file system.
-
In MapReduce Job Tracker Port, enter the port used to access the MapReduce server JobTracker process. This value maps to the Hadoop property
mapred.job.tracker. -
In Primary NameNode HTTP Port, enter the port on which the NameNode primary web user interface listens. This value maps to the Hadoop property
dfs.namenode.http-address. -
In Secondary NameNode HTTP Port, enter the port on which the NameNode backup web user interface listens. This value maps to the Hadoop property
dfs.secondary.http-address. -
In Job Tracker HTTP Port, enter the port on which the JobTracker web user interface listens. This value maps to the Hadoop property
mapred.job.tracker.http.address.
SAS Visual Analytics Public Data ProviderSpecify a library definition for a public, non-distributed SAS LASR Analytic Server data provider, and click Next.-
In Data Reload Library Name, enter the name for the Reload library.
-
In Data Reload Libref, enter the libref for the Reload library.
-
In SAS Visual Analytics Reload Path, enter the absolute path to the Reload library.
SAS LASR Analytic Server Monitor Configuration InformationSpecify SAS LASR Analytic Server Monitor configuration information, and click Next.-
In SAS LASR Analytic Server Monitor Host, enter the SAS LASR Analytic Server Monitor host name.
-
In SAS LASR Analytic Server Monitor RMI Registry Port, enter the Remote Method Invocation (RMI) port that the SAS LASR Analytic Server Monitor listens on for activity.For more information, see Pre-installation Checklist for Ports for SAS.
SAS Visual Analytics Public Data Library InformationConfirm the port for the SAS High-Performance Analytics environment to which the SAS clients connect, and click Next.-
In SAS Visual Analytics Public Data Library Port, enter the port number for the SAS High-Performance Analytics environment to which the SAS clients connect.For more information, see Pre-installation Checklist for Ports for SAS.
SAS Visual Analytics AutoLoad LocationSpecify the path to the SAS Visual Analytics AutoLoad location, and click Next.-
In SAS Visual Analytics AutoLoad Location, enter the absolute path of the host directory in which users place tables for loading to memory.
SAS Visual Analytics: SAS LASR Analytic Server LibrarySpecify the SAS LASR Analytic Server library name and libref, and click Next. You can modify both of these properties after installation by using SAS Management Console.-
In Library Name, enter the library name for the SAS LASR Analytic Server library.
-
In Libref, enter the libref for the SAS LASR Analytic Server library.
SAS Visual Analytics: Public LASR LibrariesSpecify the public LASR library name and libref, and click Next. You can modify both of these properties after installation by using SAS Management Console.-
In Public LASR Library Name, enter the name for the library that is pre-populated for users when they import data files and create data queries. (This public LASR library provides ease of use rather than data security.)
-
In Public LASR Libref, enter the libref for the public LASR library.
SAS Visual Analytics Services Database CredentialsSpecify JDBC connection information for the SAS Visual Analytics Services database, and click Next.-
In User ID, enter the user account that SAS uses to create a JDBC connection to the SAS Visual Analytics Services database. (The default is vatadm.)
-
In Password, enter a password for the user account (vatadm).Note: Remember this password because you will need it in the future.
-
In Confirm Password, re-enter the password.
SAS Visual Analytics Transport Service: Whitelist Mobile DevicesSpecify whether to enforce a whitelist for SAS Mobile BI, and click Next.-
Select Enforce whitelist for mobile devices to use a whitelist to control access to SAS Mobile BI.A deployment enforces either the blacklist or the whitelist. If the whitelist is not selected to be enforced, the blacklist is enforced by default. If the whitelist is enforced, only devices that are on the whitelist can use SAS Mobile BI. If the blacklist is enforced, any device that is not on the blacklist can use SAS Mobile BI. Although only one list is enforced, you can make changes to both lists.For more information, see Access to SAS Mobile BI in SAS Visual Analytics: Administration Guide.
SAS Visual Analytics: Protocol for OpenStreetMap ServerSpecify the protocol for how SAS Visual Analytics Explorer communicates with the OpenStreetMap server hosted by SAS, and click Next.-
In SAS-hosted OpenStreetMap Server Communication Protocol, select a protocol to use for standard web browser communication.Your options are HTTP Protocol (default) and HTTPS Protocol (secure).Using HTTPS can result in performance degradation because of additional communication and encryption.For more information, see OpenStreetMap Server in SAS Visual Analytics: Administration Guide.
SAS Visual Analytics Sample ReportsDecide whether to include nearly 13 GB (or more) of data and reports to help you get started, and click Next.-
Select Include Visual Analytics Sample Reports to install sample SAS Visual Analytics reports with your configuration.Quick links to these reports are available on the SAS Visual Analytics home page. The sample data is loaded when the associated server (Public LASR Analytic Server) starts. For more information, see Sample Objects in SAS Visual Analytics: Administration Guide.
SAS Visual Analytics: Configure ArcGIS ServerSpecify whether to configure an Esri ArcGIS server, and click Next.-
Select Configure ArcGIS Server to configure an ArcGIS server. If this option is not selected, then the wizard skips ArcGIS server configuration.For more information, see Esri Server in SAS Visual Analytics: Administration Guide.
SAS Visual Analytics: ArcGIS Server DetailsSpecify the URL of the ArcGIS REST Services directory, and click Next.-
In ArcGIS REST Services Directory, enter the URL used to connect to the ArcGIS REST Services directory.Use the format
protocol://hostname:port/instance/services/folder.
SAS Visual Analytics: Access to Geo Map Server URLsSelect the check box to provide outbound access from SAS Visual Analytics applications to necessary geo map server URLs by adding them to the cross domain proxy servlet whitelist, and click Next.-
Select Add the necessary geo map URLs to the whitelist to add OpenStreetMap servers (hosted by SAS) and your specified ArcGIS server (optional) to the cross domain proxy servlet whitelist.If you do not select the check box, geo map functionality might be incomplete.After installation is completed, you can review and modify the whitelist in the Configuration Manager in SAS Management Console (on the SAS Application Infrastructure node via the sas.web.cdps.knownHosts property).For more information, see Configuring the Cross Domain Proxy Servlet through a Whitelist in SAS Intelligence Platform: Middle-Tier Administration Guide.
SAS Visual Analytics Hyperlink Service: Context RootSpecify the context root, and click Next.-
In Context Root for SAS Visual Analytics Hyperlink Service, enter the context root that ties the user to the EAR file that is specified in the Display Name field.The form of the URL for SAS Visual Analytics Service Hyperlink Service is http://machine:port/SASVisualAnalytics. Although the machine and port are configured elsewhere and typically apply to the web container as a whole, the SASVisualAnalytics portion is the context root, and you can change it (within the constraints of URL rules).
SAS Visual Analytics Designer: Context RootSpecify the context root, and click Next.-
In Context Root for SAS Visual Analytics Designer, enter the context root that ties the user to the EAR file that is specified in the Display Name field.The form of the URL for SAS Visual Analytics Designer is http://machine:port/SASVisualAnalyticsDesigner. Although the machine and port are configured elsewhere and they typically apply to the web container as a whole, the SASVisualAnalyticsDesigner portion is the context root, and you can change it (within the constraints of URL rules).
SAS Visual Analytics Hub: Context RootSpecify the context root, and click Next.-
In Context Root for SAS Visual Analytics Hub, enter the context root that ties the user to the EAR file that is specified in the Display Name field.The form of the URL for SAS Visual Analytics Hub is http://machine:port/SASVisualAnalyticsHub. Although the machine and port are configured elsewhere and they typically apply to the web container as a whole, the SASVisualAnalyticsHub portion is the context root, and you can change it (within the constraints of URL rules).
SAS Visual Analytics Report Viewer: Context RootSpecify the context root, and click Next.-
In Context Root for SAS Visual Analytics Report Viewer, enter the context root that ties the user to the EAR file that is specified in the Display Name field.The form of the URL for SAS Visual Analytics Report Viewer is http://machine:port/SASVisualAnalyticsReportViewer. Although the machine and port are configured elsewhere and they typically apply to the web container as a whole, the SASVisualAnalyticsReportViewer portion is the context root, and you can change it (within the constraints of URL rules).
SAS Visual Analytics Admin: Context RootSpecify the context root, and click Next.-
In Context Root for SAS Visual Analytics Admin, enter the context root that ties the user to the EAR file that is specified in the Display Name field.The form of the URL for SAS Visual Analytics Administrator is http://machine:port/SASVisualAnalyticsAdministrator. Although the machine and port are configured elsewhere and they typically apply to the web container as a whole, the SASVisualAnalyticsAdministrator portion is the context root, and you can change it (within the constraints of URL rules).
SAS Visual Analytics Graph Builder: Context RootSpecify the context root, and click Next.-
In Context Root for SAS Visual Analytics Graph Builder, enter the context root that ties the user to the EAR file that is specified in the Display Name field.The form of the URL for SAS Visual Analytics Graph Builder is http://machine:port/SASVisualAnalyticsGraphBuilder. Although the machine and port are configured elsewhere and they typically apply to the web container as a whole, the SASVisualAnalyticsGraphBuilder portion is the context root, and you can change it (within the constraints of URL rules).
SAS Visual Analytics Explorer: Context RootSpecify the context root, and click Next.-
In Context Root for SAS Visual Analytics Explorer, enter the context root that ties the user to the EAR file that is specified in the Display Name field.The form of the URL for SAS Visual Analytics Explorer is http://machine:port/SASVisualAnalyticsExplorer. Although the machine and port are configured elsewhere and they typically apply to the web container as a whole, the SASVisualAnalyticsExplorer portion is the context root, and you can change it (within the constraints of URL rules).For more information, see SAS Studio: Administrator’s Guide.
SAS Visual Data Builder: Context RootSpecify the context root, and click Next.-
In Context Root for SAS Visual Analytics Data Builder, enter the context root that ties the user to the EAR file that is specified in the Display Name field.The form of the URL for SAS Visual Analytics Data Builder is http://machine:port/SASVisualAnalyticsDataBuilder. Although the machine and port are configured elsewhere and typically apply to the web container as a whole, the SASVisualAnalyticsDataBuilder portion is the context root, and you can change it (within the constraints of URL rules).
SAS Visual Data Builder Database CredentialsSpecify JDBC connection information for the SAS Visual Data Builder database, and click Next.-
In User ID, enter the user account that SAS uses to create a JDBC connection to the SAS Visual Data Builder database. (The default is vdbadm.)
-
In Password, enter a password for the user account (vdbadm).Note: Remember this password as you will need it in the future.
-
In Confirm Password, re-enter the password.
SAS Information Retrieval StudioOn this page and the next page, confirm the ports used for SAS Information Retrieval Studio, and click Next.-
Review the SAS Information Retrieval Studio ports.For more information, see Pre-installation Checklist for Ports for SAS.
Search Interface to SAS Content Feeder ConfigurationSpecify feeder information for Search Interface to SAS Content, and click Next.-
In Index Loader Interval In Minutes, enter the interval to provide SAS content to the server for search indexing.
SAS Internal Account: Search Interface to SAS Content UserSpecify a metadata password for the internal user account that permits access to SAS content that is provided to SAS Information Retrieval Studio for indexing. Click Next.-
Display Name contains the SAS Content User display name that is stored in SAS metadata.
-
Name contains the SAS Content User account name that is stored in SAS metadata.
-
Internal User ID contains the SAS Content User user ID (sassearch@saspw) that is stored in SAS metadata.
-
In New Internal Password, enter a password for the SAS Content User. SAS stores this password in SAS metadata. The password must contain at least six characters.Note: Remember this password as you will need it in the future.
-
In Confirm New Internal Password, re-enter the password.
SAS Deployment Backup and Recovery Tool: Enable Central VaultIndicate whether to use a central backup vault for the SAS Deployment Backup and Recovery Tool, and click Next.-
Select Enable central vault storage of backup files, to enable central storage of backup files by specifying a network-accessible vault directory.CAUTION:If your SAS deployment is not current with the second maintenance release for SAS 9.4, then a central vault location is required if your middle-tier environment includes a clustered SAS Content Server.The default value for the shared centralized vault location is kept blank. The feature of storing backup at a centralized location is disabled as default.To enable this feature, in the two pages that follow, provide a directory shared across all the tiers. The default retention period for a backup is 30 days. If the configuration that you are performing requires a backup at a centralized shared location and you want to change retention period, select this option.(On Windows only.) Finally, provide a valid operating system (external) user account and password to be used to execute commands using the SAS Deployment Agent. This user account must:
-
be an external account that has access to and sufficient privileges for each host machine to be included in the backup.
-
be known to the host machine that contains the central vault.
-
have Read and Write access to the following directories:
-
the central vault directory
-
SAS-configuration-directory/SASMeta/MetadataServer
-
For more information, see Using the Deployment Backup and Recovery Tool in SAS Intelligence Platform: System Administration Guide. -
SAS Studio Mid-Tier: Context RootSpecify the context root, and click Next.-
In Context Root for SAS Studio Mid-Tier, enter the context root that ties the user to the EAR file that is specified in the Display Name field.The form of the URL for SAS Studio Mid-Tier is http://machine:port/SASStudio. Although the machine and port are configured elsewhere and typically apply to the web container as a whole, the SASStudio portion is the context root, and you can change it (within the constraints of URL rules).For more information, see SAS Studio: Administrator’s Guide.
-
-
Deployment Summary Review the summary of software that the deployment wizard will install and configure.
-
When you see the Deployment Summary page, the deployment wizard has finished collecting installation and configuration input. This is the last opportunity to go back and change any information that you have provided in previous pages before the wizard begins writing to your system.Make one of the following choices:
-
Click Start to begin installing SAS files and writing the configuration to the current machine.The deployment wizard launches the installation and configuration process and provides an ongoing status update.
-
Click Back to navigate to earlier wizard pages to change installation and configuration information previously entered.
-
Click Cancel to terminate the wizard session. Note that you will lose installation and configuration information previously entered.
CAUTION:If you encounter a situation in which the deployment wizard reports a configuration failure, leave the error message displayed and do not continue. Consult additional documentation and, if necessary, contact SAS Technical Support. Moving past an error most often results in having to delete your deployment and start over.On Linux, when you are installing the server tier, you will be instructed to run a script as root. As the message in the installation program explains, certain SAS products and features use functionality that requires SAS to check user ID authentication and file access authorizations. This, in turn, necessitates that certain files within your SAS installation have setuid permissions and be owned by root.Your credentials are temporarily stored in your Windows registry using the Windows automatic logon functionality. In rare circumstances, it is possible those values will remain in your Windows registry after their use, thus posing a potential security risk.For more information about this functionality, including any risks, see Microsoft documentation about security and automatic logons. You should weigh the risks of convenience for automatic logon after restart against the security policies in place at your site. -
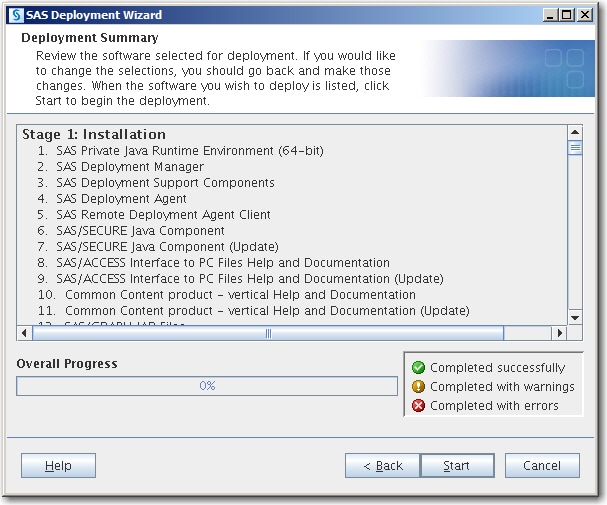
-
-
Deployment Complete The Deployment Complete page displays the configuration results for each SAS product.
-
Green check marks next to every item on this page indicate that your deployment completed successfully. Click Next.
-
If you received errors during your deployment, then contact SAS Technical Support at mailto:support@sas.com. Attach to your e-mail the files listed in Review SAS Deployment Tool Documents, Reports, and Logs in SAS Intelligence Platform: Installation and Configuration Guide.
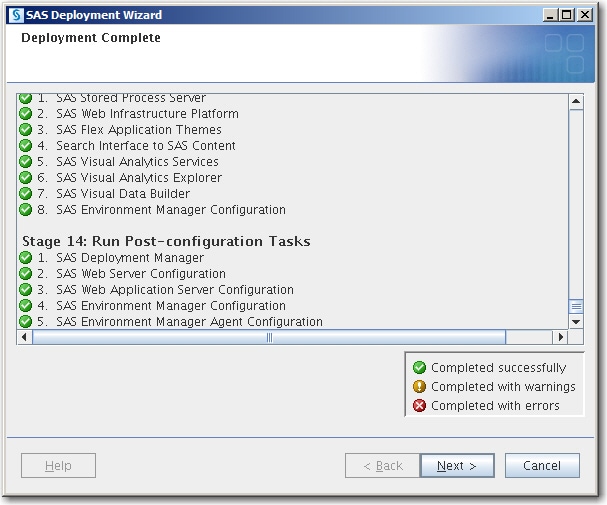
-
-
Additional Resources Use the links displayed to review more information about your SAS deployment.
-
Click Finish to close the SAS Deployment Wizard.
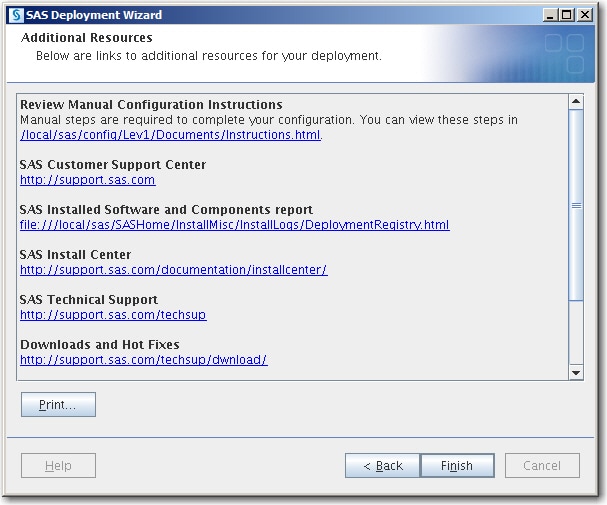
-
-
Configuration Guidelines and Details Review Configuration Guidelines and Details for post-deployment steps, and click Next.
-
To complete your SAS deployment, review Configuration Guidelines and Details and perform the steps listed.Configuration Guidelines and Details (Instructions.html) is automatically generated by the deployment wizard and has post-installation steps specific to your SAS order that you must perform.
-
The SAS Deployment Wizard writes the Configuration Guidelines and Details (Instructions.html) file to the
Documentsdirectory under the SAS configuration path. For example:-
Linux:
/opt/SAS/Lev1/Documents/Instructions.html -
Windows:
C:\SAS\Config\Lev1\Documents\Instructions.html
-
-
-
Back up your metadata repository and your SAS configuration directory.
-
Make a backup copy of your SAS Visual Analytics configuration directories by using your site-approved method. Your SAS configuration directories are all of the child directories under the path that you specified previously on the Specify Configuration Information wizard page.
-
Back up your SAS Web Application Server directories.
-
Back up your metadata repository and repository manager. For more information, see Best Practices for Backing Up and Restoring Your SAS Content in SAS Intelligence Platform: System Administration Guide.
-
-
If you opted not to automatically deploy your SAS web applications, then you must manually deploy them. For more information, see SAS Support for Web Application Servers and HTTP Servers.
-
Be sure to restart any servers that you stopped when creating the backup.
-
If you are deploying SAS Visual Analytics on Windows, proceed to Adding SAS LASR Analytic Server Monitor as a Windows Service. Otherwise, proceed to Validating Your SAS Visual Analytics Deployment.
Copyright © SAS Institute Inc. All Rights Reserved.
Last updated: August 1, 2017