Working with Gallery Folders
About Gallery Folders
Gallery folders, accessible
from the Browse pane and Gallery pane, can contain one or more galleries
as well as one or more subfolders that can also contain galleries.
Gallery folders provide a convenient way to organize galleries. You
can create and organize a hierarchy of gallery folders that categorize
and store your galleries of reports. This structure enables you to
store, manage, and locate your reports easily. For more information about galleries, see Working with Galleries.
Note: The user groups for Gallery
Manager have different access authorizations that enable different
capabilities when working with gallery folders. You might not be able
to perform some tasks with gallery folders based on your user permissions. For more information, see User Group Authorization.
Create a Gallery Folder
The
My
                     Galleries
folder contains all of the gallery folders
and galleries that you create, regardless of whether they are public
or private. When you create a gallery folder, it is stored within
the My Galleries folder.
-
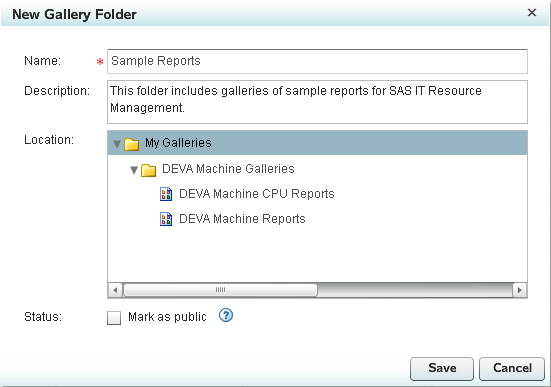
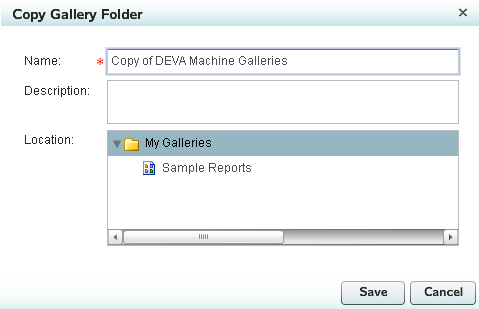
In the Name field, enter a unique name for the folder. The name of a gallery folder can include no more than 60 characters.TipWhen you copy a gallery folder, Gallery Manager creates a copy of the folder and provides the default name
Copy of <name of the original gallery folder>. If the name of your original gallery folder uses 60 characters, then the default name for the gallery copy will exceed the maximum character limit. For best results, name your galleries with 50 characters or less to allow for character additions later. -
Select the status of the gallery folder as private or public. The status specifies whether the gallery folder is viewable only by you (private) or whether other users of Gallery Manager can view the folder (public). The default status is private unless you select Mark as public.You can specify the status of a gallery folder only if it is located at the first level under
My Galleries. All subfolders and galleries within a gallery folder automatically adopt the same status as their parent folder. Therefore, the status of a folder and its contents is determined only at the first level in theMy Galleriesfolder. For more information, see Public and Private Gallery Folders and Galleries.
View and Navigate Gallery Folders
You can use the Browse
pane and the Gallery pane to view and navigate through the gallery
folders that are available in the Gallery Manager. The Browse pane
displays the gallery folders and galleries in a tree view. You can
click the arrow next to the name of a gallery folder to expand the
folder and view its components. Click a gallery folder in the Browse
pane to open the folder in the Gallery pane.
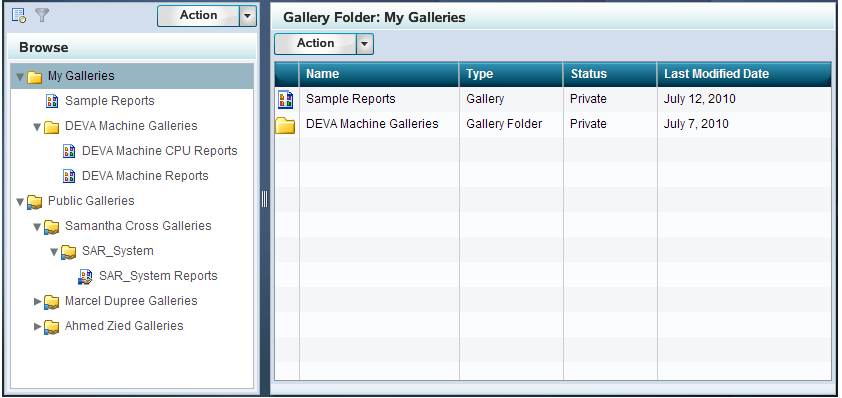
The following example
shows the
My Galleries folder selected
in the Browse pane and its first level of contents displayed in the
Gallery pane.
A Gallery Folder in the Gallery Pane

The Gallery pane displays
the following information about the first level of subfolders and
galleries in a gallery folder:
The column headings
of the grid enable you to sort the objects by column. When you click
a column heading in the grid, an up arrow (ascending) or down arrow
(descending) icon appears. These arrows indicate whether the information
in the columns is sorted by ascending or descending order. You can
click the arrow in a column heading to change the sort order for that
column.
Note: If an object does not have
a value in one of the possible sort fields, then that object appears
first in a list that is sorted in ascending order.
In the Browse pane and
the Gallery pane, you can navigate the gallery folders to locate the
gallery that you want to view. Then, double-click a gallery to view
its reports in the Gallery pane. For more information, see Viewing Reports in a Gallery.
Edit a Gallery Folder
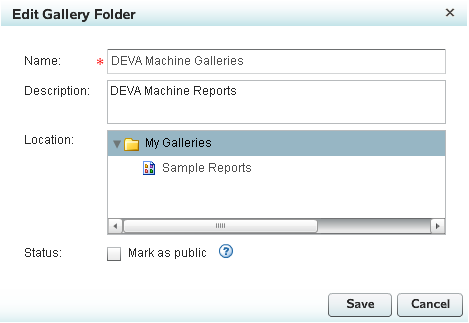
You can change the name,
description, location, and status of existing gallery folders. However,
the folders that you have permission to edit are based on your user
ID. You can edit only your own gallery folders that you create.
-
If you are editing a gallery folder that resides on the first level of the
My Galleriesfolder, then you can also edit the Status of the folder and its contents. Select Mark as public if you want the gallery folder and its contents to be public and accessible by all Gallery Manager users. Otherwise, the gallery folder and its contents are private and accessible only by you and members of the IT Resource Management Administrator group. For more information, see Public and Private Gallery Folders and Galleries.
Copy a Gallery Folder
-
Note: You can select only one gallery folder at a time in the Browse pane. However, you can hold down the CTRL or SHIFT key and select multiple gallery folders in the Gallery pane. If you copy multiple gallery folders at the same time, then the dialog box does not enable you customize the name and description of the folders. Therefore, you must ensure that the folders that you copy have names that are unique within the folder where you plan to store them.
Delete a Gallery Folder
You can delete a gallery
folder to remove it and its contents from the Gallery Manager. However,
this action does not delete the corresponding reports from the SAS
Content Server.
Note: Members of the IT Resource
Management User group can delete only the gallery folders that they
created. Members of the IT Resource Management Administrator group
can delete any gallery folder and its contents regardless of whether
they created the folder.


