Creating Aggregation Tables with the Aggregation through the Template Wizard
The Aggregation
Tables through Template enables you to create aggregation
tables by using supplied templates or user-defined templates.
Note: User-defined templates are
tables that are created by users. These tables are located in the
/Shared
                  Data/SAS IT Resource Management/IT User-defined Templates/Aggregation
folder.
To create an aggregation
table with the New Aggregation Table through Templates wizard,
respond to the wizard's prompts.
Note: The template that you are
using might have join columns that require the creation of dependent
tables. When the wizard is invoked, a list of these tables might
be presented in a dialog box. If you want to bypass the creation of
these tables, click
Yes. None of the
tables that are listed are created.
-
On the Specify location page, you can view the metadata location of the folder within the IT data mart where the newly created table is saved.You can override the default value for this folder by clicking Browse. Then select a path to the table from the Select a Location dialog box that displays the metadata directory structure.Note: The IT data mart field displays the name of the IT data mart where the job is located. It cannot be modified.
-
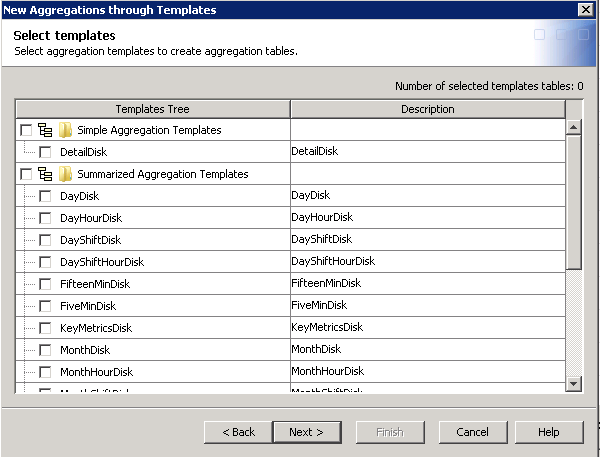
On the Select templates page, check the template tables that you want to use to create aggregation tables. The Total number of selected template tables field is updated to reflect the number of template tables that you selected.Some staged tables are designed to contain data that is already summarized to an hourly interval. For these tables, you cannot successfully select aggregations that attempt to summarize the data to smaller intervals. When you specify an aggregation table that summarizes data for a time period that is shorter than the source table normally provides, a warning message is displayed. The message states that the aging column cannot be created. In that case, the aggregation table is not created. To avoid this situation, make sure that your source table provides the appropriate level of summarized values for the aggregation that you want to generate. For example, you might want to specify an aggregation table such as FifteenMinAcctTcodeSy. In that case, make sure that the source data (that is, the staged table) is summarized no higher that 15 minutes and import the DATETIMEFIFTEENMINUTE computed column into the staged table. (For information about importing a column into a staged table, see Modify a Staged Table.)Note: If the templates that you select have a dependency on other templates, an information box is displayed that lists the additional aggregations that are to be created. Click OK to continue.
-
If this aggregation table is the first target table that is specified for this Aggregation transformation, an additional page of the wizard opens. This page prompts you for the physical target location and for information about the SAS library where the data is to be stored. When this page opens, the following fields are already specified with default values. (However, you can modify these fields.)
-
The Name field contains the name of the library that contains all aggregation tables that are associated with the Aggregation transformation that you are working with. This field can contain up to 60 characters and should be unique within the IT data mart. A value is required in this field.
-
The Description field contains the information that describes the library. It can contain no more than 200 characters. It is an optional field.
-
The Server field contains the application server that you specified for the IT data mart that you are working with. The default application server is the SASITRM server. A value is required in this field.
-
The Libref field contains the name that is temporarily associated with the library. The libref for an aggregation library is a concatenation of AGG and a random number (for example, AGG27040). A value is required in this field.
-
The Path specification field contains the location where the tables for this library are to be stored. You must specify a location for the tables that is within the IT data mart that is specified in the IT Data Mart field.Enter this field manually or click Browse to select a location from the Select a Directory dialog box that displays the directory structure on the server's file system. A value is required in this field.
-
-
The final page of the wizard displays the details for the aggregation tables that you specified. If the aggregation job that you specified adds more than 20 tables to an existing job, a warning message is displayed. The message suggests that you might want to remove some tables in order to experience better performance. Click Yes to continue to generate the tables. Click No to return to the Select templates page, where you can change your selections. If you are satisfied with your choices, click Finish.Click OK to return to the process flow diagram.Note: Some aggregation templates require other aggregation tables to be created. If so, a dialog box appears that notes the dependency and asking for confirmation before proceeding.
Copyright © SAS Institute Inc. All rights reserved.
