Defining an Exception Definition with the New Exception Definition Wizard
To create an exception
definition, perform the following steps:
-
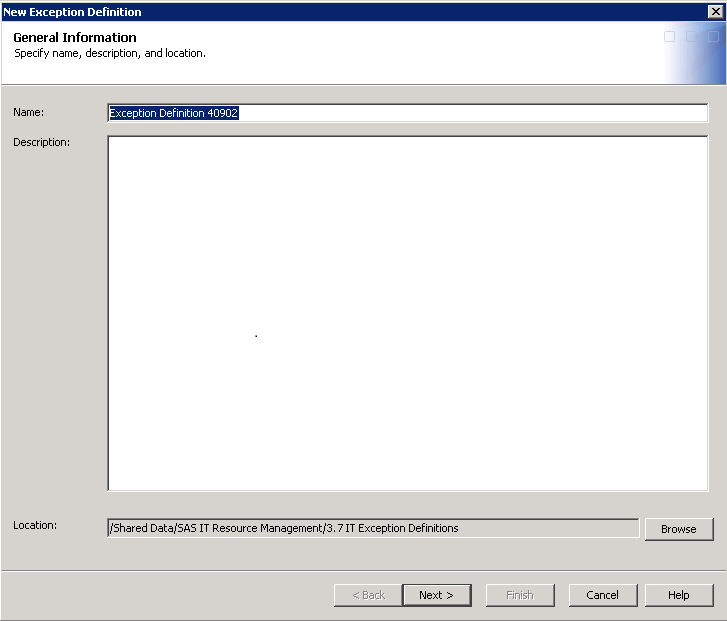
On this page, you can specify identifying information about this exception definition.
-
Enter the name of the exception definition in the Name field. This field can contain up to 60 characters. It must be unique within the metadata folder. A value is required in this field. The default value of this field is a concatenation of the term “Exception Definition” and a random number (for example,
Exception Definition
                                             40902
). -
(Optional) Enter the identifying information in the Description field. This field can contain up to 200 characters. It is useful to include, at a minimum, the following information:
-
Input table: Adapter_TableName
-
Measures: Measure name
-
Purpose: Summary of the exception definition and its purpose
-
-
The Location field specifies where the exception definition is stored. Click Browse to navigate in the
/Shared Data/SAS IT Resource Management/3.7
                                             IT Exception Definitions
folder to the adapter and domain category that is associated with this exception definition. Then select theUser-Definedfolder and click OK.Note: This location is supplied for your convenience. However, you can store the new exception definition in a different folder location.TipSAS IT Resource Management software stores the definitions that it supplies in theSuppliedfolder. Therefore, do not store your user-defined definitions in that folder. Future updates to the software might result in overwriting the contents of theSuppliedfolder.
-
-
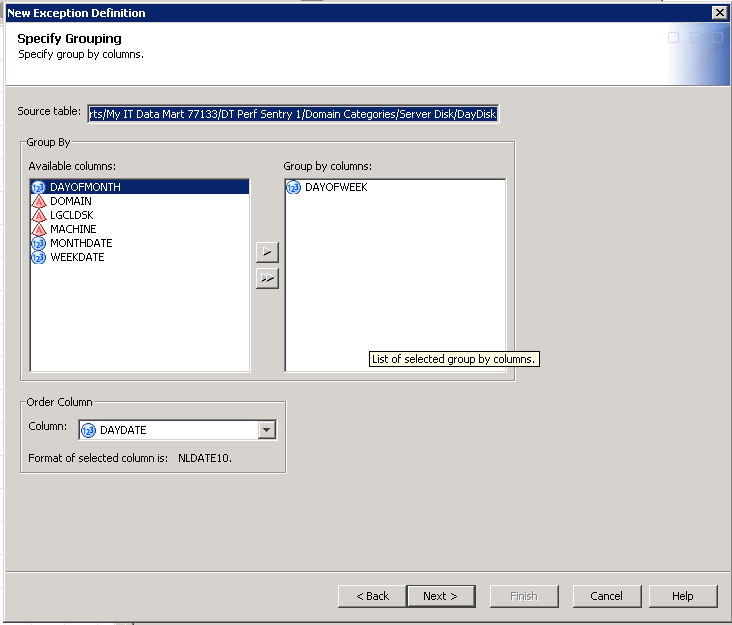
On the Specify Grouping page, you can specify the columns by which groups are defined, and the column that should be used to order observations within each group.
-
If you specify Group by columns, each grouping is evaluated separately to find exceptions. There is either one or no exception for each grouping. (A grouping is defined by a unique set of values for the group by columns.) For example, if you specify
MACHINE, the data for each unique machine is treated as a separate grouping and evaluated separately for exceptions. In other words, for each unique machine, either there is an exception or there is no exception for that machine. If you do not specify any group by columns, then the entire input data is evaluated as a whole. (The grouping is the entire data set.) There would be either one or no total exceptions for this definition. -
If an order column is specified, then observations are ordered within each group prior to evaluation. Ordering observations impacts those exception definitions where you want to flag an exception if a certain number of occurrences are found in a row.
TipIn most cases, you should specify a grouping column.Enter a value or accept the defaults for the following fields:-
Source table: shows the full name of the input source table.
-
Available columns: shows the list of columns that can be selected for grouping the exceptions.
-
Group by columns: shows the columns that define the groups by which the exception definition is evaluated. For example, if you want to evaluate each machine separately, select
MACHINEas the grouping column. If you are evaluating a summary table, the most likely choices for grouping come from the class or ID columns of the summary table. -
The Order Column box: shows the column to be used to order observations within each group prior to evaluation. If the Order Column is not specified, then the evaluation uses the order of the observations as they exist in the input data. If you are evaluating data from a summary table, the most likely choice is the aging column, if there is one.In most cases, the Order Column that is selected in an exception definition is used for the horizontal axis of graph reports. However, if all of the following conditions are met, then the horizontal column of the graph uses the concatenated column, such as DAYDATEHOUR:
-
The input to the transformation is a summarized aggregation table.
-
The class list of the input table includes the HOUR column.
-
The aging column of the input table is DAYDATE.
-
The input table includes the DAYDATEHOUR column.
-
In the exception definition, either of the following conditions is true:
-
The Order Column is HOUR and the Group by columns field does not include the aging column.
-
The Order Column is the aging column and the Group by columns field does not include HOUR.
-
Note: The label on the resulting exception report might showDate_Hour. -
-
Format of the selected column is displays the format of the column that is used for ordering the analysis column. (The format is displayed for informational purposes only.)
In the following display, the group by column is DAYOFWEEK and the order column is DAYDATE. This groups the data by each day of the week that is present in the input data. In addition, the data is sorted by the date for each observation in the data. In other words, the data is evaluated separately for each day of the week (Monday, Tuesday, and so on). In addition, within each group (DayOfWeek), the data is evaluated in order of the date (DayDate).Note: When you select multiple Group By columns, the order of these columns affects the order of reports as seen in ITRM Report Center, such as in the Resource workspace. If you select those columns for exception definitions in the same order that you selected the Group By columns for your performance reports, then both the exception report results and the performance report results are presented in the same order when seen in ITRM Report Center. For example, if you selectedDOMAINand thenMACHINEas the Group By columns for your performance report, you should not selectMACHINEand thenDOMAINas the Group By columns for your exception report, if you want them to appear in the same order in ITRM Report Center.CAUTION:If you are selecting multiple Group By columns, select those columns in the same order that you selected the Group By columns for your performance reports.For example, if you selectedDOMAINand thenMACHINEas the Group By columns for your performance report, you should not selectMACHINEand thenDOMAINas the Group By columns for your exception report. -
-
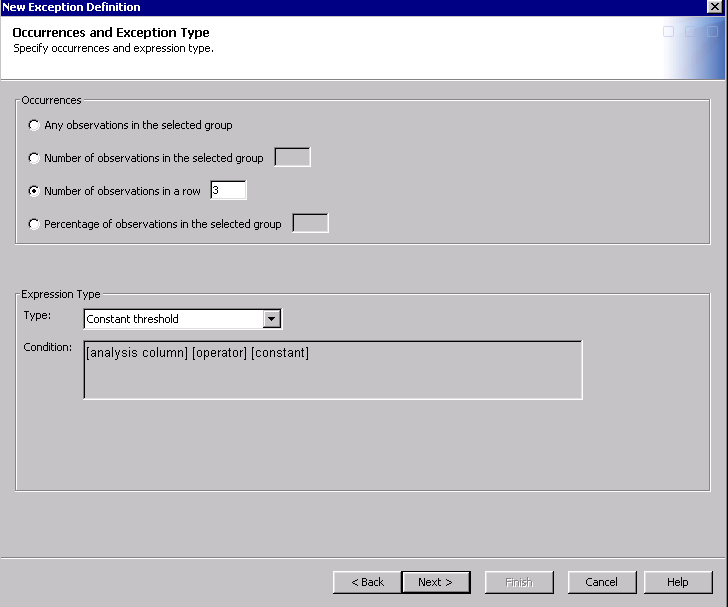
On the Occurrences and Exception Type page, you can specify the following information:
-
In the Occurrences group box, you can specify the observations that you want to be processed. Select one of the following options:
-
Any observations in the selected group: specifies that each observation in the selected group should be examined to determine whether it satisfies the condition specified in the exception definition.If the expression that is displayed below in the Condition field is found to be true for any observation in the group, then an exception is recorded for this group.
-
Number of observations in the selected group: specifies how many observations must satisfy the condition specified in the exception definition in order to trigger an exception.If the expression that is displayed below in the Condition field is true for this many (or more) observations in the group, then an exception is recorded for this group.
-
Number of observations in a row: specifies how many sequentially occurring observations must satisfy the condition of the exception definition in order to trigger an exception.If the expression that is displayed below in the Condition field is true for this many (or more) observations in a row, then an exception is recorded for this group. (Observations are determined to be in a row based on the order that is specified by the Order Column on the Specify Grouping page, if any. If the Order Column is not specified, then the observations are processed in the order in which they exist in the input table.)
-
Percentage of observations in the selected group: specifies the percentage of observations that must satisfy the condition of the exception definition in order to trigger an exception.If the expression is found to be true for this percentage of observations (or more) in the group, then an exception is recorded for this group.Note: When evaluating observations for the number or percentage of occurrences, observations with missing values for columns in the expression are omitted prior to evaluation. Therefore, they do not factor into the calculation of numbers or percentages or the evaluation of observations that are in a row.
-
-
In the Type field of the Expression Type group box, use the down arrow to select the expression that defines this exception. The following choices are available:
-
Constant threshold: compares the value of the specified column to the specified constant value. For example, the expression might beCPUBUSY > 99.Note: The value of the constant must be a numeric value if the specified column is numeric, even if the formatted value of the column appears to be non-numeric. For example, if the specified column is a time value, such as CPUTIME, which has a TIME. format, the formatted values in the column might appear as “00:01:00”. However, the constant value needs to be specified as an unformatted numeric such as 60 (seconds). Some other numeric columns might have formatted values such as “up”, “down”, “yes”, “no”, but the constant value needs to be the unformatted numeric equivalent such as 0 or 1. -
Other column: compares the value of one specified column to the value of another specified column. -
Range: compares the value of the specified column to a range. The condition is met if the value is within or outside of the upper or lower bound of the range. -
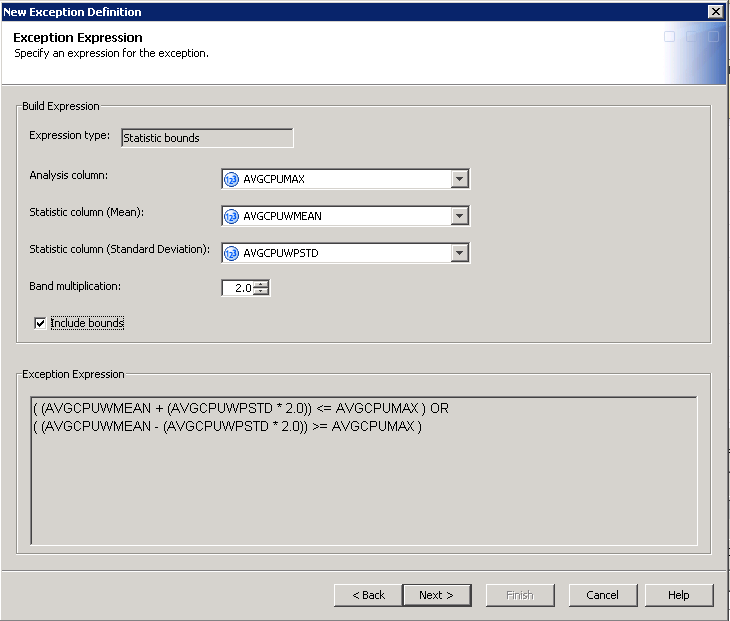
Statistic bounds: compares the value of the specified column to a range that is defined by the specified mean, plus or minus the specified standard deviation (times a multiplication factor).Note: TheStatistic boundstype is available only when the source table is a summary aggregation table. -
Free form: enables the user to specify any valid SAS DATA step code that results in a Boolean (true/false) result.
-
-
The Condition field displays the form of the expression that corresponds to the type of this exception definition. This field is for informational purposes only and does not accept user input.
In the following display, the exception definition triggers an exception if three observations in a row satisfy the exception condition. The exception type is Constant threshold, which is defined on the next page of the wizard. -
-
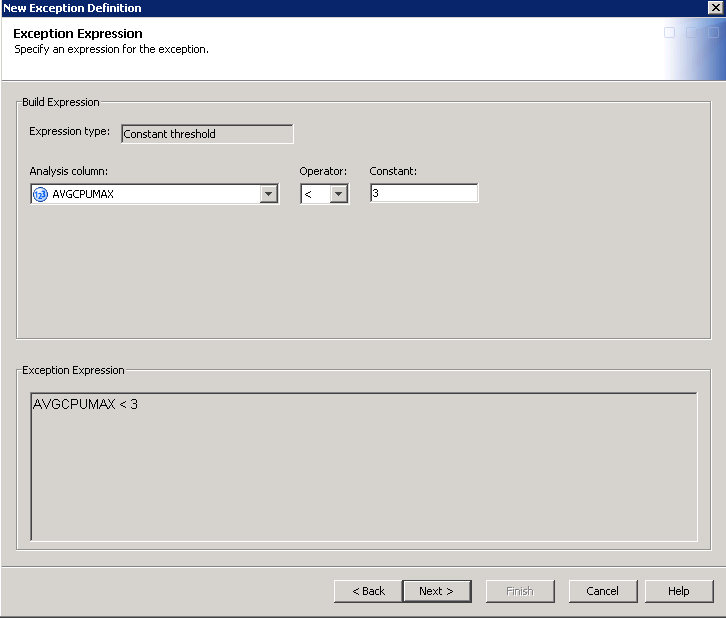
On the Exception Expression page, you can define the expression for the expression type that you chose on the previous page. The Exception Expression field at the bottom of the page displays the mathematical expression of the exception type. For information about how to specify the fields, see the Help for that page.The values that are specified in an exception expression should be unformatted. The expression is evaluated without regard to formats or informats that might be associated with the column. However, in the expression for a free-form-type exception, you can use formatted values. In that situation, the syntax must use those formatted values explicitly. Here are some examples:
-
In the expression for a constant threshold exception, you might select the column CPUTIME with a TIME. format. To evaluate if CPUTIME was more than one minute, define this expression as
CPUTIME > 60rather than asCPUTIME > ’00:01:00’.Note: If the exception was of the free-form type, you could also use SAS date, datetime, or time constant syntax, such asCPUTIME > ’00:01:00’d. This syntax is independent of any specific format that CPUTIME might have. -
In the expression for a free-form type of exception, your source table might have a column USER with a $USRGRP. user format. The following code shows how to include an explicit use of that format (or any other available format or informat):
… [code omitted] PUT(USER,$USRGRP.)=’Technical Support’ …[code omitted]
Note: When defining the expression, you are prompted to select an analysis column from a drop-down list of column names. If an exception report is generated based on this expression, the analysis column name is not displayed. Instead, the label that corresponds to the analysis column name is shown on the report.-
Constant thresholdis the default value for Expression Type. For theConstant thresholdtype of expression, specify the following fields:-
Analysis column
-
Operator
-
ConstantNote: This value is used to draw the reference line on the resulting graphs.
The fields that are needed to define the expression of the exception vary for each type of expression.The following display shows the fields needed for theConstant thresholdtype of expression. -
-
For the
Othercolumn type of expression, specify the following fields:-
Analysis column
-
Operator
-
Comparison column
Note: Graphs for exceptions of this type of expression are multi-line plots. -
-
For the
Rangetype of expression, specify the following fields:-
Analysis column
-
Lower limit
-
Upper limit
-
Check the Include bounds box if you want to include the upper and lower limits in the comparison.
The resulting expression is an OR of the two sub-expressions that specify the upper and lower ranges.Note: The values in the Upper limit and the Lower limit are used as reference lines on the resulting graphs. -
-
For the
Statistic
                                             bounds
type of expression, specify the following fields:-
Analysis column
-
Statistic column (Mean)
-
Statistic column (Standard Deviation)
-
Band multiplicationNote: The list of eligible standard deviation columns is restricted to those columns that are related to the selected mean. If there are none, the
Statistic
                                                         bounds
type cannot be fully defined. -
Check the Include bounds box if you want to include the upper and lower limits in the comparison.Note: The
Statistic
                                                         bounds
type is available only when the source table is a summary table.
The following display shows the fields needed for theStatistic boundstype of expression.The resulting expression is an OR of the two sub-expressions that specify the upper and lower statistic bounds.Note: For an example of how this expression type can be used, see Example 2: Detecting Sudden Increases in Demand with the Statistic Bounds Expression Type. -
-
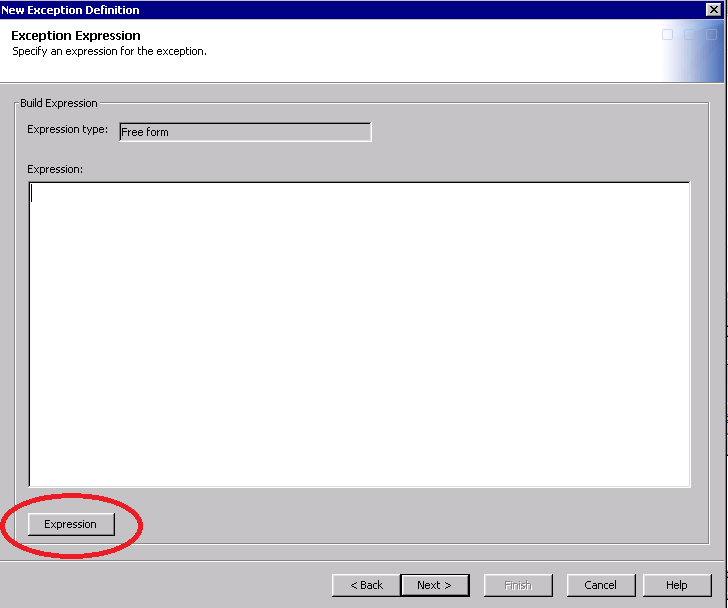
The following display shows the fields that are needed to specify the
Free formtype of expression.You can specify the expression by invoking the Expression Builder function or by entering it manually.-
To invoke Expression Builder, click the Expression button (circled in red). For information about how to use this functionality, see About the Expression Builder.
-
If you enter the expression manually, you are responsible for the syntax of the free-form expression. The text that you specify here should be valid SAS syntax for the right-hand part of a SAS assignment statement in the DATA step. It should result in a Boolean (true/false) value.
When the job that contains the free-form expression is run or deployed, the syntax of the expression is checked. If the syntax of the expression is not valid, an error message is displayed and the job is not run.Note: For any columns that are used in the expression, be sure to treat missing values appropriately. -
-
-
There are two sections on the Recommendations page: Recommendations and Documents. In the Recommendations box, you can enter text that pertains to the exception. For example, you can specify the actions that the exception report recipient should take as a result of this exception.TipThere are no restrictions on the text in the Recommendations box.In the Documents box, you can specify the names and paths of documents that are assigned to this recommendation. Document references can be either file system names (such as MyDocument), uniform resource identifiers (URIs), or uniform resource locators (URLs). These fields are not validated, so be sure to enter valid values.You can perform these actions:
-
Click New to add a document to this recommendation. The New Document dialog box appears. Specify the following information about the document. You can enter the name of the document or accept the default. You can also enter a description of the document.
-
You can specify a name in the Name field or accept the default name.
-
(Optional) In the Description field, enter information about the document. Do not use double quotation marks in this field.
-
In the Location field, you can specify the folder where the document is stored. If the document is not in the default location, you can use the Browse button to navigate to where the document is stored. Click Browse Local to search the folders on your local machine. Click Browse Remote to search for folders that are not on your machine.
-
In the File field, specify the filename of the document.
-
-
Click Remove to delete a highlighted document from this recommendation.
-
Click Attach to select additional documents to include in this recommendation. The Select Documents dialog box appears. You can select documents from the folders in the Folders tab or from the Inventory tab.
Note: Click Finish on this page to complete the specification of the exception definition. The recommendation and any documents are visible in the exception reports for this exception definition. -
-
On the Report Attributes tab, you can specify the following fields:
-
Domain categoryNote: This field is required.
-
Domain subcategory
-
Job schedule frequency
-
Keywords
-
Report authorNote: Do not use double quotation marks in the Report author field.
-
Expire reports after (Days)Note: This field is required.
When planning to filter and subset your reports, you might need to create domain categories, domain subcategories, job schedule frequencies, and keyword values that are unique to your business. The ITRM Report Definition task enables you to create and manage your own unique primary report filter values that you can assign to report definitions. You can use these filter values later in ITRM Report Center when viewing and searching for reports. You can also share these user-defined primary report filters with other clients that might want to filter reports in a similar way. -
Copyright © SAS Institute Inc. All rights reserved.
