Working with the Exception Transformation
Set Up the Exception Transformation
To set up the Exception
transformation manually, perform the following actions.
-
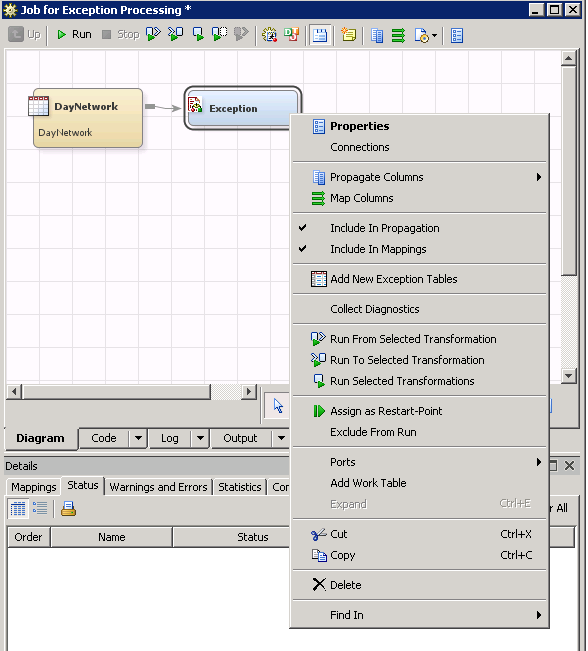
Locate your selected source table and then drag and drop it onto the process flow diagram. Use the cursor to connect the table to the left side of the exception image.TipA staged table is typically the source table for Exception transformations. However, the source table can be any physical table or view that has been defined in metadata.The name of the source table can contain a maximum of 60 characters.
-
Designate what data should be kept by adding target tables. You must specify the exception table. You can also specify the creation of an exception condition table.For more information about the exception and exception conditions tables and their contents, see Exception and Exception Condition Tables. For more information about specifying the target tables, see How to Specify an Exception Table.
Specify the Properties of the Exception Transformation
-
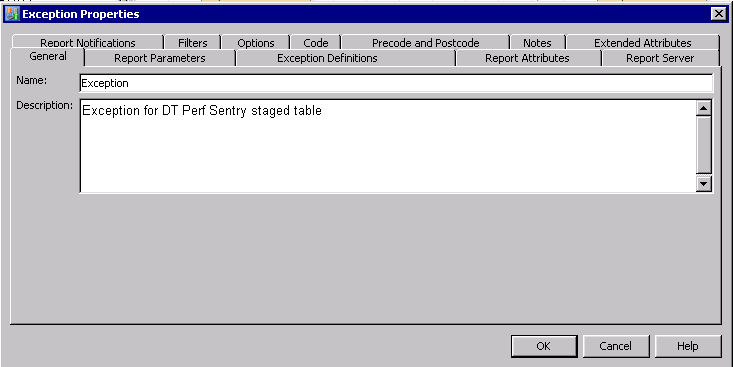
On the General tab, you can modify the following information about the table.Nameidentifies the name of the Exception transformation that you are specifying. The default value for this field is
Exception.TipEnter a name that describes and distinguishes this from other Exception transformations.Descriptiondescribes the Exception transformation that you are specifying. It is useful to include, at a minimum, the following information:-
the Input table: Adapter_TableName
-
Measures: Measure name
-
Purpose: Summary of the exception definition and its purpose
-
-
The Filters tab enables you limit the amount of data that is input to an Exception transformation. (Filtering occurs before exceptions are evaluated.)You can specify the following information:
-
In the Maximum number of individual exceptions to be processed field, enter a numeric value to limit the number of exceptions that you want to process.If the exception triggers more exceptions than the Maximum number of individual exceptions to be processed, the Exception transformation issues a warning and stops searching for other exceptions. For example, if the limit is set to 100, the 1st through 100th exceptions that are found are recorded normally, and processing continues. If another exception is detected, the following warning is displayed:
WARNING: The maximum number of individual exceptions to be
         processed, 100, was exceeded; stopping evaluation.
The input data is not evaluated for any additional exceptions. -
Check the Apply “No Limit” on the number of exceptions to be processed box to process all exceptions that are discovered.TipFor best results, leave this box unchecked. If it is checked and an exception definition results in many thousands of exceptions, the job might run for a long time and exceed disk space allocations.
-
In the Last time periods field, enter the number of previous periods that you want to evaluate for exceptions. (This field is applicable only for simple or summary aggregation tables that specify an aging column. The aging column values define what is considered to be a time period.)If the field is blank or zero, no time period sub-setting is performed.Note: The last N time periods are evaluated over all of the data. They are not evaluated separately by group. (If a filter is specified, then the time periods are calculated over all of the data that passes the filter criteria.) The time periods are calculated by evaluating distinct values of the TimePeriod column in the source aggregation table. Therefore, if you ask for the latest 5 time periods, the last 5 time periods are evaluated for the data as a whole. If you specify Group BY columns, some groups might not have any data for those specific 5 time periods. For example, this can occur in situations where occasionally machines dynamically drop in and out of the data stream.
-
On the Report Server tab, you can specify the name of the SAS Content Server and the path on that server to which exception reports are published. These choices are required when reports are generated. (Generating reports is the default behavior.)
-
The default value for this field is
SAS Content Server. Use the drop-down arrow to display and select the other choices. -
The Repository folder path is the location in the SAS Content Server where exception reports are published.Note: Use the Administration workspace of ITRM Report Center to add or delete a repository folder path. Do not edit the path. (If you need to change the path, delete it and then add the correct path in the Administration workspace of ITRM Report Center.)
-
-
TipIf you do not want to generate reports, use the drop- down list to set the Generate exception reports option to
No. Then you do not have to specify any additional fields on the Report Parameters tab.You can specify the following information:-
Style template specifies the name of the style template that is used by all of the graph reports that the Exception transformation creates. The style template determines graph colors and other attributes inside the graph portion of a report. You can use the standard style template that SAS IT Resource Management provides (named
ITRMDefault) or create your own style template that includes custom colors and visual design. For more information, see “About Templates and Style Sheets” in Chapter 8, “Working with Report Jobs and Performance Report Transformations,” in the SAS IT Resource Management 3.7: Reporting Guide.Note: The content, report titles, and footnotes of the individual reports that are generated by the Exception transformation honor the style template that you specify. This style sheet does not affect the overview report. -
Location for style sheet specifies the cascading style sheet (.css file) that is used when viewing a report. It controls colors and other attributes outside of the graph portion of a report.Any of the following location types are valid values for this field:
-
a full URL to the style sheet on a specified server (such as http://<server>:8080/<folder name>/<file name of the cascading style sheet>).
-
a URL to a style sheet on all the clients where the web browser is initiated (such as file://c:/programfiles/<folder name>/<file name of the cascading style sheet>).
-
a relative URL to the style sheet on the middle tier where the graphs are installed (such as /<folder name>/<subfolder name>/<file name of the cascading style sheet>). The option to use only the relative path provides portability of this value. For example, the name or location of the middle tier might change. If it does, the location value does not need to change if the folder names in the middle tier remain the same.The default value (
/SASContentServer/repository/default/sasdav/ITRM/styles/ITRMDefault.css) provides a path to the default style sheet for SAS IT Resource Management reports . You can create a style sheet that includes your own custom colors, logos, and visual design. For more information, see “About Templates and Style Sheets” in Chapter 8, “Working with Report Jobs and Performance Report Transformations,” in the SAS IT Resource Management 3.7: Reporting Guide.
-
-
The Override location for temporary physical files on server field specifies temporary disk space for storing reports that are generated by a report job. After the reports have been published to the SAS Content Server, these files and any associated folders are deleted. The default value for this field is blank.
-
Generate exception reports specifies whether to generate exception reports. The default value for this parameter is
Yes.
The Report Parameters tab also enables you to reset the parameter values to their original default values. To do so, select Reset next to a specific field to reset the value for that parameter to the default value. Or, select Reset to defaults to reinstate the default value for all parameters on the tab. -
-
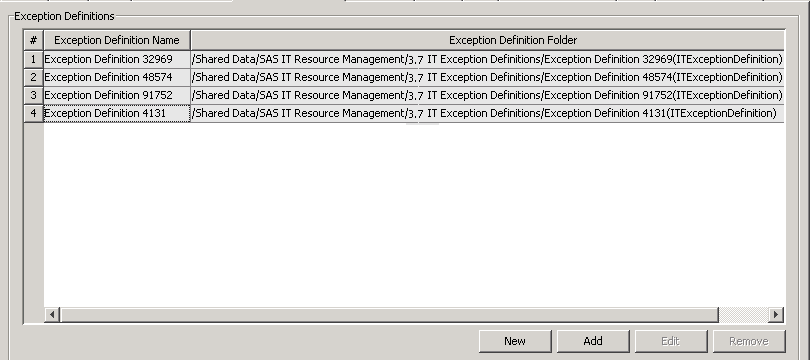
On the Exception Definitions tab, you can select from the available exception definitions or create new exception definitions to be included in the transformation.The Exception Definitions tab includes a list of currently selected exception definitions for this transformation.Note: An exception definition describes what constitutes an exception. It includes the exception condition, the exception persistence, and the text that describes the exception. You can select a supplied definition or create a new definition. At least one exception definition must be defined for the Exception transformation to run.This table includes the following parameters:
-
Exception Definition Name specifies the name of the exception definition.
-
Exception Definition Folder displays the folder where the exception definition is stored.
On the Exception Definitions tab, you can perform the following tasks.-
To create a new exception definition, follow the instructions here: Defining an Exception Definition with the New Exception Definition Wizard.
-
To add an existing exception definition to this transformation, perform the following steps:
-
Click Add. The Select Exception Definitions dialog box appears.
-
In the
3.7 IT Exception
                                                            Definitions
folder, navigate to the adapter and domain category that you are working with. -
You can select one or more definitions from the
SuppliedorUser-Definedfolders. However, if you select multiple exception definitions, the Selected IT exception definition field and the Description box are blank.If you select a single exception definition, the Selected IT exception definition field and the contents of the Description box are displayed. These fields can help you determine whether you selected the appropriate exception definition.-
The Selected IT exception definition field displays the name of the highlighted definition.
-
The Description box shows the contents of the Description field of the highlighted exception definition.
Note: If you saved exception definitions in another folder (for example,My Folder), you can select them from that folder instead. -
-
Click OK to add the selected definitions to the Exception transformation.
-
-
To edit an existing exception definition, perform the following steps:
-
Select the exception definition that you want to modify.
-
Click Edit. The Edit Exception Definition wizard appears.
-
Use the Next button to navigate to the page of the wizard that you want to modify.
-
Continue to navigate through the remaining pages of the wizard. When you are satisfied with your changes, click Finish to update the transformation with your modified definition.Note: If the same exception definition is currently in use in another Exception transformation, you are warned about possible implications for altering this exception definition.
-
-
To remove an exception definition, perform the following steps:
-
Select the exception definition that you want to remove from the Exception transformation.
-
Click Remove. The exception definition is removed from the transformation but is not deleted from metadata.
-
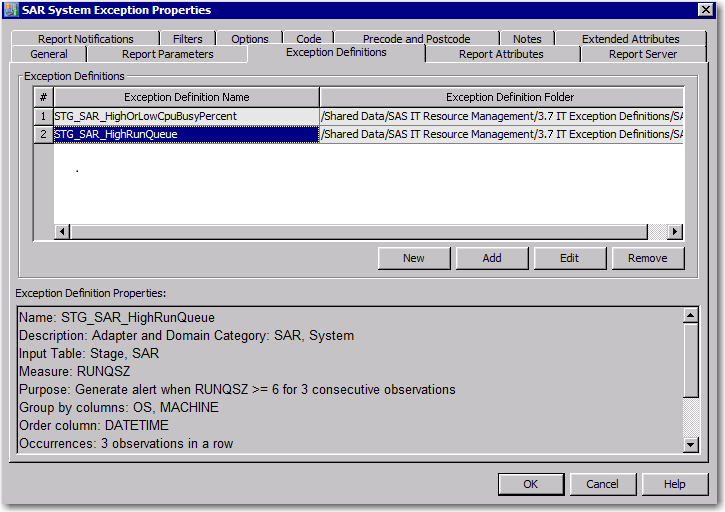
The Exception Definitions tab provides additional information about the exception definition that is selected in the Exception Definitions table. The lower part of the following display shows the contents of the Exception Definition Properties group box. These properties reflect the properties of the highlighted exception definition. -
-
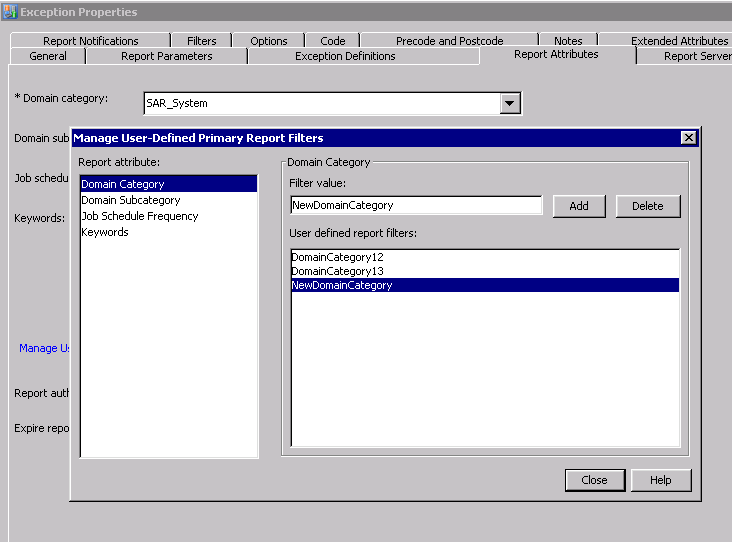
On the Report Attributes tab, you can specify values for fields that can be used to filter reports in ITRM Report Center. To specify the values, you can select an attribute from the drop-down list.TipIf you do not want to generate reports, you do not have to specify any fields on the Report Attributes tab.
Report Attributes of the Exception Definition PropertyNotesDomain categorySpecifies the adapter and domain category for the Exception transformation. For example, the valueDTPerfSentry_ServerDiskindicates that the Exception transformation corresponds to the Server Disk domain category of the DT Perf Sentry adapter. This value is a primary report filter that can be used when viewing reports in the Gallery workspace of ITRM Report Center.Use the down arrow to select a value for this field. This value is required.
Domain subcategory(Optional) Specifies the domain subcategory that corresponds to the domain category for the Exception transformation. This value is a primary filter that can be used when viewing report in the Gallery workspace of ITRM Report Center.Use the down arrow
 to select a value for this field.
Note: Although this property is optional, specifying this property can facilitate viewing the associated report in ITRM Report Center.Job schedule frequency(Optional) Specifies when the corresponding reports for the Exception transformation should be scheduled to run. This value is a primary filter that can be used when viewing reports in the Gallery workspace of ITRM Report Center.Use the down arrow
 to select a value for this field.
Note: Although this property is optional, specifying this property is recommended because it facilitates viewing the associated report in ITRM Report Center.Note: This value is a primary report filter in metadata only. It does not affect the schedule for the corresponding report job. However, for best results, you should schedule the corresponding exception analysis job to run according to this filter. For example, if the schedule frequency is Weekly, then schedule the job to run weekly.Keywords(Optional) Specifies the keywords that the Exception transformation assigns to the reports that it creates. Keywords are primary filters that can be used when viewing reports in the Gallery workspace of ITRM Report Center.Use the right arrow
 to select keywords from the list of Keywords
Available values.
For best results, include the keyword Excp in your selections.Note: Although this property is optional, specifying this property is recommended because it facilitates viewing the associated report in ITRM Report Center.Report authorSpecifies the user ID of the person who created the Exception transformation. If the value is
to select keywords from the list of Keywords
Available values.
For best results, include the keyword Excp in your selections.Note: Although this property is optional, specifying this property is recommended because it facilitates viewing the associated report in ITRM Report Center.Report authorSpecifies the user ID of the person who created the Exception transformation. If the value isSupplied, then the exception definition was supplied by SAS IT Resource Management 3.7. Do not use double quotation marks in this field.This value is automatically specified. However, you can modify it.Note: Although this property is optional, specifying this property is recommended because it facilitates viewing the associated report in ITRM Report Center.Expire reports after (Days)Specifies the number of days that the corresponding reports are stored in the SAS Content Server before they expire. If a report expires and its exception job is run again, the expired report is deleted and replaced with the new report.This value is required. The default value of this property is1.When planning to filter and subset your reports, you might need to create domain categories, domain subcategories, job schedule frequencies, and keyword values that are unique to your business. To manage your own unique primary report filter values, click Manage User-Defined Primary Report Filters on the Report Attributes tab. The Manage User-Defined Primary Report Filters window appears. On this window, you can add or delete primary report filters that are user-defined. To do so, perform these steps:-
To add a new filter, select a report attribute and then enter the new filter value in the Filter value field in the right pane of the window. This field accepts only letters, numbers, hyphens, and underscores.Click Add to create the filter value.Note: Misspellings, typing errors, and differences in capitalization standards can create inconsistencies in this field. An error in the value can make the associated reports difficult to find when using ITRM Report Center to filter your reports. Inconsistencies can also lead to multiple filter values that mean the same thing but are listed separately.
Note: You can use the user-defined primary report filter values later in ITRM Report Center when viewing and searching for reports. Because user-defined primary report filters are stored on the metadata server, they can be shared with other clients that might want to filter reports in a similar way. -
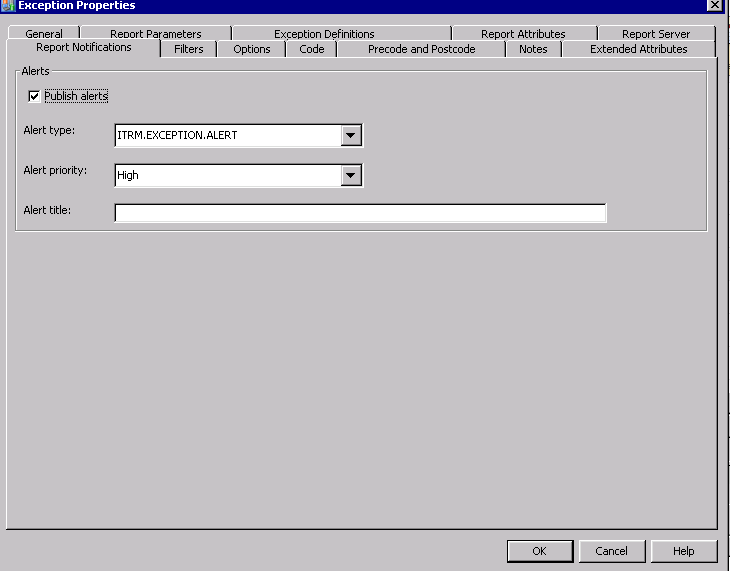
The Notifications tab enables you to specify whether to publish alerts on the Home workspace of ITRM Report Center when an exception is discovered.To publish alerts, perform the following steps:
-
To publish alerts, check the Publish alerts box. By default, this box is not checked.Note: Alerts are displayed in a user’s Home workspace of ITRM Report Center if the user subscribed to receive them.
-
Specify the type of alerts that should be published. Select a value for the Alert type field from the drop-down list. A value in this field is required if the Publish alerts box is checked.Note: To revise the list of alert types, see “Update the List of Available Alerts” in Chapter 10, “Administrative Tasks,” in the SAS IT Resource Management 3.7: Reporting Guide.
-
Specify the alerts that have priority to be published. Select a value for the Alert priority from the drop-down list of priorities. A value in this field is required if the Publish alerts box is checked.
-
Enter up to 60 characters in the Alert title field. A value in this field is required if the Publish alerts box is checked.
Note: If reports are generated, then the alert also contains a URL to the overall exception report that is generated at this time by this job execution. -
CAUTION:
If you
made any changes to any of the properties or exception definitions
in the Exception transformation, redeploy the job that contains the
transformation.
Delete an Exception Transformation
Edit an Exception Transformation
Note: In Edit mode, you cannot
change the expression type of an exception definition.
To edit an existing
Exception transformation, perform the following steps:
-
Right-click the Exception transformation in the process flow diagram and select Properties. A Properties dialog box is displayed and enables you to modify the various parameters that are specified for the Exception transformation and the code that it generates.For more information about the specific parameters that are available for configuration in the Exception transformation, see Specify the Properties of the Exception Transformation.
Copyright © SAS Institute Inc. All rights reserved.
