Server Tier Post-migration Tasks
z/OS Burst Set and Optimizer Library Considerations
If the burst set library is pre-assigned in z/OS, attempting
to distribute using an existing burst set in that library generates
a message that the table could not be read (or a blank list) when
you select Recipients and Distribution Rules.
Attempting to create a new burst set while the library is pre-assigned
generates exceptions, similar to the following:
An error
                     occurred in processing the page request. createBurstSet() (com.sas.report.output.management.OutputManagementException:
                     The physical data is not available [ java.sql.SQLException: Unable
                     to execute for an undetermined reason. SQL passthru expression contained
                     these errors: ERROR: Libname WRSDIST is not assigned.
[ java.sql.SQLException:
SQL passthru expression contained these errors: ERROR: Libname WRSDIST
is not assigned. ] ] ) SQL passthru expression contained these errors:
ERROR: Libname WRSDIST is not assigned.Update SAS Server Configuration Files
As mentioned earlier, certain SAS Application
Server configuration files such as autoexec files (appserver_autoexec.sas)
and sasv9.cfg files are not migrated. At some point, you might need
to tune these files with configuration settings (such as Java options)
appropriate for your site. For more information, see Optional Setup Tasks.
Although the command
to start SAS and any settings in config or autoexec files are not
migrated, load balancing configuration and metadata information for
SAS servers is migrated. (Load balancing here should not be confused
with server clustering-the management of multiple Web application
servers on the SAS middle tier.) The same server load-balancing algorithms
that were present in SAS 9.1.3 are available and still used. The new
load-balancing algorithms are for servers or configurations that did
not exist in SAS 9.1.3. For more information about the load balancing
algorithms available in SAS 9.3, see Understanding the Load-Balancing Algorithms in SAS Intelligence Platform: Application Server Administration Guide.
Migrating Content Stored outside the SAS Configuration Directory
About Migrating Content Stored outside the SAS Configuration Directory
SAS content stored
outside the configuration directory remains in its current location.
Examples of SAS content include the following:
-
external files. See Migrate External SAS Data Integration Studio Content.
-
libraries. See Migrate Libraries Stored outside the SAS Configuration Directory.
-
stored processes. See Migrate Stored Processes Stored outside the SAS Configuration Directory.
Note:
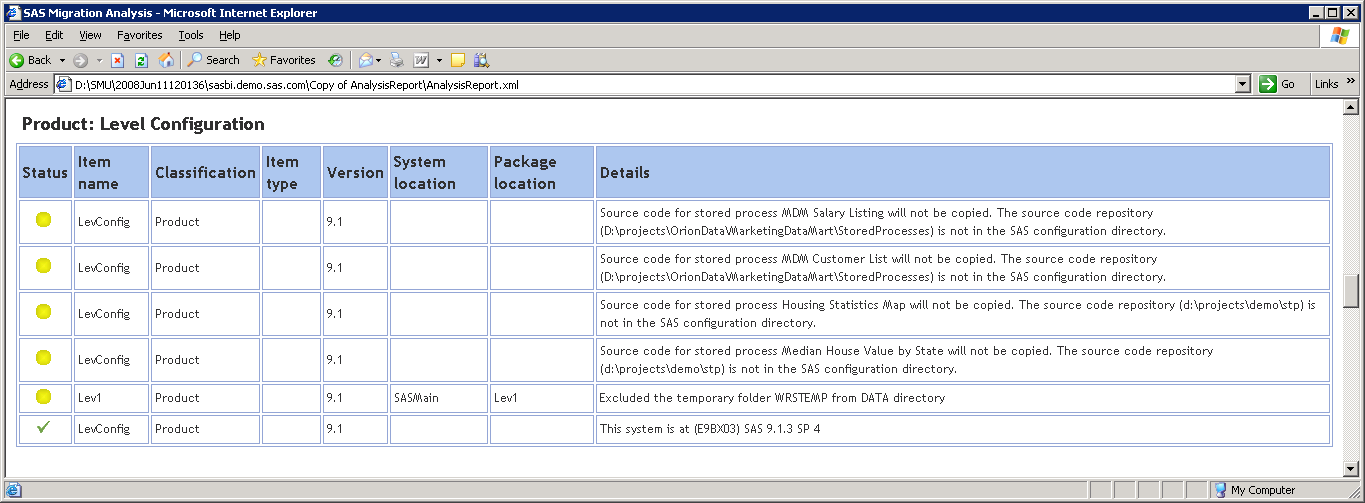
In the design phase
of your migration, the migration analysis report identified any SAS
content that would require manual steps to migrate. (These steps are
listed in the “Product: Level Configuration” section
of the analysis report.)
/levconfig/datapackagesuffix.
The following migration
analysis report identifies some SAS stored processes that would not
be migrated to SAS 9.3, because these stored processes reside outside
of the SAS configuration directory:
The SAS migration tools
do not support automatically migrating this content and updating the
SAS 9.3 metadata. If you want to maintain two separate repositories
for your SAS content outside of the configuration directory, then
you must manually move this content and update your SAS 9.3 metadata.
CAUTION:
Regardless
of whether you choose to migrate SAS content that is stored outside
of the configuration directory, we strongly recommend that you back
up this content before proceeding.
Even though the SAS
automated migration tools migrate SAS tables that reside under the
SAS configuration directory and in
a
SASEnvironment or Data folder,
the best practice is to store your SAS tables outside the SAS configuration
directory. Migrating large amounts of data encountered under the configuration
directory slows migration utility performance.
Where your tables reside—and
how the libraries reference those tables—determine whether
you must manually update paths in your libraries. Rules for how the
automated migration tools update paths to data in SAS libraries are
as follows:
Migrate External SAS Data Integration Studio Content
The SAS Migration Utility is able to migrate all your
SAS Data Integration Studio 3.4 jobs and job flows because these are
objects that are stored in metadata. However, if any of your jobs
or job flows point to files that reside outside of the SAS configuration
directory, (such as source code files), then you have to manually
migrate these external files.
For more information,
see Migrate Content Stored outside the SAS Configuration Directory in SAS 9.3 Guide to Software Updates.
Migrate Libraries Stored outside the SAS Configuration Directory
The
SAS 9.3 migration tools do not support automatically migrating content
that is stored outside the SAS configuration directory. (This is true,
even when the target machine running SAS 9.3 is the same as the current
SAS machine.) For more information, see the What Can Be Migrated?.
If you want to maintain
two separate repositories for your SAS libraries outside of the configuration
directory, then you must manually move these libraries and update
your SAS 9.3 metadata.
CAUTION:
If you
do not update the file and library paths to a new SAS 9.3 location,
future changes made with SAS 9.3 will be written to the current SAS
libraries.
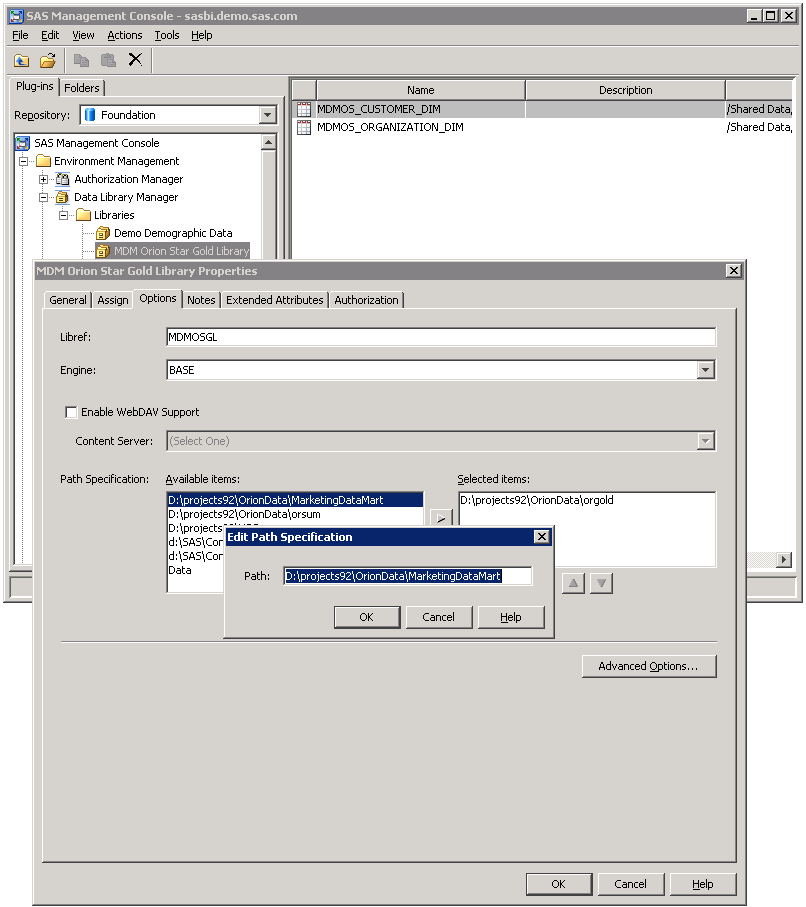
To manually migrate
SAS libraries that reside outside the SAS 9.3 configuration directory,
follow these steps:
Migrate Stored Processes Stored outside the SAS Configuration Directory
The
SAS migration tools do not support automatically migrating content
that is stored outside the SAS configuration directory. (However,
the migration utility does package any .sas files pointed to by metadata
outside of the current SAS configuration directory.) If you want to
maintain two separate repositories for your SAS stored processes outside
of the configuration directory, then you must manually move these
stored processes and update your SAS 9.3 metadata.
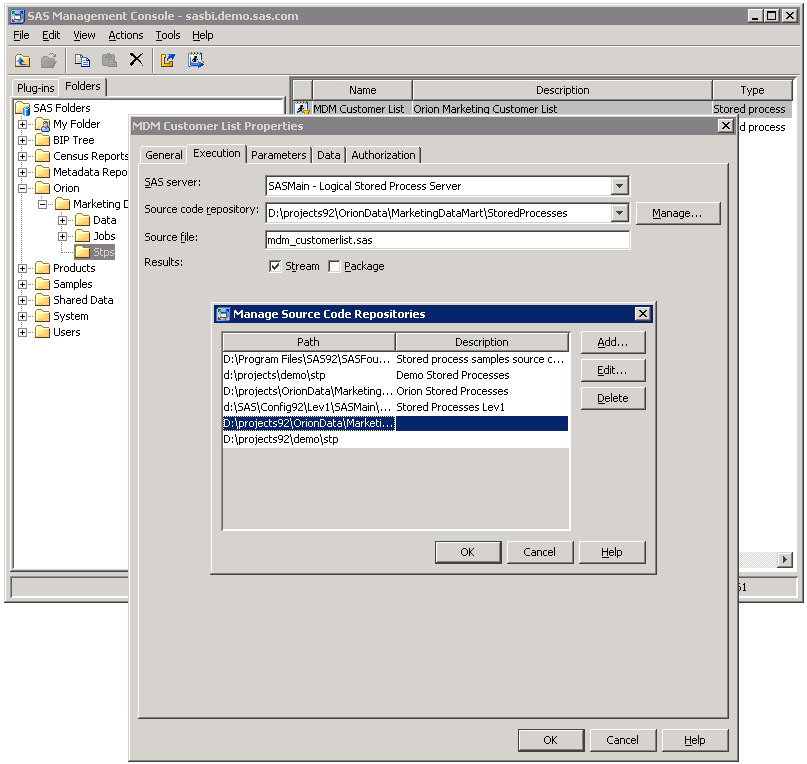
To manually migrate
SAS stored processes that reside outside the SAS 9.3 configuration
directory, follow these steps:
Update Stored Process Archive Package Paths
The SAS
automated migration tools update stored process archive package paths
that point to locations inside the SAS configuration directory.
The SAS Migration Utility
cannot update any paths that reside outside of the configuration directory.
The migration utility flags such problematic paths in its migration
analysis report. In SAS 9.3, stored process archive package paths
are no longer modeled by metadata but are stored in prompt metadata.
Therefore, after the SAS Deployment Wizard finishes executing, you
will need to manually update the _ARCHIVE_PATH prompt for all affected
stored processes using SAS Management Console. For more information,
see Developing Stored Processes with Package Results in SAS Stored Processes: Developer's Guide and the prompt Help in SAS Management Console online Help.
Update Stored Process WebDAV Paths
For SAS 9.1.3,
if you published stored process result packages to a Xythos WebDAV
server, then the SAS automated migration tools are able to automatically
migrate these paths to the new SAS 9.3 WebDAV server, known as the
SAS Content Server. In SAS 9.1.3, if you used a WebDAV server other
than Xythos, (such as Apache HTTP), then you must manually update
these WebDAV paths.
In its migration analysis
report. the SAS Migration Utility flags all stored process WebDAV
publish paths that are not for Xythos. In SAS 9.2 and later, stored
process WebDAV paths are no longer modeled by metadata but are stored
in prompt metadata. Therefore, using SAS Management Console, you will
need to update the _COLLECTION_URL prompt for all affected stored
processes. For more information, see Developing Stored Processes with Package Results in SAS Stored Processes: Developer's Guide and the prompt Help in SAS Management Console online Help.
About Migrated OLAP Cubes
For SAS 9.1.3 cubes,
the deployment wizard creates SAS code files that you can run to rebuild
your SAS 9.1.3 cubes to run in SAS 9.3. The deployment wizard writes
these files to the SAS-configuration-directory
\Levn\SASMain\OLAPServer\OLAP directory.
You can run these SAS files to rebuild your cubes without having to
specify a new SAS 9.3 path for your cube repository.
In SAS 9.3, SAS 9.2
cube files maintain their physical status in metadata. The OLAP procedure
does not overwrite a cube repository if it finds files already present.
Instead, PROC OLAP creates a new folder with a unique name for the
new cube. For this reason, OLAP cubes that were built in SAS 9.2 can
be used in SAS 9.3 without rebuilding them, although some situations
might require action on your part:
-
If there is no change to the path, then you can rebuild the cube by first submitting PROC OLAP with the DELETE_PHYSICAL option to ensure all physical files are removed. Then, you re-submit PROC OLAP to create the physical files from the existing metadata definition. If the physical files are not accessible, the first PROC OLAP step might generate an error or warning, but ignore this and the cube can be built.
Manually Convert Data Explorations to Reports
In the November 2010
release of SAS 9.2, (which contains the release of SAS Web Report
Studio 4.3), data explorations are now maintained as reports. When
you upgrade or migrate, the SAS deployment tools automatically convert
each bookmark in the data exploration into a report that you can view
and edit using SAS Web Report Studio 4.3.
Note: If the conversion for any
data exploration fails, you will receive a warning in the Instructions.html
file. Because data explorations can have dependencies on OLAP cubes,
make sure the cubes have been built after you migrate and before you
run the scripts described later in this topic. For more information,
see About Migrated OLAP Cubes.
-
Read Before You Convert in SAS 9.3 Guide to Software Updates.
-
Note: Before execution, you will need to edit the script to replace the SPECIFY_ADMIN_PASSWORD_HERE and SPECIFY_TRUSTED_PASSWORD_HERE values with the correct passwords before executing it. It is strongly recommended that you specify a value encoded by SAS for the password.For more information, such as where the script is located and where its log file is written, see Update Content Manually for the SAS Content Server in SAS Intelligence Platform: Middle-Tier Administration Guide.
-
Manually run the script (
manualAdjustUrls-OrderNumber.bat/.sh) to adjust URLs and references to metadata that has moved either during migration or an upgrade.For more information, such as where the script is located and where its log file is written, see Adjust Directive URLs Manually in SAS Intelligence Platform: Middle-Tier Administration Guide. -
Validate that the conversion script was successful by running SAS Web Report Studio and loading one of the newly created reports.For more information, see the SAS Web Report Studio: User's Guide.
After the conversion
to bookmarks, the newly created reports follow this naming convention: data-exploration-name_bookmark-name-report.srx
If the bookmark name
contains spaces, the resulting report name contains no spaces. For
example, assume you have a data exploration named Sales Forecast that
contains two bookmarks: Region A and Region B. The resulting report
filenames after the upgrade or migration are:
Sales
                     Forecast_RegionA-report.srx
and Sales
Forecast_RegionB-report.srx, respectively.
Note: If the resulting report name
is longer than 60 characters, then the portion of the name that precedes
-report.srx is
truncated.
If the data exploration
contains conditional highlighting that includes an image, the image
is removed from the conditional highlight. If a collection portlet
in the SAS Information Delivery Portal pages contains links to the
data explorations, these links are removed and replaced with links
to the newly created reports. The converted links become visible
to users when they refresh the collection or reopen the portal. For
more information, see Before You Convert in SAS 9.3 Guide to Software Updates.
Redeploy Jobs for Scheduling
All
jobs that were deployed for scheduling or were deployed as stored
processes should be redeployed in the SAS 9.3 environment. From the
SAS Data Integration Studio desktop, you can select Tools Redeploy Jobs for Scheduling or ToolsRedeploy Jobs to Stored Processes.
For more information
about migrated jobs, see Updates to Jobs and Transformations during Migration in SAS 9.3 Guide to Software Updates.
Verify Migrated Jobs with Data Quality Transformations
If
jobs that include the Create Match Code transformation do not run
successfully after migration, verify that the appropriate Quality
Knowledge Base (QKB) location value (DQSETUPLOC value), is specified
on the global options window for SAS Data Integration Studio.
For more information,
see SAS Data Integration Studio in SAS 9.3 Guide to Software Updates.
Reschedule Flows
After
migrating to SAS 9.3, owners of scheduled flows will need to submit
them to the scheduling server used by the SAS 9.3 system. To reschedule
flows, follow these steps:
-
Determine the user IDs associated with each SAS 9.1.3 flow. (Locate the checklist you completed earlier in Apply Any Required SAS Maintenance.)
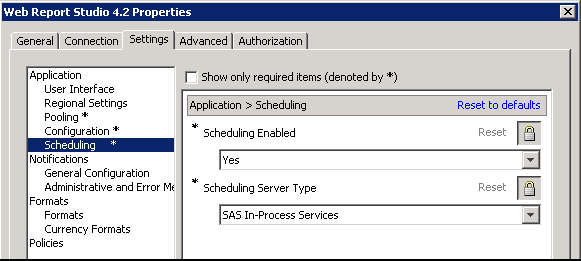
-
If you have migrated any SAS Web applications, such as SAS Web Report Studio, verify that scheduling is enabled (Configuration ManagerWeb Report Studio 4.3PropertiesSettingsApplicationScheduling).
Note: For more information, see Using Configuration Manager in SAS Intelligence Platform: Middle-Tier Administration Guide.
Modify Migrated Information Maps to Enable SAS Web Report Studio Optimization
When a measure data
item that meets the following criteria is migrated from SAS 9.1.3
or SAS 9.2 to SAS 9.3, it is not automatically optimized for SAS Web
Report Studio in the same way that an identical, new SAS 9.3 data
item is optimized.
To optimize these migrated
data items for SAS Web Report Studio, you must re-create them in a
SAS 9.3 environment. Consider the following example, which uses SAS
Information Map Studio 4.2 to re-create some migrated data items:
-
When you re-create one of these data items, specify its aggregate function as a property of the data item (that is, follow the same basic steps that you followed when you created the data item in SAS 9.1.3). Do not define the aggregate function in the expression of the data item.For example, data item DataItem1 was created in SAS Information Map Studio 3.1 and its aggregate function, SUM(argument), was specified on the Classifications/Formats tab. In SAS Information Map Studio 4.2, re-create this data item and select SUM(argument) on the Classifications, Aggregations, Formats tab.
Note: Neither new nor migrated
measure data items are optimized for SAS Web Report Studio if the
aggregate functions of the data items are defined in the data item
expressions. If one of these data items is also referenced by the
expression of another data item, then you can optimize it if you can
change to specifying its aggregate function as a property of the data
item.
For more information,
see SAS Information Map Studio 4.3 online Help and the Base SAS Guide to Information Maps.
Post-migration Tasks for DataFlux Data Management Server (SAS 9.3 to SAS 9.3)
When performing a SAS
9.3 to SAS 9.3 migration, complete these post-migration steps to finish
your migration of DataFlux Data Management Server:
-
Using a text editor, do the following to dmserver.cfg:dmserver.cfg resides in the SAS-install-dir
-
Update the SOAP port to the port number for the Data Management Server that was specified for it on the SAS Deployment Wizard Port Remap page.
/dmserverdirectory (for example,/var/sashome/dmserver). -
-
Jobs that include Data Quality transformations that reference the DataFlux Data Management Server require the new target server definition. Therefore, open each job and select the new server definition in the Data Quality transformation.For more information, see Working with Data Quality Transformations in SAS Data Integration Studio: User's Guide.