

|
Implementation & Administration Guide 1.1 |


|
To expand the functionality of the SAS Information Delivery Portal, you can develop your own custom Java Server Pages (JSPs) that take advantage of the portal's content, metadata, and security services. These services are available through the portal's Application Programming Interfaces (APIs). Using these APIs, you can implement robust data analysis and reporting features with minimal programming effort.
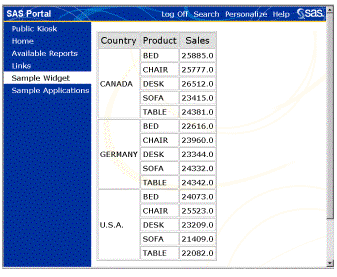
Custom JSPs can be deployed in the portal either as widgets or as applications. A widget (also referred to as a portlet) is a graphical user interface (GUI) component that is produced by a JSP. A widget can be hosted within a portal window or within a custom application. An application is a Web application deployed in the Portal that is composed of JSPs and other resources. Applications are launched from within the portal, and they run outside of the portal container. In either scenario, the portal framework provides a secure and convenient platform on which to deploy custom-developed JSPs and make them available to the appropriate users.
Both applications and widgets leverage the portal's APIs for content, metadata, and security services. However, they differ from one another in several ways, as described in the following table:
| A widget... | An application... |
| ...generates an HTML fragment that is hosted by the portal (or by a custom application that is launched from the portal). | ...is a Web application that is launched from the portal. |
| ...is a generic presentation component driven by parameters. | ...can perform any type of function, and is sometimes driven by parameters. |
| ...is subject to the navigation features of the portal (or other host application). | ...has its own navigation features. |
...appears within a window on the portal
(or within the host application's user interface). |
...is launched in a separate browser window. |
Note: If an application does not use the services of the portal, you should implement it as a link from the portal, not as an application.
To design and develop a custom widget or application for deployment in the portal, you should have a working knowledge of JSPs, Java servlets, and the Java programming language. Follow these steps to develop a custom JSP (widget or application) and add it to the portal:
Install the widget or application and its associated files in the portal web application.
Use the Personalize tool to add the widget or application to the portal's enterprise directory.
Define access rules for the widget or application and for the data sources.
Use the Personalize tool to make the widget or application appear as a selection on the portal.
As you design a widget or application to be implemented in the SAS Information Delivery Portal, you should consider the following questions:
What parameters will be required? The portal provides a mechanism for passing any type of parameter, or multiple parameters, to a widget or application. Through the use of parameters, you can develop a single generic widget or application and use it for multiple purposes. For example, a parameter could specify which data source an application is to access; or it could specify the type of graph that is to be surfaced as a widget. To implement a parameter, you must define it using the Personalization feature, as described in step 4
What data source will be used? Determine which SAS table, MDDB, or other data source will provide input for the application or widget. So that you can leverage the portal's content and security features, be sure to place metadata for the data source on the portal's enterprise directory, as described in step 5. You can then use methods from the Enterprise Directory SDK to access this data.
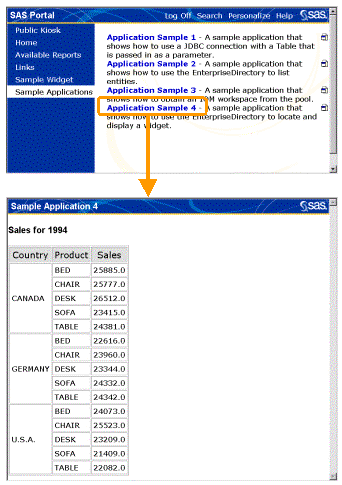
What components can be shared as widgets? When developing an application, you may want to implement some features by developing a re-usable widget to be displayed inside this and other applications. For an example of application code that locates and displays a widget, see Application Sample 4.
Does any state need to be persisted between sessions? Determine if any state information from application sessions will need to be persisted, or retained, after the session is closed. If so, the application can use methods from the Enterprise Directory SDK to add new objects to the portal's enterprise directory or to update existing objects.
To design and develop a custom widget or application for deployment in the portal, you should have a working knowledge of JSPs, Java servlets, and the Java programming language. If you wish, you can develop the widget or application using the SAS webAF development platform. The webAF software is part of SAS AppDev Studio, which is provided in the SAS Information Delivery Portal package.
To assist you in the development process, several sample applications and widgets are provided with the SAS Information Delivery Portal. You can view the source code for these samples, along with brief explanatory comments, by accessing the following links:
When coding an application or a widget for deployment in the portal, it is important to follow these basic guidelines:
Refer to the Application Programming Interfaces (API) Reference for detailed documentation of the Java classes that make up the Enterprise Directory System Development Kit (SDK) and Portal SDK. To ensure that your applications and widgets are tightly coupled with the portal, you should make use of the services provided by these classes whenever possible. The convenience methods in the LogicBean class, together with the name/value pairs defined in the ModelId class, are especially useful for accessing portal data. You can augment these classes with additional data as needed to support your application,
As an authorization check, include code that ensures that the user is accessing the application or widget from inside the portal, rather than from an external application. Operation of the application or widget should be halted if the user did not obtain access from within the portal. An example of the code for performing this authorization is provided in each of the sample applications.
When performing SAS functions or accessing SAS data, be sure that your code uses the SAS workspace manager to obtain a workspace on the SAS server. For an example of this code, see Application Sample 3: Obtain a SAS Workspace. For additional information, refer to Using the Java Workspace Factory on the SAS Integration Technologies Web site.
To install the widget or application in the portal Web application, follow these steps:
Move or copy the JSP that invokes the application or widget, along with its supporting resource files, to the appropriate path in the portal's setup directory. This path must be in or under the directory that contains the JSP files for the portal application. The four sample applications reside in the path /jsp/html/samples. For effective management of the portal, you should create a separate directory structure, such as /jsp/custom, for your custom widgets and applications.
If the application or widget requires Java classes, place them in the path Portal/WEB-INF/classes. The subdirectory name should match the name of the package that contains the classes.
If the application or widget requires JAR files, place them in the path Portal/WEB-INF/lib.
Run the PortalConfigure program, and deploy the resulting WAR file in the servlet container. For detailed installation instructions, see the readme file that accompanies the portal package.
Use the portal's Personalize tool to add the application or widget to the portal. This tool provides a graphical user interface for entering the metadata for the application or widget. The metadata includes the path and file name of the main JSP, as well as information about parameters and their default values. For detailed instructions, refer to Adding and Editing Personal Applications, Adding and Editing Role-Based Applications, Adding and Editing Personal Widgets, or Adding and Editing Role-Based Widgets in the portal User's Guide.
If your data sources have already been defined in the enterprise directory, you can skip this step.
To enable the widget or application to leverage the portal's content and security features, you must add metadata to the portal's enterprise directory to define each SAS table, MDDB, or other data source that will provide input. The SAS servers, spawners, and logins associated with the data sources must also be defined. You can then use methods from the Enterprise Directory SDK to access these resources.
To create metadata for SAS data sources, you can use the Integration Technologies Administrator application. For details, refer to the SAS Integration Technologies Administrator page on the SAS Integration Technologies Web site. For an overview of metadata requirements for the portal, refer to Adding SAS Content and related sections in this manual.
Note: Although the metadata for application and widget data sources must be added to the enterprise directory, it is not necessary for these data sources to be surfaced on portal lists.
Take any necessary steps to control access to the application or widget and its data sources. For general information about access control, refer to Controlling Access to Portal Content.
Depending on who has access permission to the application or widget, you can use one of several methods to make it appear as a selection on the portal:
The public content administrator can use the Personalize feature to add an application to a public list, or to create a public window that is defined by a widget. When the administrator performs one of these functions, the portal displays a list box containing all applications or widgets in the enterprise directory that are accessible to all portal users. From the list box, the public content administrator selects the desired applications or the desired widget.
Group owners can use the Personalize feature to add an application to a role-based list, or to create a role-based window that is defined by a widget. When the group owner performs one of these functions, the portal displays a list box containing all applications or widgets in the enterprise directory that the group is authorized to access. From the list box, the group owner selects the desired applications or the desired widget.
Individual users can use the Personalize feature to add an application to a personal list, or to create a personal window that is defined by a widget. When the user performs one of these functions, the portal displays a list box containing all applications or widgets in the enterprise directory that the user is authorized to access. From the list box, the user selects the desired applications or the desired widget.

|
Implementation & Administration Guide 1.1 |


|