HTML Data Set Formatter
Formatting a Data Set Interactively
The Data Set Formatter makes it easy for you to format and save output from a SAS data set into an HTML file. This following instructions describe how to invoke the Data Set Formatter and prepare results interactively. To use the Data Set Formatter in interactive mode, you must be running Release 6.12 of SAS software.
This page describes the following topics:
- Invoking the Data Set Formatter Window
- Specifying General Settings
- Selecting Variables
- Selecting ID Variables
- Selecting SUM Variables
- Selecting BY Variables
- Push Buttons.
Rather than work interactively, you can enter a Data Set Formatter macro call directly into your SAS program. For information, see Formatting a Data Set in Batch Mode.
Invoking the Data Set Formatter Window
To invoke the Data Set Formatter window, submit the following code in the Program Editor:
%DS2HTM (RUNMODE=I);
The General panel of the HTML Data Set Formatter window appears.
Note: Do not attempt to use macro variables, macro invocations, or macro
functions (including %NRSTR) in any of these fields, as they will not resolve.
You can use them only when running this tool in batch mode.
In addition to RUNMODE=I, you can include the following
arguments when you invoke the HTML Data Set Formatter window. Many of
the arguments in the following table are not available in the HTML Data
Set Formatter window. The only way to specify the information
represented by these arguments is to include them with your macro
invocation. If you specify an argument that is available in the window,
the window will reflect the argument value that you supplied with the
macro invocation. See the syntax reference for
information about how to specify each of these arguments.
htmlfile |
saspower |
tranlist |
cclass |
sshref1-sshref5 |
openmode |
prtpower |
charset |
clclass |
sstype1-sstype5 |
doctype |
prtfoot |
where |
fclass |
ssrel1-ssrel5 |
pagepart |
prttitle |
caption |
oclass |
ssrev1-ssrev5 |
brtitle |
by |
rowssfmt |
sepclass |
sstitle1-sstitle5 |
proploc |
var |
rowssvar |
spclass |
ssmedia1-ssmedia5 |
data |
id |
bclass |
tclass |
ssfile1-ssfile5 |
encode |
sum |
bdclass |
tbclass |
ssfref1-ssfref5 |
Specifying General Settings
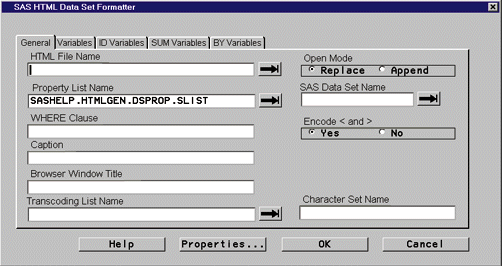
After invoking the Data Set Formatter window, the General panel appears. Use the General panel to set options that affect the processing of the data and the entire HTML page. If you are viewing another panel, select the General tab to return to the General panel.
Enter information in the following fields:
HTML File Name: Specify a filename to which your HTML-formatted output will be written. Type the fully-qualified path and filename or select the arrow button to the right of the field to browse your directory structure.
Property List Name: The name of the property list that governs the format of your output appears here. SASHELP.HTMLGEN.DSPROP.SLIST is the default property list. To use another property list, type the complete four-level name or click on the arrow button to choose from a list of SAS SLIST entries.
You can change the formatting directives by creating a different property list. For details, see Customizing Properties.
WHERE Clause: Specify a subset of the data from the data set. This becomes selection criteria for your data set. This must be a valid
WHEREclause.If you are using special characters (for example, % , & ) in the
WHEREfield or theCAPTIONfield (described next), include%NRSTRin order to process these characters correctly. For details, see the Macro Syntax Reference section.Caption: Enter text that you want to appear as the table caption. See the Note for the
WHEREclause for information about handling special characters.Browser Window Title: Enter the text you want to appear as the title in the browser window title bar.
Transcoding List Name: Specify the name of the list that you want to use to transcode your data from one encoding to another. This field is optional. However, if you provide a transcoding list name, you may also need to provide a Character Set Name.
You can use a list that we provide or one that you create using MAKETL macro. For more information, see Character Transcoding and National Language Support.
Open Mode: To append new data to an existing HTML file, select Append. (If you select Append, you must specify an existing file in the HTML File Name field.) To replace existing data, do nothing as Replace is the default.
SAS Data Set Name: Enter the name of the data set that you want to format.
Encode: To have the Data Set Formatter check for the characters "<" and ">" and encode them as Numeric Character References (NCR), select Yes. This will display the actual brackets in the browser. By default, the brackets will be encoded. To have the Data Set Formatter pass the brackets as is to the browser (where the browser will attempt to act on them as an HTML-formatting instruction), select No.
Character Set Name: Enter the name of the character set should appear in the <META> tag in your HTML file. Character set names vary based on the browser you are using. Therefore, the Formatting Tools do not perform any error checking on this value.
For more information, see Specifying the Character Set.
To change the properties that govern how the data appears in your HTML table, select Properties. You can select the Properties button from any panel on the HTML Data Set Formatter window. For information about formatting data using the property list, see Customizing Properties.
Use the Variables, ID Variables, SUM Variables, or BY Variables panels to order and select the variables that should appear in the formatted table for this data set. Each of these panels is described in the following sections. This step is optional. If you skip this step, the data is processed in the same way it is processed using PROC PRINT.
To format the data set and save the results to an HTML file, select OK from any panel. The Data Set Formatter retrieves the data from the data set, adds the HTML tags, and writes the HTML-formatted data to the file you specified.
You can view your HTML-formatted table by entering the URL (including the HTML filename) in the browser window.
Selecting Variables
Use the Variables panel to specify the subset or order of variables to be included in the HTML page. If you want all variables to appear in the output in the order that they appear in the data set, you do not need to make any selections on this panel.
To access the Variables panel, select the Variables tab from the HTML Data Set Formatter window.
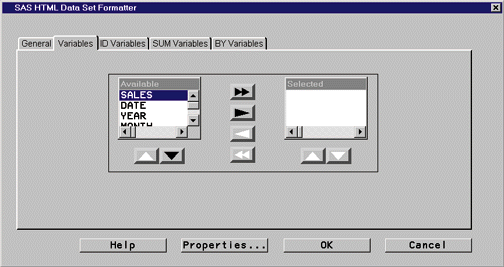
Tasks you can perform from the Variables panel:
Selecting the variables that you want to display in the HTML table.
If you want to display all of the variables, do nothing. If you want to subset the variables that are displayed, do one of the following:
- Select a variable from the
Availablelist then select the single right arrow to move the variable name to theSelectedlist. Repeat the selection process until you have moved all the variables that you want displayed to theSelectedlist. - If you are including most of the variables, it may be faster to
move all the variables at once by selecting the double right arrow then
removing the few variables that you do not want. To remove a variable
from the
Selectedlist, select the variable name and select the single left arrow.
The variables appear in your HTML table in the same order they appear in the
Selectedlist.- Select a variable from the
- Ordering how the variables appear in the HTML table.
You can specify the order that the variables appear in the table by moving the appropriate variables to the Selected list and reordering them using the methods described below:
- To move an item down in a list, select the variable name then select the down arrow that appears below the list containing the selected item.
- To move an item up in a list, select the variable name then select the up arrow that appears below the list containing the selected item.
Selecting ID Variables
Use the ID Variables panel to specify which ID variables you want to appear in your HTML-formatted file. You can use ID variables as row labels. Using ID variables may be helpful if you want to distinguish certain variables from others. For example, you can use one color for ID variables and another for other variables.
To access the ID Variables panel, select the ID Variables tab from the HTML Data Set Formatter window. Select the ID variables using the selection methods described in Selecting Variables.
Selecting SUM Variables
Use the SUM Variables panel to specify which totals or sums you want to appear in your HTML-formatted file.
To access the SUM Variables panel, select the SUM Variables tab from the HTML Data Set Formatter window. Select the variable names that you want to sum using the selection methods described in Selecting Variables.
Selecting BY Variables
The BY Variables panel enables you to use BY-group processing when you are formatting data sets interactively. BY-group processing is new to the Data Set Formatter in Version 1.1.
To implement BY-group processing:
- Select the variables that you will use for BY-group processing using the selection methods described in Selecting Variables.
- Specify how you want the TITLE statements printed in your HTML file. Because the Data Set Formatter formats each BY group as a separate table, you have to indicate if you want the titles printed with each table or only once per data set. You can print the titles before all tables by selecting ALL for Title Printing. If you do not select ALL, the titles are printed before the first table only.
- Specify how you want the FOOTNOTE statements printed in your HTML file. Because the Data Set Formatter formats each BY group as a separate table, you have to indicate if you want the footnotes printed with each table or only once per data set. You can print the footnotes after all tables by selecting ALL for FOOTNOTE Printing. If you do not select ALL, footnotes are printed after the last table only.
Push Buttons
The HTML Data Set Formatter window includes the following push buttons. You can select any of these buttons regardless of the panel that is displayed. If you have omitted a required field, an error message appears at the top of the window, and the cursor is positioned in the appropriate entry field.
- Help
- The Help push button displays a window that provides the URL for the documentation that is located on the SAS Web site. If you have installed the Web Publishing Tools documentation package at your site, you might want to refer to your local copy of the documentation instead of returning to our Web site. However, the documentation provided on the SAS Web site might contain updated and enhanced information.
- Properties
- The Properties push button displays the HTML Data Set Formatter Properties window, which enables you to change the property settings. For more information, see Customizing Properties Interactively.
- OK
- Select the OK push button when you are ready to submit your selections on the HTML Data Set Formatter window and format the data set.
- Cancel
- Select the Cancel push button to exit this window without formatting the data set.