|
|
Publishing Framework
Once you specify the contents of the package
in the What to Publish tab,
you must use the Where to Publish tab to specify the transport to use for delivering the package
to the intended audience.
The delivery transport is considered the package destination.
Follow these steps:
-
In the Destination Type panel,
identify the transport that you want to use
to deliver the package.
-
E-mail
-
sends the package in an e-mail message to the specified recipients.
-
-
Message Queue
-
publishes the package to a message queue.
-
-
SAS Channel Subscribers
-
sends the package to the channel that you specify.
All users who are subscribed to that channel receive a copy.
-
-
Archive
-
sends the package to a storage location
to be archived and possibly retrieved later.
-
-
webDAV
-
sends the package to a WebDAV-compliant server for subsequent access.
-
-
In the recipients field,
specify who or what–such as e-mail recipients,
a message queue, or a SAS channel–receives the package.
The field label changes based on the delivery transport
that you select.
For example, E-mail Address(es),
Message Queue(s),
or SAS Channel).
The field does not appear
if you select Archive or WebDAV as the destination type.
Additional windows to collect more transport information
might also display, based on the delivery transport that you select.
-
Once you specify the destination information, select the
How to Publish tab.
-
You can send a package by e-mail
and identify the e-mail recipients in either of the following ways:
-
To specify the data set, you can make an entry
in the form library.member
in the Data Set Name field.
Alternatively, you can click the right arrow
to display the Select A Member window,
where you can browse for and select the appropriate data set. Click OK to return to the Where to Publish tab.
-
To identify the variable in the data set
that stores the e-mail address,
click the right arrow that is next
to the Variable field.
This displays the Select Table Variables window,
where you either select the variable name from a scroll list
or search for the variable in the list.
Select only one variable from the list.
You can also deselect the chosen variable from the selected list.
-
Optionally, specify SAS options to open the data set
for reading in the Options field found in the Select Table Variables window.
Specify options as a text string in the following form:
option1=value option2=value ...
For example:
pw='born2run' keep=empno
Surround only string values, such as a password,
with single quotation marks.
For a complete list of data set options,
refer to the SAS Data Set Options topic
in the SAS online documentation.
-
Once you specify data set options in the Select Table Variables window,
click OK to return
to the Where to Publish tab.
-
Once you specify the destination information,
you can specify other package properties in the
How to Publish tab.
-
You can send a package to a message queue
by entering the name of the message queue
in the To field
of the Where to Publish tab
in one of the following formats:
-
MSMQ://machineName\queueName
-
MQSERIES://queueManager:queueName
-
MQSERIES-C://queueManager:queueName
For multiple entries, separate each entry with a comma.
-
Once you specify the destination information,
you can specify other package properties in the
How to Publish tab.
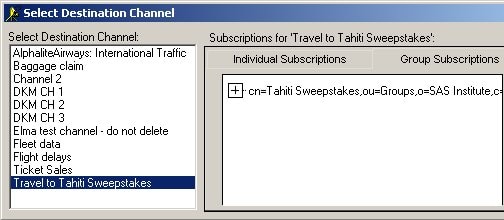
Clicking the Channel button
displays the Select Destination Channel window,
where you can select a single channel for your package.
If you have not already configured channels
before you attempt to publish a package to a channel,
you receive the following error message:
Insufficient LDAP Directory Server information supplied.
Please provide values for HOST, PORT, and BASE.
For details about setting these SAS macros in a SAS session, see
Configuring Channels.
-
To select a channel, position the cursor over the channel name
in the Select Destination Channel panel and left-click.
-
The channel expands to a list of subscribers
on the Individual Subscriptions tab
in the Subscriptions for channel-name window.
If the selected channel has a group
that is subscribed to it,
selecting the Group Subscriptions tab
displays the group subscription,
which is specified as a distinguished name (DN).
-
Once you select the channel that you want to publish to,
click OK to return
to the Where to Publish tab.
The name of the selected channel appears
in the SAS channel field.
The channel name is gray to indicate that the field is not available.
To change the channel name,
open the Select Destination Channel window
by clicking the Channel button
and select another channel.
-
Once you specify the channel destination,
you can specify other package properties in the
How to Publish tab.
-
You can publish a package as an archive
for storage on a host or server.
If the host or server is secure
and does not accept anonymous user access,
you must supply a user ID and password.
In that case, select the Publish Options tab to specify the user ID and password
for access to the remote host or server.
For details, see
Options
for Archives and Message Queues.
-
Once you specify the channel destination,
you can specify other package properties in the
How to Publish tab.
You can send a package to a WebDAV-compliant server
by using the Viewers and Publish Options tabs,
to display the WebDAV Properties.
-
Select the Publish Options tab to
Specify Properties
for Server Access and Package Storage.
-
Select the Viewers tab to
Render a Package View.
-
You must supply a user ID and password
in the HTTP User
and HTTP Password fields
only if the WebDAV-compliant server runs secure
and the Web server does not accept anonymous access.
Specifying a user ID and a password lets the publisher bind
to the Web server when publishing the package.
-
Specify the URL of the proxy server
in the HTTP Proxy URL field.
-
Identify the URL, in the form of a string,
into which the collection of package entries is placed.
Make an entry in either of these fields, but not both.
-
Collection URL
-
specifying a collection URL
lets package consumers easily recognize package names for retrieval.
An example of a collection URL is
http://www.host.com/AlphaliteAirways/revenue/quarter1.
The collection name is quarter1.
Caution: A disadvantage of specifying a collection URL is that subsequent publications
of the same package overwrite the original package.
-
Parent URL
-
specifying a parent URL generates a name
for the collection on the Web server
that is unique in the destination directory.
Specifying a parent URL also allows subsequent publications
of the same package under unique names.
A generated name is limited to eight characters,
the first character being an s.
An example of a parent URL directory location is
http://www.host.com/AlphaliteAirways/revenue. An example of a collection name that is automatically generated might be s9811239.
-
Optionally, enter one or more namespaces
in the Namespaces field
to uniquely define the contexts for the package
that is published to a server.
Here is an example of a namespace definition
that you might enter in the Namespaces field:
HOUSTON='http://www.AlphaliteAirways.com/revenue'
The namespace HOUSTON is stored with the URL on the server
to signify that the package contains data about revenue
that only the Houston office generated.
A namespace specification is case-sensitive,
with single quotation marks surrounding embedded values.
To specify multiple namespaces,
separate each namespace definition with a space.
Storing a namespace with a package on a server
lets developers write retrieval applications
to filter package data that meets specific criteria.
For details about using namespaces in a filter, see
Specifying Name/Value Pairs.
You can use the Viewers tab
to specify a viewer.
A viewer file is a template that contains formatting directives
for rendering a specific view of the published package.
For complete details about viewers, see
Viewer Processing.
-
Click the appropriate button to specify the location
of the viewer either as a physical filename
or a SAS fileref.
Here are some examples:
by name (filename)                 by reference (fileref)

c:\Public\flights-viewtemplate     viewtemplate
-
Specify the name of the viewer file as a character string.
By default, SAS Publisher stores the rendered view in the root collection
of the published package as index.html.
You can use the arrow buttons to the right
of the Viewer field
to browse directories or select from previously defined locations.
-
Specify the name of the rendered target view
in the Target Viewer field.
The specified target viewer name overrides the default name,
which is index.html.
-
Identify the mime type of the target view
in the Target Viewer Mimetype field.
The target viewer mime type overrides the default viewer mime type,
which is automatically inferred from the viewer file.
Typical MIME types are HTML (.htm) and plain text (.txt) files.
If this field remains blank,
SAS Publisher uses the viewer filename extension
to locate the MIME type in the appropriate registry.
Windows hosts use the Windows Registry,
while all other host types use the SAS Registry.
Advanced options are available on the Publish Options tab
for archives and message queues under the following conditions:
-
You selected an Archive destination
in the Where to Publish tab.
-
You selected a Message Queue destination
in the Where to Publish tab.
-
Decide whether FTP or HTTP protocol is appropriate for the host
or server to which the transport will deliver the package.
Then supply an appropriate user ID and password.
-
You must supply a user ID that grants access
to a secure remote host or server
where the package is to be delivered only if the host
or server does not accept anonymous user access.
-
If you specify a user ID, you must also specify a password.
-
If you use HTTP protocol, then specify the URL of the proxy server
in the HTTP Proxy URL field.
-
Once you specify the appropriate user ID and password, return to the appropriate tab
to continue specifying the package.
|