SAS® Bridge for ESRI
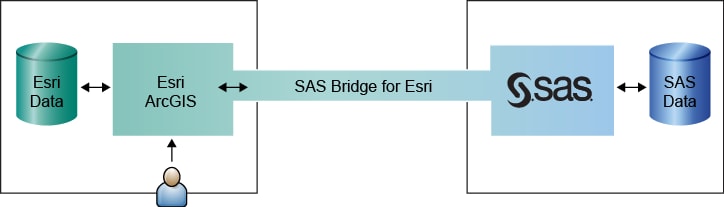
The SAS Bridge for Esri adds the powerful analytic and business intelligence capabilities of SAS to your geographic information system. With this extension to ArcGIS, you can create maps and interactive presentations that show relationships and provide answers that were previously hidden. You can link tabular data in SAS with spatial data in ArcGIS so that queries can consider spatial proximities as part of the analysis.
 With the SAS Bridge for Esri, you can do the following:
- add SAS data to your maps. You can establish a connection to your SAS data and incorporate that data into your GIS.
- join SAS data to an ArcMap layer. Uncover new relationships in your existing data to find answers and solve problems.
- export data, including raster data, to a SAS data set. Use SAS procedures to distinguish the important from the unimportant, and turn your data into strategic information.
- run stored processes. You can save SAS programs and applications on a SAS server as stored processes. You can then share and run these SAS programs from client applications such as ArcMap. Stored processes are especially useful for applications that are run frequently or used by multiple clients.
- view the metadata associated with SAS data sets.
- create custom applications or macros that export data to SAS and run other processes, without your intervention. The SAS Bridge for Esri is built on a set of objects that make it simple for you to create your own custom export applications and macros.
With SAS Bridge for Esri, you can export your data to a SAS data set, use SAS to perform any analysis that is needed, read the new data back into ArcMap, and incorporate the new information into your maps and presentations.
The SAS Bridge for Esri adds the analytic intelligence of SAS to the easy-to-use mapping capabilities of ArcGIS. The result is a geographic information system unmatched in the ability to inform, persuade, and motivate.
The features provided by the SAS Bridge for Esri are integrated with ArcGIS. After you have installed the software, you can access its features through the ArcGIS interface.
SAS
SAS is an integrated system of software products that provides an applications development environment for accessing, managing, analyzing, and presenting data. With SAS, you can do the following:
- read data in any format, from any kind of file, and manipulate it any way you choose. Your data can reside on numerous platforms and servers, in a multitude of formats.
- ensure the quality of your data using built-in and customizable data transformations. Use the powerful transformation language provided by SAS to handle everything from validation and scrubbing to integration and structuring, including denormalization and summarization.
- create analyses to concisely summarize your data. For example, you can generate frequency counts and cross-tabulation tables.
- compute correlations and other measures of association, as well as multi-way cross-tabulations and inferential statistics.
- perform predictive and descriptive modeling, forecasting, simulation, and optimization.
At the center of SAS is Base SAS software, which provides basic tools for accessing, managing, analyzing, and presenting data. You can extend the capabilities of SAS by adding solutions packages. SAS offers several solutions that address specific enterprise intelligence needs. For more information about SAS solutions, see the SAS web site at www.sas.com.
To use the SAS Bridge for Esri, you must have the second maintenance release of SAS 9.3 or later. For more details, see the SAS Bridge For Esri System Requirements.
ArcGIS
ArcGIS is a suite of applications from ESRI that enable you to create, manage, analyze, and integrate geographic data. ArcGIS enables you to create and edit simple geographic features as well as features in a multi-user geographic database. ArcGIS is an easy-to-use integrated system that can be deployed at any level in an organization, from the individual user to a global network of users. For complete information about ESRI and ArcGIS, refer to the Web site http://www.esri.com.
If you are completely new to ArcGIS, then we suggest that you work through the quick-start tutorial in the ArcGIS documentation or contact ESRI for training before using the SAS Bridge for ESRI.
Add an OLE database connection using ArcCatalog
Because SAS and ArcGIS exchange data using an OLE protocol, each SAS library is treated as an OLE database. Therefore, to exchange data you must first add an OLE database connection to ArcGIS's list of database connections. Use ArcCatalog to do one of the following:
- Connect to a local SAS server.
- Connect to a remote SAS server.
A list of SAS OLE DB connections that you define in ArcCatalog
is presented to you in ArcMap, and you can choose one of these
connections when you add data from, or export data to, a SAS data
set.
Connect to a Local SAS Server
From within ArcCatalog do the following:
- In the Catalog Tree, expand Database Connections and then
double-click Add OLE DB Connection.
Note: If Add OLE DB Connection is not present, then you must add it. Follow these instructions on the Esri web site. - Select SAS IOM Data Provider 9.x from the
Provider tab of the Data Link Properties window.
- Select the Connection tab and specify
_local_in the Data Source field.
This specifies that the SAS libraries are on the same machine as ArcCatalog. - Click OK to add an OLE DB Connection.odc
entry to your Add Data window.
Note: The default name for an OLE connection is OLE DB Connection.odc. Additional connections are identified by number, for example, OLE DB Connection(2).odc. - Right-click OLE DB Connection.odc and select Connect from the pop-up menu.
- In the Catalog Tree, double-click the OLE DB Connection that you just created, which opens the Data Link Properties window.
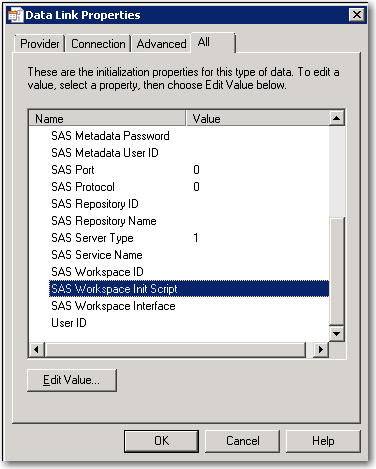
- Click the All tab.
- Select SAS Workspace Init Script and click Edit Value.
- In the Edit Property Value window, type in the location of the user-defined library as if you were including a LIBNAME statement in SAS code. For example:
libname mydata 'C:\dept_datasets';
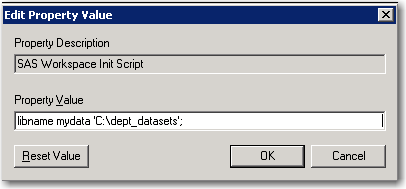
The directory that you specify must be accessible from your workspace server. When you connect to the server and view the data sets, the user-defined library is available as well as the data sets in the libraries SASUSER and SASHELP allocated by SAS. The TEST library is also available.
Connect to a Remote SAS Server by Using the SAS IOM Data Provider 9.2 or Later
When you connect to a remote SAS server, SAS Bridge for Esri
makes a request to an object spawner on the server. The object spawner starts a SAS session that listens for further requests from the SAS Bridge for Esri.
To connect to a remote SAS server using ArcCatalog:
- In the Catalog Tree, expand Database Connections and then double-click Add OLE DB Connection.
Note: If Add OLE DB Connection is not present, then you must add it. Follow these instructions on the Esri web site. - Select SAS IOM Data Provider 9.x from the
Provider tab of the Data Link Properties window.
Note: To connect to a remote SAS server, the object spawner must be running on the remote machine. If you cannot connect to the remote SAS server, then contact your system administrator for assistance.
- Select the Advanced tab.
- Deselect the Use default box, and then specify the following information:
Metadata Server Location specifies the machine name where the SAS Metadata Server is running User name specifies the user name that is used to access the metadata server Password specifies the password for the metadata server Data Source specifies the SAS Workspace Server that SAS Bridge for Esri interacts with. Select the server that you want to use from the drop-down list. User name specifies the user name that is used to access the workspace server Password specifies the password for the workspace server - Click OK to add an OLE DB Connection
entry to your catalog.
Note: The default name for an OLE connection is OLE DB Connection. Additional connections are identified by number, for example, OLE DB Connection(2). You can rename a connection to something more easily recognizable by right-clicking on the name and selecting Rename.
- Right-click OLE DB Connection and select Connect from the pop-up menu.
Add SAS data to ArcMap
Not all tabular information is displayed on your map. You can also add tables that have no spatial information. These tables are listed in the table of contents. You can work with them as you would any table based on geographic features to produce, for example, graphs and reports.
To add a SAS data set to ArcMap:
- Select File
 Add Data (or click the Add
Data button
Add Data (or click the Add
Data button  ).
). - Select the data source that contains the data set that you want to add.
Note: If you have not defined an OLE database connection, then you must first add an OLE database connection. - Select the SAS data set that you want to add.
- Click Add to add the data set.
To export SAS data from ArcMap, right-click the data in the Table of Contents pane, and then select Open. From the Table dialog box, select 
![]() Export to a SAS data set.
Export to a SAS data set.
Join SAS data to an ArcMap layer
You can join a SAS data set to an existing ArcMap data set by using the common values in corresponding fields. When you join the attributes from a SAS data set to an ArcMap data set, a new data set is created that contains the joined data.
To join a SAS data set to an ArcMap layer:
- Select a layer in ArcMap and right-click.
- Select Joins and Relates
Join from the pop-up menu.
- Select Join attributes from a table.
- Choose a field from the ArcGIS layer for the join.
- If you previously added the SAS data set that you want to join, then select that data set from the drop-down list.
To add a new SAS data set:- Click the Browse button
 .
. - Select the OLE database connection that contains the data set that you want to add.
Note: If you have not created an OLE database connection, then you must first add an OLE database connection. - Select the SAS data set that you want to join.
- Click Add to add the data set.
- Click the Browse button
- Select the variable in the SAS data set that corresponds to field that you selected in step 4.
- Click OK.
To view the results of the join:
- Right-click the layer that you joined to a SAS data set.
- Select Open Attribute Table from the pop-up menu.
Export ArcMap data to a SAS data set
You can either export all features from the layer or export selected features.
Export All Features from the Layer
To export all of the features from a layer:
- In the ArcMap Table of Contents, select the data map layer that you want to export.
If your version of ArcGIS is release 10 with Service Pack 2, or later, then press Alt+B to display the Attribute export window.
Otherwise, right-click the layer to export and select Data Export to a SAS data set from the pop-up menu.
Note: If you neglect to select a data map layer, then the export function is unavailable in the pop-up window.
- In the Attribute export window, select All features.
Note: If the layer contains a query, then the query is not used when you export the layer attributes.
- Specify the SAS server to which the data is exported.
Note: The list of available servers is generated from the SAS OLE database connections defined in ArcCatalog. The default server is the first one in the list. If you select a different SAS server, then it becomes the default server for subsequent exports. If a connection fails, then the next one in the list is tried until a connection is successful.
If, and only if, the list of available servers is empty (because no SAS OLE database connection has been defined in ArcCatalog), then the SAS Bridge for Esri attempts to use a local installation of SAS (which it names Local SAS).
However, if a local installation of SAS is not available, then you must use ArcCatalog to add an OLE database connection.
- Specify the path and filename for the SAS data set that you want to create. If you are exporting to a local SAS server, then you can browse
to the output location by clicking the File Open button
.
By default, the data is written to the SASUSER path to a data set named Export_Output.sas7bdat. You can direct the output to any directory to which you have write access, and you can change the name from Export_Output to any valid SAS data set name. On subsequent exports, the name defaults to the last name that you entered.
- Choose whether to export geometry data. If you select Export Geometry Data, then two
additional SAS data sets are created:
- A data set with the suffix
_xycontains the x and y coordinates that define the feature. - A data set with the suffix
_xy_metacontains spatial reference information.
Note: The types of geometry that can be exported to a SAS data set are: Point, Polyline, and Polygon. If the geometry is not one of these types, then the geometry export fails, and an error message appears in the export dialog box.
Note: If the attribute data set already exists, and if you choose Replace or Append, then that same action is performed on an existing geometry data set. If you choose Append and the_xydata set does not exist, then the export will fail. You can choose Replace instead to create the geometry data sets.
Note: When you append to an existing geometry data set, the_xy_metafile is replaced rather than appended.
- A data set with the suffix
- Click OK. Your SAS data sets are created in the location that you specified. In addition, if you selected the Save XML Data option, then data is written in XML format to your Windows TEMP directory. For more information about the XML files, see Configure Bridge for Esri Options.
Export Selected Features
To export selected features from an ArcMap layer to a SAS data set:
- Highlight the layer that you want to export.
Press CTRL+T, or CTRL double-click the layer name to display the Open Attribute Table window.
Otherwise, right-click the layer that you want to export and select Open Attribute Table from the pop-up menu.
- Select the rows that you want to export by using one of the following methods:
- Click in the left-most column of the table to select individual rows.
Use Ctrl + Click to select multiple rows, or drag your cursor across the left-most column of the rows to be selected. - Select Select by Attributes to select rows with an SQL query.
- Click in the left-most column of the table to select individual rows.
- If your version of ArcGIS is release 10 with Service Pack 2, then press ALT+B.
Otherwise, select
Export to a SAS data set.
- In the Attribute export window, select Selected features.
Note: You must select rows from the layer's data set for Selected features to be available.
Note: If the layer contains a query, then the query is not used when you export the layer attributes.
- Specify the SAS server to which the data is exported.
Note: The list of available servers is generated from the SAS OLE database connections defined in ArcCatalog. The default server is the first one in the list. If you select a different SAS server, then it becomes the default server for subsequent exports. If a connection fails, then the next one in the list is tried until a connection is successful.
If, and only if, the list of available servers is empty (because no SAS OLE database connection has been defined in ArcCatalog), then the SAS Bridge for Esri attempts to use a local installation of SAS (which it names Local SAS).
However, if a local installation of SAS is not available, then you must use ArcCatalog to add an OLE database connection.
- Specify the path and filename for the SAS data set that you want to create. If you are exporting to a local SAS server, then you can browse
to the output location by clicking the File Open button
.
By default, the data is written to the SASUSER path to a data set named Export_Output.sas7bdat. You can direct the output to any directory to which you have write access, and you can change the name from Export_Output to any valid SAS data set name. On subsequent exports, the name defaults to the last name that you entered.
- Click OK. Your SAS data sets are created in the location that you specified. In addition, if you selected the Save XML Data option, then data is written in XML format to your Windows TEMP directory. For more information about the XML files, see Configure Bridge for Esri Options.
Export raster data to a SAS data set
To export raster data from an ArcMap layer to a SAS data set:
- In the ArcMap Table of Contents, select the raster that you want to export.
If your version of ArcGIS is release 10 with Service Pack 2, or later, then press ALT+B
to display the Raster export window.
Otherwise, right-click the raster to export and select Export to a SAS data set from the pop-up menu. - In the Raster export window, select to export either All bands or only a selected
band. If the raster contains only a single band, then the name of the band is shown.
- Specify the SAS server to which the raster data is exported.
Note: The list of available servers is generated from the SAS OLE database connections that are defined in ArcCatalog. The default SAS server is the first one in the list. If you select a different SAS server, then it becomes the default server for subsequent exports. If a connection fails, then the next one in the list is tried until a connection is successful.
If, the list of available servers is empty (because no SAS OLE database connection has been defined in ArcCatalog), then the SAS Bridge for Esri attempts to use a local installation of SAS (which it names Local SAS).
However, if a local installation of SAS is not available, then you must use ArcCatalog to add an OLE database connection.
- Specify the path and filename for the data set that you want to create. (If you are exporting to a local SAS server, you can browse
to the output location by clicking the File Open button
.)
By default, the data is written to the SASUSER path with the filename Export_Output.sas7bdat. You can direct the output to any directory to which you have write access, and you can change the name from Export_Output to any valid SAS data set name. On subsequent exports, the name defaults to the last name that you entered.
Notes:- When raster data is exported, an additional SAS data set is created contains metadata about the raster data. The additional file has the suffix
_meta. - If the data set already exists, and if you choose Replace or Append, then that same action is performed on an existing metadata file. If you choose Append and a metadata file does not exist, then the export will fail. You can choose Replace instead to create a metadata file.
- When raster data is exported, an additional SAS data set is created contains metadata about the raster data. The additional file has the suffix
- Click OK.
View SAS metadata
To view the metadata associated with a SAS data set that has been added to ArcMap:
- Open ArcCatalog.
- Right-click the OLE database connection that contains the data set that you want to view, and then select Connect.
Note: If you have not created an OLE database connection, then you must first add an OLE database connection. - Expand the database connection that contains your data set, and then select the data set.
- Select the SAS Metadata tab.
Run a SAS stored process
A stored process is a SAS program that is saved on a server and be executed as required by a requesting application. You can use stored processes to pass data from Esri to SAS and perform SAS processing. For example, you can write to SAS data sets, retrieve SAS data sets, and create SAS ODS output such as reports and graphs. For more information, see the SAS Stored Processes Developer's Guide at https://support.sas.com/en/software/sas-integration-technologies.html#documentation.
Note: The default method of using stored processes requires a SAS Metadata Server. If a SAS Metadata Server is not available, then you can create a stored process by using VBA code. For more information, see Run a Stored Process as a VBA Macro.
Before you can run a stored process, you must perform configuration tasks. For more information, see Configuring Stored Processes.
To run a stored process, perform the following steps:
- If the SAS toolbar is not visible, then add the SAS toolbar.
- (Optional) If your stored process uses Esri layer data, then select the layer that you want to use from the Table of Contents pane.
- On the SAS toolbar, click
 or select SAS Stored Processes. A file browser window appears.
 - Locate and select the stored process that you want to run, and then click Open.
- Specify any input parameters for the stored process in the Parameters window, and then click Run.
Use SAS Bridge Objects
For information on the SAS Bridge for Esri Class Library, you can open the .chm file which is installed with the SAS Bridge for Esri product.
The components for SAS Bridge for Esri are built on a set of classes that encapsulate the following:
- Starting and stopping a SAS workspace.
- Processing an ArcMap feature table.
- Creating a SAS data set.
You can use these classes to create your own custom export applications and macros. For example, you can create an application that exports data to SAS, and then runs other processes without intervention.
There is both a simple way to use these classes to export data and a more advanced approach. The more advanced approach requires more coding but enables greater flexibility and customization. Whichever way you choose, your code can run in either silent mode or verbose mode. In verbose mode, a progress dialog box tracks the export progress. In silent mode, the progress dialog box does not appear.
To use these classes in a VBA macro in ArcMap follow these steps:
Define a VBA macro in ArcMap:
- Open the Visual Basic Editor in ArcMap.
- Select Tools
References from the menu bar of the Visual
Basic Editor.
- Select the following from the References window:
- SAS Bridge for ESRI 3.5 Type Library
- SAS: Integrated Object Model (IOM) (SAS System 9.3) Type Library
- SAS WorkspaceManager 1.1 Type Library
- Select Insert
Module from the menu bar of the Visual Basic
Editor.
- Type the macro code. See Use SAS Bridge for Esri objects in a custom application for sample macros that export Esri data.
Run the macro:
- Select Tools
Macros from the Visual Basic Editor menubar
(or, Tools
Macros
Macros from the ArcMap menubar).
- Select the macro you want to run.
- Click Run.
- SAS Bridge for ESRI Class Library
The Bridge For ESRI class documentation is delivered with the product as the file classDoc.chm. By default, this file is located in the following location:
C:\Program Files\SASHome\SASBridgeForEsri\3.6\Documentation\classDocOn 64-bit Windows systems, the default location is:
C:\Program Files\SASHome\x86\SASBridgeforEsri\3.6\Documentation\classDoc - SAS Integration Technologies
- Demos and Downloads