Installation Note 48593: The Oracle automatic update of Windows 32-bit Java 6 to Java 7 might affect the SAS® installation if Java 6 is removed from your system
 |  |  |
In December 2012, Oracle began automatically updating Windows 32-bit Java Runtime Environment (JRE) users from JRE 6 to JRE 7. The auto-update to JRE 7 removes JRE 6 from the system, in some cases. Because the SAS software uses a JRE, your SAS software might not function properly if JRE 6 is removed from your system.
This SAS Note addresses issues related to the JRE auto-update and provides guidance for avoiding or rectifying problems.
Please note:
- During the SAS installation process, if you selected to install the recommended JRE using the SAS® Deployment Wizard, you are not affected by the JRE auto-update.
- If you instead selected to use an existing JRE during the installation process, or if you changed your JRE after the installation, you might be affected by the auto-update and you should continue reading this SAS Note for additional instructions.
Details about the Oracle scheduled auto-update as well as answers to frequently asked questions about the update can be found on the Oracle website: Java 6 Auto-Update to Java 7
What to Expect If JRE 6 Is Removed from Your Operating System
If the JRE that was selected at installation time is later removed from your operating system, certain components of SAS will not function properly. For example, graphing might not function correctly, or SAS Java clients might not start.
The following errors might appear in the SAS log when you start a SAS session:
ERROR: The Java proxy is not responding.
ERROR: The Java proxy's JNI call to start the VM failed.
ERROR: Java failed to start during the SAS startup.
How Can I Tell If My SAS Installation Could Be Affected by the Upcoming Auto-update to JRE 7?
You might be affected by the auto-update to JRE 7 if both of these conditions are met:
- The Java Update mechanism is enabled in your Java Control Panel. Click here to determine whether the Java Update mechanism is enabled in your Java Control Panel.
- And the JRE referenced in your SAS configuration files was installed in a patch-in-place configuration. For help figuring out whether your JRE was installed in a patch-in-place configuration, see the "How to Determine If You Have Installed the JRE in a Path-in-Place Configuration" section near the end of this SAS Note.
Note: If you installed the JRE using the SAS Deployment Wizard, the JRE was installed in a static configuration, not a patch-in-place configuration, and is not affected by the JRE auto-update to Java 7.
What Should I Do If I Have Already Been Affected by the Update to JRE 7 or If I Have Determined That I Might Be?
If you have already been affected by the auto-update to JRE 7 or if you know that you will be, there are two things that you should do:
- Install JRE 6 in a static configuration
- Update your SAS configuration files
Installing JRE 6 in a Static Configuration
A JRE installed in a static configuration does not get overwritten by another JRE version. For example, when JRE 6 update 24 is installed in a static configuration to C:\Program Files\Java\jre1.6.0_24, installing JRE 6 update 25 does not overwrite the jre1.6.0_24 folder.
Note: When a JRE is installed in a static configuration, it is installed to a folder named like the following: C:\Program Files\Java\jrelversion. For example: C:\Program Files\Java\jre1.6.0_24.
To install the JRE, follow these steps:
- First, locate your SAS software depot or SAS installation DVD(s). If you do not have access to your SAS software depot or installation DVDs, download and save the JRE installer from the Oracle site by clicking either of the links shown below.
Do not install the JRE in this step. Just download and save the JRE installer. When downloading the JRE from the links shown below, Oracle might prompt you to first create a profile. Create the profile before proceding. - For SAS 9.2: Download and save jre-6u14-windows-i586.exe.
- For SAS 9.3: Download and save jre-6u24-windows-i586.exe.
- Open a command prompt dialg box:
- Click Start, click All Programs, and click Accessories. Then click Run.
- When the Run dialog box appears, click the Browse button.
- Using your Browse window, navigate to the JRE installer.
- In SAS 9.2: jre-6u14-windows-i586.exe
- In SAS 9.3: jre-6u24-windows-i586.exe
- 32-bit Windows: \products\javaruntime__<this number varies>__win__xx__sp0__1\
- 64-bit Windows: \products\javaruntime__<this number varies> __wx6__xx__sp0__1\
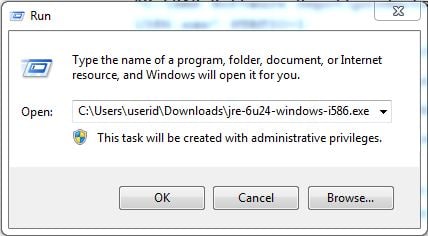
- Select the JRE installer and click Open. Doing this displays the command in the Run window.
Note: The remaining steps in this example show jre-6u24-windows-i586.exe, but if you have SAS 9.2 software, you would install jre-6u14-windows-i586.exe. - Add STATIC=1 to the command in the Open field. For example:
- If you are installing the JRE from a SAS software depot:
"C:\SAS Software Depot\products\javaruntime____wx6__xx__sp0__1\jre-6u24-windows-i586.exe" STATIC=1
- If you are installing the JRE from SAS DVDs:
"D:\products\javaruntime____wx6__xx__sp0__1\jre-6u24-windows-i586.exe" STATIC=1
- If you downloaded the JRE that was installed in Step 1:
"C:\users\userid\Downloads\jre-6u24-windows-i586.exe" STATIC=1
- Click OK to start the installation.
If you are installing the JRE from your SAS software depot or DVD(s), navigate to the root folder of the depot or DVD and locate the JRE installer.
Look for your version:
Or, if you downloaded the JRE installer in step 1, navigate to the folder in which you chose to save the JRE on your Windows operating system. If you are not sure where you saved the JRE installer on your Windows operating system, check your Downloads folder here:
Note: These paths vary depending on the location of the SAS software depot, the DVD drive letter, or the location where you saved the JRE installer on your Windows operating system.
Update Your SAS® Configuration Files, If Necessary
- Locate your sassw.config file.
- For SAS 9.2: C:\Program Files\SAS\sassw.config or C:\Program Files (x86)\SAS\sassw.config
- For SAS 9.3: C:\Program Files\SASHome\sassw.config
- Open the file for editing with Notepad.
- Change the JREHOME property per the following:
- For 32-bit operating systems: JREHOME=C:\Program Files\Java\jre1.6.0_14\bin\java.exe
- For 64-bit operating systems: JREHOME=C:\Program Files (x86)\Java\jre1.6.0_14\bin\java.exe
- For 32-bit operating systems: JREHOME=C:\Program Files\Java\jre1.6.0_24\bin\java.exe
- For 64-bit operating systems: JREHOME=C:\Program Files (x86)\Java\jre1.6.0_24\bin\java.exe
- Save the file.
- Locate your sasv9.cfg file.
- C:\Program Files\SAS\SASFoundation\9.2\nls\en\sasv9.cfg
or: C:\Program Files (x86)\SAS\SASFoundation\9.2\nls\en\sasv9.cfg - C:\Program Files\SASHome\SASFoundation\9.3\nls\en\sasv9.cfg
- C:\Program Files\SASHome\x86\SASFoundation\9.3\nls\en\sasv9.cfg
- Open the file for editing with Notepad.
- Modify the following line under the JREOPTIONS per the following:
- For SAS installed on a 32-bit machine: -Dsas.jre.libjvm=C:\PROGRA~1\Java\JRE16~1.0_1\bin\client\jvm.dll
- For SAS installed on a 64-bit machine: -Dsas.jre.libjvm=C:\PROGRA~2\Java\JRE16~1.0_1\bin\client\jvm.dll
- For SAS installed on a 32-bit machine: -Dsas.jre.libjvm=C:\PROGRA~1\Java\JRE16~1.0_2\bin\client\jvm.dll
- For SAS installed on a 64-bit machine: -Dsas.jre.libjvm=C:\PROGRA~2\Java\JRE16~1.0_2\bin\client\jvm.dll
- Save the file.
For SAS 9.2:
For SAS 9.2 software:
For SAS 9.3 software:
For SAS 9.2 software:
How to Determine Whether the Java Update Mechanism Is Enabled in Your Java Control Panel
- Access the Java Control Panel.
-
On Windows XP and Windows Server 2003: Click Start ► Settings ► Control Panel.
- On Windows 7, Windows 2008, and Windows Vista: Click Start ► Control Panel.
- Enter Java in the Search Control Panel located in the upper right corner.
- Launch the Java Control Panel by double-clicking the Java icon. The Java Control Panel appears.
- Click the Update tab to access the settings.
- If the Check for Updates Automatically check box is selected, Java is set to automatically check for updates.
Important: Whether or not you decide to disable Java update options is up to you. SAS cannot and does not make any recommendations as to whether or not you should do so.
How to Determine Whether Your JRE Was Installed with a Patch-in-Place Configuration
The default installation directory for a patch-in-place configuration of the JRE is shown below. If you find either of the jre files shown here, then you have a patch-in-place configuration.
- For Windows 32-bit systems: c:\program files\Java\jren
- For Windows x64 systems: c:\program files (x86)\Java\jren
In the above, n is the Java SE minor version number (for example, n=6 for version 1.6.0_24).
For more information about the JRE configuration, see the following documentation on the Oracle website:
http://www.oracle.com/technetwork/java/javase/jre-install-137694.html
Or see the following document for a detailed description of patch-in-place and static JRE installations
Patch-in-Place and Static JRE Installation.Operating System and Release Information
* For software releases that are not yet generally available, the Fixed Release is the software release in which the problem is planned to be fixed.Product Family Product System SAS Release Reported Fixed* SAS System N/A Microsoft Windows Server 2003 for x64 9.2 TS2M2 Microsoft Windows Server 2008 for x64 9.2 TS2M2 Microsoft® Windows® for 64-Bit Itanium-based Systems 9.2 TS2M2 Microsoft Windows Server 2003 Datacenter 64-bit Edition 9.2 TS2M2 Microsoft Windows Server 2003 Enterprise 64-bit Edition 9.2 TS2M2 Microsoft® Windows® for x64 9.2 TS2M2 Microsoft Windows Server 2003 Datacenter Edition 9.2 TS2M2 Microsoft Windows Server 2003 Enterprise Edition 9.2 TS2M2 Microsoft Windows Server 2003 Standard Edition 9.2 TS2M2 Microsoft Windows Server 2008 9.2 TS2M2 Microsoft Windows XP Professional 9.2 TS2M2 Windows 7 Enterprise 32 bit 9.2 TS2M2 Windows 7 Enterprise x64 9.2 TS2M2 Windows 7 Home Premium 32 bit 9.2 TS2M2 Windows 7 Home Premium x64 9.2 TS2M2 Windows 7 Professional 32 bit 9.2 TS2M2 Windows 7 Professional x64 9.2 TS2M2 Windows 7 Ultimate 32 bit 9.2 TS2M2 Windows 7 Ultimate x64 9.2 TS2M2 Windows Vista 9.2 TS2M2 Windows Vista for x64 9.2 TS2M2
| Type: | Installation Note |
| Priority: | alert |
| Date Modified: | 2013-10-02 13:04:27 |
| Date Created: | 2012-12-04 11:52:00 |