Sample 39432: Associating an existing SAS® Stored Process with an information map in SAS® Information Map Studio 4.2 and later
 |  |  |
Overview
This sample shows you how to prepare an existing stored process for use with an information map. Preparation requires these three main steps:
- Register the stored process.
- Create the table that is associated with the stored process.
- Register the structure of the table that is used in the stored process.
After you complete these steps, the stored process is ready to be associated with an information map.
Note: For help with the previous versions of this software, see Sample 33954.
About the sample stored process
As the input table for the stored process, this sample uses the SASHELP.CLASS table. If you want to follow along with the sample, copy and save the code shown below. For this example, the stored process is named stpclass.sas. Make note of the physical location. You will need it later when you register the stored process in metadata.
*ProcessBody;
%stpbegin;

%let workpath=%sysfunc(pathname(work));

libname biout "&workpath";

data biout.class;
  set sashelp.class;
run;

%stpend;
|
Register the stored process
- In SAS Management Console, click the Folders tab.
- Select SAS Folders ► Shared Data ► StoredProcesses. (Create the StoredProcesses folder if it does not already exist.)
- Right-click on the StoredProcesses folder and select New Stored Process to launch the New Stored Process wizard.
- The second wizard page is the most important. On this page, you provide the following information:
- For the SAS server, select the SAS Workspace Server on which to run the stored process. In version 9.2, typically, this value is SASApp - Logical Workspace Server. In version 9.3, select SASApp as the Application server and then select the Workspace server only option under Server type.
Note: If you do not specify a workspace server, then the stored process will not be available to select in SAS Information Map Studio.
- For 9.3, accept the default Allow execution on selected application server only and Store source code on application server .
- For the Source code repository, select from the existing list, or click Manage to select the physical location where you stored the sample stored process (e.g.,
c:/storedprocesses). - For the Source file, enter the full name of the stored process. In this sample, the stored process is named
stpclass.sas. - Do not select any Output type (9.2) or Result capabilities (9.3).
- Click Next and then Finish to exit the wizard.
- For 9.3, right-click on the stored process and select Make Compatible to ensure that the stored process will work with the information map.
Create the table used in the stored process
In order to associate a stored process with an information map, the stored process must have an associated table. That table must exist so that you can register its structure in metadata (discussed later). There are several ways to create this table. For this sample, you can submit the following code, which will output a table with one observation. You can submit the code in an interactive Base SAS session or in a SAS Enterprise Guide code node.
libname biout "c:\temp";

data biout.class;
  set sashelp.class (obs=1);
run;
|
Register the table structure in metadata
The structure of the table that is used in the stored process (in this sample, BIOUT.CLASS) must be registered in metadata. Structural information includes column names, formats, informats, lengths, and data types. At this point, the sample table has one observation.
Tip: In order to register the table, only the table structure is needed, so, technically, the table could be empty.
- Back in SAS Management Console, click the Plug-ins tab.
- Select Environment Management ► Data Library Manager ► Libraries.
- Right-click on Libraries and select New Library to launch the New Library wizard.
- On the first wizard page, select SAS Base Library.
- On the second wizard page, enter
BIOUTas the name of the library. (The table must be called BIOUT because that is the name of the library used in the sample stored process.) - On the third wizard page, assign the library to a server, typically, SASApp.
- On the fourth wizard page, enter
BIOUTas the libref and enter the path where you saved the table. In this sample, the table was saved toc:\temp. - After you finish registering the new library, right-click on the library name, select Register Tables, and complete the wizard to register the CLASS table that contains one observation.
Associate the stored process with an information map
Now, you are ready to associate the stored process with the information map.
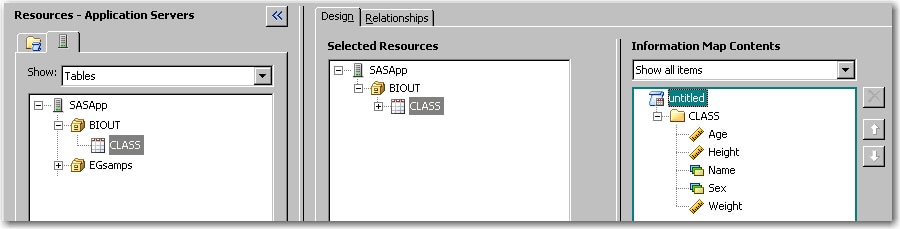
- Open SAS Information Map Studio.
- On the Resources pane, select Tables from the Show drop-down list, then select the CLASS table from the BIOUT library.
- Move the CLASS table to the Selected Resources pane and then move all of the data items to the Information Map Contents pane.
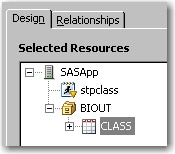
- Back on the Resources pane, expand the Show drop-down list again. Now, you see Stored processes as an option. Select Stored processes to see a list of the stored processes that you have registered in metadata.
- Drag
stpclass.sasfrom the Resources pane to the Selected Resources pane.
Note: If your stored process is not in the list, then view its Execution properties in SAS Management Console and verify that you selected to run the stored process on a SAS Workspace Server.
Test the information map
- Select Tools ► Run a Test Query.
- Move all of the data items to include in the test query, and click Run Test.
If the test results include all of the rows in the CLASS table (and not just one observation), then the stored process has executed successfully.
Additional Documentation
For more information about stored processes, see SAS 9.2 Stored Processes: Developer's Guide.
For more information about SAS Web Report Studio, see the SAS Web Report Studio documentation page.
For more information about SAS Information Map Studio, see the SAS Information Map Studio documentation page.
For more information about SAS Management Console, see the SAS Management Console documentation page.
These sample files and code examples are provided by SAS Institute Inc. "as is" without warranty of any kind, either express or implied, including but not limited to the implied warranties of merchantability and fitness for a particular purpose. Recipients acknowledge and agree that SAS Institute shall not be liable for any damages whatsoever arising out of their use of this material. In addition, SAS Institute will provide no support for the materials contained herein.
These sample files and code examples are provided by SAS Institute Inc. "as is" without warranty of any kind, either express or implied, including but not limited to the implied warranties of merchantability and fitness for a particular purpose. Recipients acknowledge and agree that SAS Institute shall not be liable for any damages whatsoever arising out of their use of this material. In addition, SAS Institute will provide no support for the materials contained herein.
| Type: | Sample |
| Topic: | Query and Reporting ==> Interactive Querying Query and Reporting |
| Date Modified: | 2010-04-23 14:42:10 |
| Date Created: | 2010-04-23 14:08:47 |
Operating System and Release Information
| Product Family | Product | Host | Product Release | SAS Release | ||
| Starting | Ending | Starting | Ending | |||
| SAS System | SAS Information Map Studio | Windows Vista | 4.2 | 9.2 TS2M0 | ||
| Microsoft Windows XP Professional | 4.2 | 9.2 TS2M0 | ||||
| Microsoft Windows Server 2003 Standard Edition | 4.2 | 9.2 TS2M0 | ||||
| Microsoft Windows Server 2003 Enterprise Edition | 4.2 | 9.2 TS2M0 | ||||
| Microsoft Windows Server 2003 Datacenter Edition | 4.2 | 9.2 TS2M0 | ||||
| Microsoft® Windows® for x64 | 4.2 | 9.2 TS2M0 | ||||