Sample 32009: How to Use "Copy to SAS Server" to Write Back to your Original Data in Microsoft Excel
 |  |  |
Overview
The SAS® Add-In for Microsoft Office currently does not have the capability to write back to the original table after the data has been modified in the spreadsheet. However, you can use the Copy to SAS Server feature in order to write the modified data back to the original table.
How to Copy the Modified Data Using Copy to SAS Server
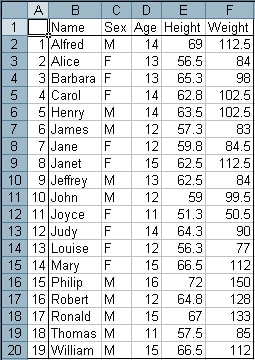
If you open data in an Excel spreadsheet by using the SAS Add-In for Microsoft Office and then make changes to that data, you can use SAS→Active Data→Copy to SAS Server to save those changes. However, if you do not select the spreadsheet properly, then you might save the original data to the table instead of the modified data in the spreadsheet.
When you select SAS→Active Data→Copy to SAS Server from the menu, you must follow these steps in order to copy the modified data in the spreadsheet.
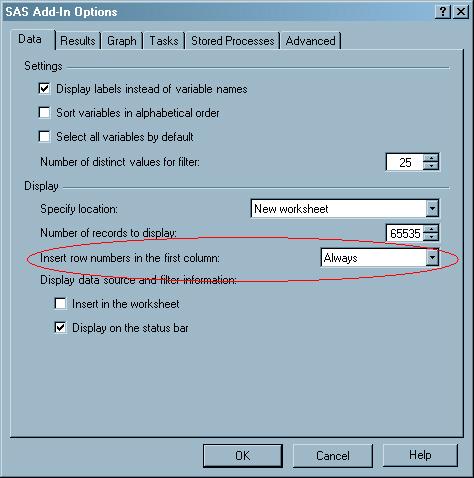
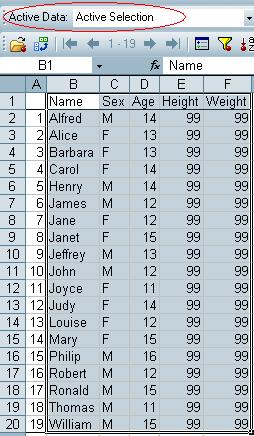
- Make sure that you have row numbers displaying in your spreadsheet.
- Modify your data and then select the variable names and values in the spreadsheet that you want to copy. When you select the columns and rows, do not select the row numbers.
- Make sure that the Active Data field in the SAS Analysis toolbar displays Active Selection.
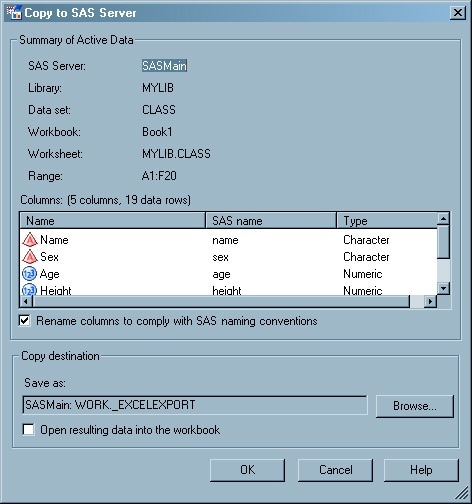
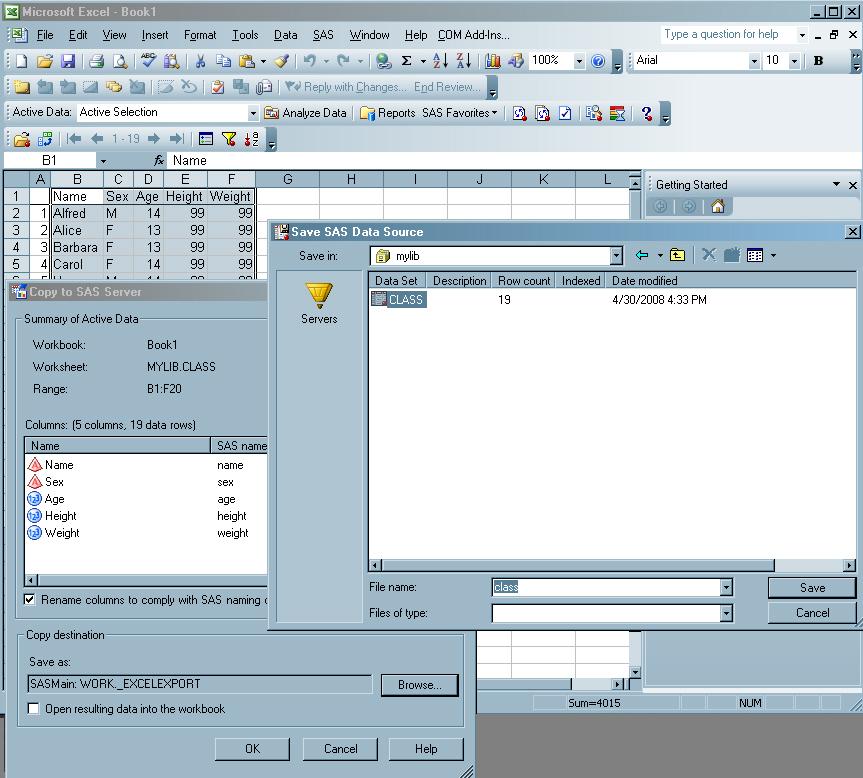
- Select SAS→Active Data→Copy to SAS Server to copy the modified data. Make certain the Copy to SAS Server dialog box contains Workbook, Worksheet, and Range information only. The dialog box should look similar to the following:
- Specify the destination in the Copy to SAS Server dialog box. Next to the Save as field, click Browse, and then navigate to your original table. It will prompt you to overwrite the existing data. Select Yes to write the modified data back to the original table.
If you are not showing row numbers, you can turn them on in the SAS Add-In Options dialog box. Select SAS→Options and change the value of Insert row numbers in the first column to Always. After making this change, you must refresh your results in order to display the row numbers. You can refresh your results by selecting a cell in your data and then selecting SAS→Refresh.
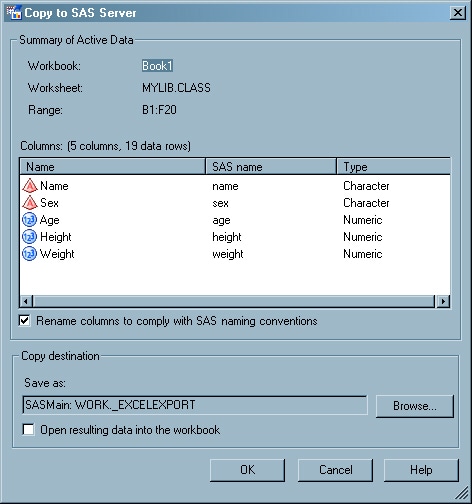
Note: If your dialog box contains information for the SAS Server, Library, and Data Set as well as the ones listed above, then you are not copying the modified data, but rather the original data that is referenced in the Data Set field. Here is an example of what the wrong dialog box might look like:
Note: To write back to your original table, you must have write permissions to the library where you are going to save the data. For more information on permissions and administering libraries, see the Technical Document What SAS® Administrators Should Know about Libraries, Metadata, and SAS® Enterprise Guide 4.1 (http://support.sas.com/techsup/technote/ts788.pdf). The information on administering libraries in SAS Enterprise Guide applies to the SAS Add-In for Microsoft Office as well.
Additional Documentation
For a list of available documentation for SAS Add-In for Microsoft Office, see http://support.sas.com/documentation/onlinedoc/addin/index.html
These sample files and code examples are provided by SAS Institute Inc. "as is" without warranty of any kind, either express or implied, including but not limited to the implied warranties of merchantability and fitness for a particular purpose. Recipients acknowledge and agree that SAS Institute shall not be liable for any damages whatsoever arising out of their use of this material. In addition, SAS Institute will provide no support for the materials contained herein.
These sample files and code examples are provided by SAS Institute Inc. "as is" without warranty of any kind, either express or implied, including but not limited to the implied warranties of merchantability and fitness for a particular purpose. Recipients acknowledge and agree that SAS Institute shall not be liable for any damages whatsoever arising out of their use of this material. In addition, SAS Institute will provide no support for the materials contained herein.
| Type: | Sample |
| Topic: | Common Programming Tasks ==> Reading and Writing SAS Data |
| Date Modified: | 2008-05-08 09:56:37 |
| Date Created: | 2008-05-06 14:26:20 |
Operating System and Release Information
| Product Family | Product | Host | Product Release | SAS Release | ||
| Starting | Ending | Starting | Ending | |||
| SAS System | SAS Add-in for Microsoft Office | Microsoft® Windows® for x64 | 2.1 | |||
| Microsoft Windows 95/98 | 2.1 | |||||
| Microsoft Windows 2000 Advanced Server | 2.1 | |||||
| Microsoft Windows 2000 Datacenter Server | 2.1 | |||||
| Microsoft Windows 2000 Server | 2.1 | |||||
| Microsoft Windows 2000 Professional | 2.1 | |||||
| Microsoft Windows NT Workstation | 2.1 | |||||
| Microsoft Windows Server 2003 Datacenter Edition | 2.1 | |||||
| Microsoft Windows Server 2003 Enterprise Edition | 2.1 | |||||
| Microsoft Windows Server 2003 Standard Edition | 2.1 | |||||
| Microsoft Windows XP Professional | 2.1 | |||||
| Windows Millennium Edition (Me) | 2.1 | |||||
| Windows Vista | 2.1 | |||||