Creating Life Cycle Templates
Overview of Creating Life Cycle Templates
A life cycle template
is an XML file that defines the milestones and tasks that must be
completed in order to place a champion model in a production environment,
and to monitor and retire that model. You determine the milestones
and tasks for a version in a version planning phase. For each task,
you can define dependent tasks and assign users to complete or approve
the tasks. By assigning a weight to each task in a milestone, you
can track the progress of completing a milestone.
You create a life cycle
template for a version before you create a version. A life cycle template
is typically shared by multiple versions. When you create a version,
the life cycle template that you want to use must be available from
the Life Cycles perspective. Templates that appear in the Life Cycle
perspective are the life cycle templates that have been uploaded to
the SAS Content Server.
To create a life cycle
template, you can use the SAS Model Manager Template Editor or you can create a life cycle template XML file using a text editor.
When you create a life cycle template using the SAS Model
Manager Template Editor, you can browse existing templates
and select one to modify using a new name or you can create a new
life cycle template.
SAS supplies four life
cycle templates that you can use to create a template: Basic, Standard,
Extended, and User Lifecycle templates. The Basic, Standard, and Extended
templates are reserved templates and are provided only as examples.
They are not intended for use by any organization. Reserved templates
cannot be modified, but they can be saved using another name to create
a new template. Templates that are not reserved can be uploaded to
the SAS Content Server. The Browse Templates window indicates which templates are reserved.
The SAS
Model Manager Template Editor uses standard windowing
techniques to access pop-up menus and selection lists. The template
editor automatically generates milestones and task identification
numbers. The editor provides a list of SAS Model Manager users, also
known as participants, for you to choose for task assignments.
When you save a template,
the template is saved to a local or network location as an XML file
using the required XML element structure. You save templates to create
a backup of a template. A template can be used in SAS Model Manager
only by uploading the template to the SAS Content Server. The SAS Model Manager Template Editor provides an Upload File menu selection.
If you create a life
cycle template using an XML file, you can copy any life cycle template
from the user-templates directory and modify the file with any text
editor. When you modify an XML template file, you specify the milestone
and task properties as XML element and element attributes. SAS Model
Manager does not generate participant identification numbers or participant
lists. You must specify them explicitly in the XML file.
The SAS Model Manager Template Editor Window
You use the SAS Model Manager Template Editor window to create or
modify a life cycle or model template.
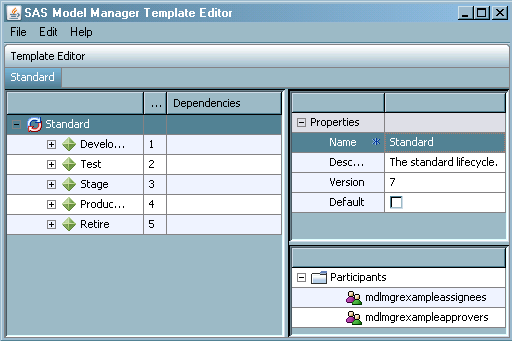
When you open the SAS Model Manager Template Editor window to access a
new or existing life cycle template, the editor displays three panes:
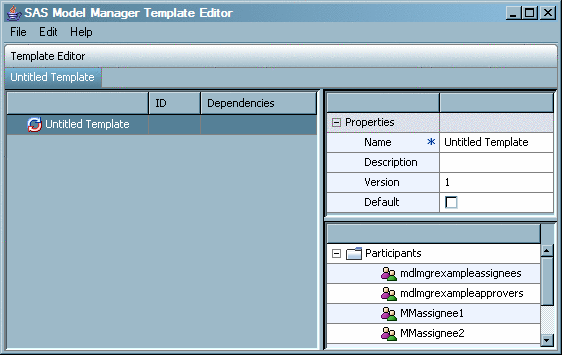
When you open a new
template, the tab at the top of the left pane is titled Untitled Template. The tab name changes to the template
name when you save the template. The template name appears in the
tab and as the root node in the life cycle template tree. The life
cycle template tree has three nodes:
When you select a node
in the tree, the properties for that node appear in the upper right
pane. Required properties are indicated by a blue star  . For a description of life cycle template properties, see Life Cycle Template Properties.
. For a description of life cycle template properties, see Life Cycle Template Properties.
Life Cycle Template Participants
Participant Roles
The following roles
are used to determine who can be assigned to complete a task or who
can mark a task complete or approved:
-
Model Manager: Life Cycle Participant Usage is assigned to SAS Model Manager users and groups whose user ID or group ID appears in the Life Cycle Template Editor Participant list. Only users and groups that are assigned this role for a life cycle, and are in the Participant list can be assigned to the roles Model Manager: Life Cycle Assignee Usage and Model Manager: Life Cycle Approval Usage for the life cycle.
When you open the template
editor, the users and groups that are assigned life cycle roles appear
in the Participants list. You cannot add
or delete users and groups from the Participants list. A best practice
is to ensure that all users and groups have the appropriate life cycle
roles assigned to them before you create a life cycle template in
the template editor.
Selecting Life Cycle Participants
When you open the SAS Model Manager Life Cycle Template Editor, the Participants list displays the SAS Model Manager users
and groups that have been assigned the role Model Manager:
Life Cycle Participant. Only users and groups in this
list can be assigned to complete a task or approve a task.
In the Properties pane, you designate a user or group to complete a task in the Assignee template property. You designate a user or
group to approve a task in the Approver template
property. When you click the ellipsis button for the Assignee or Approver properties, the Select Participants window displays the users and groups
that can be assigned to those tasks.
The participants that
you select in the Select Participants window
determine the users that appear as a value in a version’s Life Cycle node task properties To Be Completed
By and To Be Approved By.
-
If any user or group that you select in the Select Participants window is assigned the role Model Manager: Life Cycle Assignee Usage in the SAS Management Console User Manager, then only the selected users and groups that have that role appear as values for the To Be Completed By task property. Users that you select do not appear in the To Be Completed By task property if they are not assigned that role.
-
If any user or group that you select in the Select Participants window is assigned the role Model Manager: Life Cycle Approver Usage in SAS Management Console, then only the selected users and groups that have that role appear as values for the To Be Approved By task property. Users that you select do not appear in the To Be Completed By task property if they are not assigned that role.
If you select a group
to complete a task or approve a task, any or all members of the group
can be responsible for completing the task or marking that the task
is complete. The group members have the authorization to update the
task Status field. However, only one member
needs to set the corresponding milestone task to Completed or Approved.
Using Groups as Assignee and Approval Participants
After a version is created,
you cannot modify the life cycle definition for that version. This
means that you cannot create new milestones and tasks or remove existing
milestones or tasks. You cannot add or remove users or groups from
the Participants list. However, the value
of the task fields To Be Completed By and To Be Approved By can be changed to specify another
user or group that is listed in the selection list for those task
fields. These fields can be modified only by a SAS Model Manager administrator
or by the current user that is assigned to complete or approve the
task. If a group is specified, then any member of the group can modify
fields.
A best practice is to
assign the value of To Be Completed By and To Be Approved By to a group instead of to a user. If
there is a chance that those responsibilities could be assigned to
other users, you can make changes if you assign a group to those responsibilities
instead of assigning an individual user. Specifying a group for the
assignee and approval responsibilities is preferred because of the
flexibility you then have to add or remove users in a group.
When you specify an
individual user, only that user has the authorization to update the
task Status field. If you specify a group,
any member of the group can update the task Status field. The user ID of the group member who changed the status appears
in the Completed By or Approved
By fields.
Users can be added to
or deleted from a group using SAS Management Console and no changes
are needed in the life cycle template if a group is specified as an Assignee or Approver. For example,
if a user leaves your organization and that user was the only assignee,
then that user's SAS Model Manager user ID cannot be deleted from
the system until the champion model is retired. If your organization
hires a new analyst, you can add that analyst to a group that has
the role of Model Manager: Life Cycle Participant Usage and Model Manager: Life Cycle Assignee Usage. That user can then complete a task and update the task Status field without having to create a new version
and a life cycle template that includes that individual user.
When you assign a group
to be an Assignee or an Approver, all users and groups in that group have the authority to change
the task status. Therefore, ensure that the users and groups that
are defined in the group are those users and groups that you intend
to be an Assignee or Approver.
SAS Model Manager provides
two groups, Model Manager Example Life Cycle Assignee
Users and Model Manager Example Life Cycle
Approver Users. Use these groups only as an example of
how to configure a group in SAS Management Console for Assignees and Approver groups.
Do not include them in your template.
The Browse Templates Window
Using the Browse Templates window, you can access life cycle templates
that are used by SAS Model Manager and are stored on the SAS Content
Server.
To open the Browse Templates window, from the SAS Model
Manager Templates Editor, select File BrowseBrowse Templates.
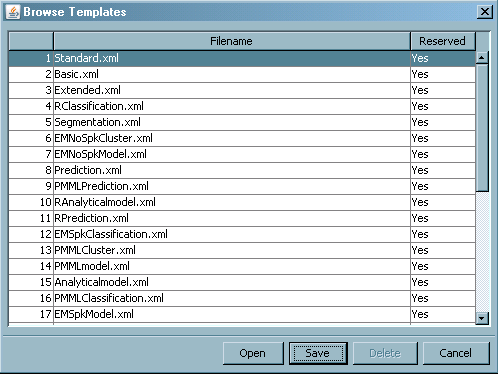
The Browse
Templates window lists life cycle and model templates
that are stored on the SAS Content Server. The first three templates,
Standard.xml, Basic.xml, and Extended.xml are life cycle templates
that are supplied by SAS. A Yes value in
the Reserved column indicates that the template
cannot be modified. These templates are supplied by SAS. A No value indicates that the template can be modified.
Create a Life Cycle Template from a Sample Template
SAS Model Manager supplies
sample life cycle templates (Basic, Standard, Extended, and UserLifecycleTemplate)
that you can use to create a life cycle template. To view the sample
templates, select FileBrowseBrowse Templates. The templates that have Yes in the Reserved column of the Browse Templates window cannot be modified. Select a
template and click Open. You can also view
sample templates in the Life Cycles Perspective of the SAS Model Manager window.
Note: The UserLifeCycleTemplate.xml
template that is supplied by SAS is not a reserved template and can
be modified. When you create a life cycle using this template, rename
the template before you modify it. Only a user or group with the role
of Model Manager: Administration Usage can upload a template.
-
-
To modify milestone properties, click the property and modify the properties in the Properties pane. Properties with an * are required. For a description of the properties, see Milestone Properties.
-
For each task, complete the task properties. For tasks that have multiple values, such as Dependencies, Assignees, and Approvers, click the value field for a list of values or click
 to assign a value. For a description of
the properties, see Task Properties.
to assign a value. For a description of
the properties, see Task Properties. -
To change the position of the milestone in the life cycle tree or to change the position of the task in the milestone tree, right-click the milestone name or the task name and select Move Up or Move Down. A task or milestone can be moved up or down only if no tasks are dependent on later tasks in the tree structure.Note: You can cut or copy milestones and tasks, and paste them as new milestones or tasks. To paste a milestone, right-click the template name and select Paste. To paste a task, right-click a milestone name and select Paste. When you cut or copy a milestone or task, dependencies on that task or milestone are deleted.
Create a New Life Cycle Template
Note: You can view sample life
cycle templates in the Life Cycles perspective. Only a user or group
with the role of Model Manager: Administration Usage can upload a
template.
-
Using a text editor, open the life cycle template XML file that you saved. Remove the individual participants who you do not want to appear in the Participants list. The participants are enclosed in <Participant> </Participant> tags. Be sure to remove the mdlmgrexampleassignees and mdlmgrexampleapprovers participants. If you do not remove these example groups, the To Be Completed By and the To Be Approved By version life cycle task properties cannot display only a list of participants.
-
Assign values to the life cycle properties Description, Version, and Default. For more information, see Template Properties.
-
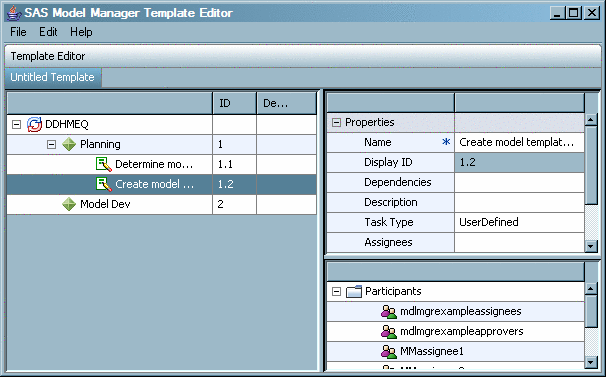
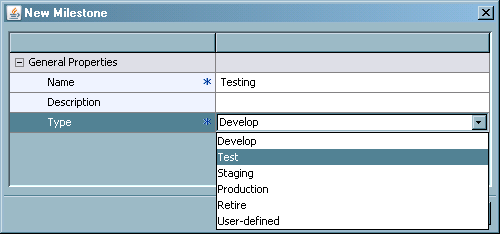
Create milestones for the life cycle. For each new milestone, right-click the template name and select New Milestone. The New Milestone window appears.
-
Click the Type field, select a milestone type, and then click OK. For more information, see Milestone Properties. The milestone is added to the template and assigned a Display ID value.
-
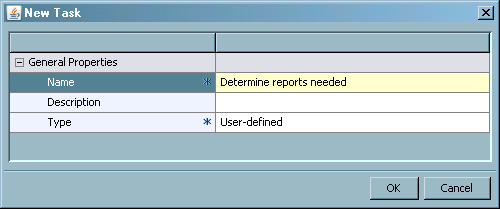
For each milestone, define the tasks for the milestone. Right-click the milestone and select New Task. The New Task window appears.
-
Click on the Type field and select a task type. Click OK. For more information, see Task Properties.
-
For each task, complete the task properties. For more information, see Task Properties.
-
To change the position of the milestone in the life cycle tree or to change the position of the task in the milestone tree, right-click the milestone name or the task name and select Move Up or Move Down. A task or milestone can be moved up or down only if, after the move is complete, no tasks are dependent on later tasks in the tree structure.
-
To delete a milestone or a task, right-click the milestone or task and select Delete. When you delete a task, dependencies on that task are deleted.Note: You can cut or copy milestones and tasks, and paste them as new milestones or tasks. To paste a milestone, right-click the template name and select Paste. To paste a task, right-click a milestone name and select Paste. When you cut or copy a milestone or task, dependencies on that task or milestone are deleted.
Modify a Life Cycle Template
-
To modify life cycle properties, select the property and make changes to the property value. For more information, see Template Properties.
-
Note: Only a user or group with the role of Model Manager: Administration Usage can upload a template.Each time you upload a template to the SAS Content Server, SAS Model Manager increments the template’s Version property value by 1. If you create a backup copy of the template after you upload the template to the SAS Content Server, increment the Version property value by 1 and then save the template. This action ensures that your backup copy is the same version as the version on the SAS Content Server.