Capture Changed Data from Oracle

Problem

You need to load changed data from an Oracle database, with the eventual purpose of updating a dimension table in a star schema.

Solution

Create and run a job that contains an Oracle CDC transformation. The source table contains changed data from an Oracle database. A control table is used to prevent the updates of target rows that were updated in a previous run.
The steps in the following Tasks section assume that the Oracle base table was previously loaded into the dimension table in a separate job. The example job in the task section also assumes that a third job loads the CDC target table into the dimension table using the SCD Type 2 Loader. The SCD Type 2 Loader was not included in this example job as a matter of simplicity. To see an example that uses the SCD Type 2 Loader, refer to Loading a Dimension Table with Type 1 and 2 Updates.
The source changed data table from Oracle contains all of the inserts, updates, and deletes that have occurred since the last time the dimension table was loaded.
To accommodate database deletes, the Oracle CDC transformation calculates new end dates for the corresponding rows in the dimension table. (The dimension table retains a history of data changes by closing-out records, rather than deleting them.)

Tasks

Prerequisites

Perform the following steps to prepare your Oracle source changed data table and control table:
  1. Fulfill the prerequisites for changed data capture, as defined in Prerequisites for Change Data Capture.
  2. Use Oracle tools to create the source changed data table. Typical implementations use database triggers or log mining. Typical tools are the Oracle Data Integrator or the Oracle Log Miner.
  3. Specify a library for the Oracle source table. For more information, see the SAS Intelligence Platform: Data Administration Guide.
  4. To create the control table, select Newthen selectTable.
  5. In the New Table Wizard, create a new table without columns. Specify a table name and a library, and then click Next until you can select Finish. The Oracle CDC transformation provides column definitions when you run the job.

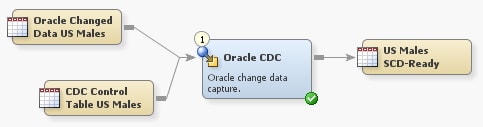
Create and Populate the Job

Perform the following steps to create and populate a job that loads data by using an Oracle changed data table and control table:
  1. Create an empty SAS Data Integration Studio job.
  2. In the Transformations tree, in the Change Data Capture folder, drag the Oracle CDC transformation into the empty job in the Diagram tab.
  3. Select and drag the source changed data table from its folder and drop it before the Oracle CDC transformation on the Diagram tab. In the example job, the source table is named Oracle Changed Data US Males.
  4. Drag the cursor from the source table to the input port of the Oracle CDC transformation. This action connects the source to the transformation.
  5. Select and drag the control table from its folder and drop it before the Oracle CDC transformation in the Diagram tab. In this example job, the control table is named CDC Control Table US Males.
  6. Drag the cursor from the control table to the input port of the Oracle CDC transformation. This action connects the control table to the transformation. Note that the CDC transformation reads the control table without loading any of its data into the target.
  7. Because you want to store the output of the transformation in a permanent target table, right-click the temporary work table that is attached to the transformation and select Replace. Then, use the Table Selector window to select the target table for the job. The target table must be registered in SAS Data Integration Studio. (For more information about temporary work tables, see Working with Default Temporary Output Tables.)
  8. Drag the target table from its folder and drop it after the Oracle CDC transformation on the Diagram tab. In this example, the name of the target is US Males SCD-Ready.
  9. Drag the cursor from an output port of the Oracle CDC transformation to the target table. This action connects the transformation to the target. The following example shows the sample process flow.
    Sample Oracle CDC Process Flow Diagram
    Sample Oracle CDC Process Flow Diagram

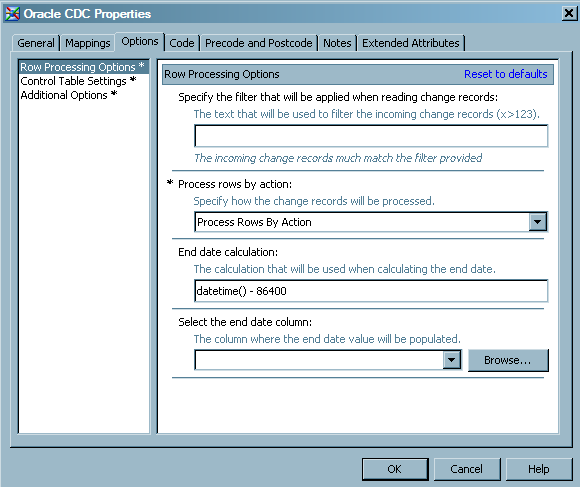
Configure Row Processing

Perform the following steps to specify how rows from the source changed data table are processed for application to the target.
  1. Open the properties window of the Oracle CDC transformation and select the Options tab.
  2. For the option Process Rows by Action, select the value Process Rows by Action. Selecting this option indicates that delete processing instructions in the source changed data table are to be processed by updating an end date/time column in the target.
  3. For the option End Date Calculation, accept the default value, which is used to calculate the date/time value that is added to the target to close-out deleted rows.
  4. For the option Select the End Date Column, click the Browse button and select the numeric column that contains end date/time values. The following display depicts the completed row processing options.
    Row Processing Options
    Row Processing Options

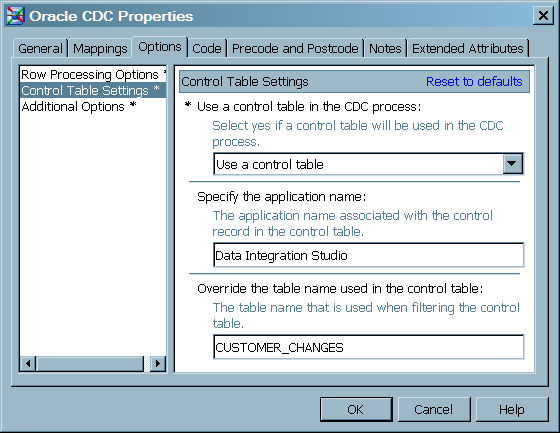
Configure the Use of the Control Table

Perform the following steps to configure the Oracle CDC transformation to use the control table.
  1. On the Options tab, click Control Table Settings in the left panel.
  2. For the option Use a control table in the CDC process, select the value Use a control table.
  3. For the option Specify the option name, accept the default value SAS Data Integration Studio. You would enter a different application name if that application was to supply input data rows based on the contents of the source changed data table and the control table.
  4. For the option Override the table name used in the control table, enter the name of the table that is used to filter the control table. In this example, enter the table name CDC Control Table US Males. You need to enter a value for this option only to use a different table when writing to and reading from the control table. The following display depicts the completed control table settings.
    Completed Control Table Options
    Completed Control Table Options
  5. Click OK to save the option specifications and close the properties window.

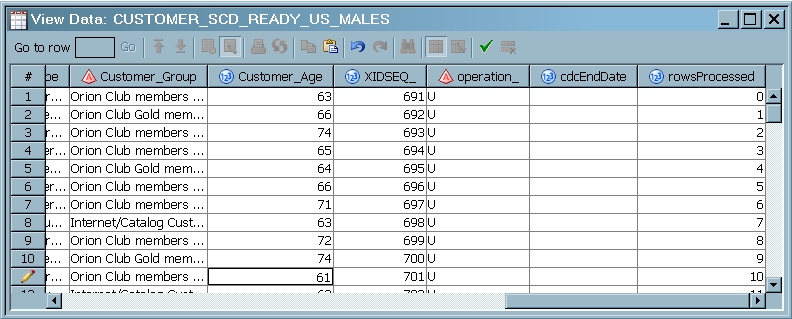
Run the Job, Update the Metadata, and View the Output

Perform the following steps to run the job and view the output:
  1. Right-click in the job and select Run. SAS Data Integration Studio generates code for the job and submits the code to the SAS Application Server for execution.
  2. If error messages are displayed on the Status tab, read and respond to the messages as needed.
  3. To store the metadata for the control table columns that were created by the Oracle CDC transformation, right-click the control table on the Diagram tab and select Update Metadata. This step and the next are necessary only when you create a control table without column definitions, and only after the first time you run the job.
  4. To prevent the columns in the control table from appearing in the target, right-click the Diagram tab and ensure that a check mark does not appear next to Automatically Propagate Columns.
  5. After the completion of the job, right-click the target and select Open. The following display shows the target table data for the sample job.
    CDC Columns in the Sample Target Table
    CDC Columns in the Sample Target Table