Loading a Dimension Table with Type 1 and 2 Updates

Problem

You want to load a dimension table using type 1 updates (overwrites) in certain columns and type 2 updates (track changes) in other columns. You need to generate a primary key for each target row and optimize performance for large source tables.

Solution

You can create a job that includes the SCD Type 2 Loader transformation. You can load Type 1 and Type 2 changes in a single transformation. To optimize performance, you can add a current-row indicator that speeds up the creation of the cross-reference table that is used for change detection.
The sample job includes the following tasks:

Tasks

Create and Populate the Job

Perform the following steps to create and populate the job:
  1. Create an empty SAS Data Integration Studio job.
  2. In the Transformations tree, in the Data folder, drag the SCD Type 2 Loader transformation into the empty job on the Diagram tab.
  3. Select and drag the source table from its folder and drop it before the SCD Type 2 Loader transformation on the Diagram tab. In this sample job, the source contains information on customers.
  4. Drag the cursor from the source table to the input port of the SCD Type 2 Loader transformation. This action connects the source to the transformation.
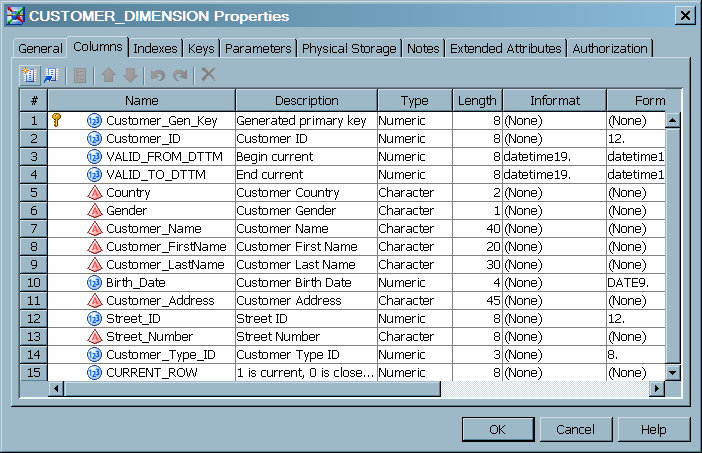
  5. Create a new target table using the New Table Wizard. The sample job uses the same columns as the source, and adds columns for change tracking, performance enhancement, and a generated key. The new columns are defined as follows:
    VALID_FROM DTTM
    receives begin datetime values.
    VALID_TO_DTTM
    receives end datetime values.
    CURRENT_ROW
    receives 1s in current rows and zeros in closed-out rows. Adding this column improves performance in loads that involve large amounts of data. The current row indicator speeds up the process of creating and updating the cross-reference table.
    CUSTOMER_DIM_ID
    receives the generated key values.
    The following display shows the column properties for the new target table:
    Target Column Properties
    Target Column Properties
  6. Drag the target table from its folder and drop it after the SCD Type 2 Loader transformation on the Diagram tab.
  7. Drag the cursor from the output port of the SCD Type 2 Loader transformation to the target table. This action connects the transformation to the target. The following display depicts the process flow in the sample job.
    Sample SCD Type 2 Loader Process Flow Diagram
    Sample SCD Type 2 Loader Process Flow Diagram

Configure the SCD Type 2 Loader

Perform the following steps to configure the SCD Type 2 Loader:
  1. Open the properties window of the SCD Type 2 Loader and select the Change Tracking tab. Note that datetime change tracking is enabled by default, with datetime values delivered to the columns VALID_FROM_DTTM and VALID_TO_DTTM.
  2. Select Use current indicator, and then click the down arrow in Current indicator column. Select the CURRENT_ROW column.
  3. Open the Business Key tab and specify the source columns that comprise the business key. During change detection, the business key columns are compared between each incoming source row and the entire target. If the business keys match between the source and target, then data values are compared to detect changes. Frequently, the business key is the primary key in the source. For the purposes of this example, click New and select Customer_ID.
  4. Open the Detect Changes tab and specify the columns that are tracked for Type 2 updates. The number and length of these columns affects the run-time performance of the job. In the sample job, select Street_ID and Customer_Type_ID, and then click the right arrow.
  5. Open the Type 1 Columns tab and specify the columns that are updated in the most current rows of their respective business keys, without affecting the begin and end datetime values. Select Customer_Lastname and Customer_Address, and then click the right arrow.
  6. Open the Generated Key tab and specify the numeric column that receive the generated key value. Click the down arrow in the Column field and specify CUSTOMER_DIM_ID. When the job runs, unique identifiers are added to this column for each row in the table.
  7. Click OK to save changes and close the properties window.

Run the Job and View the Output

Perform the following steps to run the job and view the output:
  1. Right-click on an empty area of the job, and click Run in the pop-up menu. SAS Data Integration Studio generates code for the job and submits it to the SAS Application Server for execution.
  2. If error messages are displayed on the Status tab, please read and respond to the messages as needed.
  3. After the completion of the job, right-click the target and select Open to view the generated surrogate key values. The following display depicts the target table data for the sample job.
    Key Columns and Change Tracking Columns in the Sample Target Table
    Key Columns and Change Tracking Columns in the Sample Target Table