Set Global Options
Overview of the Configuration Window
You can use the Configuration window
to specify server connections, data sources, global options, and other
settings for SAS Data Loader.
To display this window, click the More icon  in the top right corner of SAS Data Loader.
Then select Configuration. See the following
topics for details about the options in each panel of the window.
in the top right corner of SAS Data Loader.
Then select Configuration. See the following
topics for details about the options in each panel of the window.
in the top right corner of SAS Data Loader.
Then select Configuration. See the following
topics for details about the options in each panel of the window.
Hadoop Configuration Panel
Use the Hadoop
Configuration panel of the Configuration window
to specify credentials, Hive and Impala server connections, and preferences
for the SQL environment and the run-time target.
A Reload button
enables you to load a predetermined Hadoop configuration from a configuration
file.
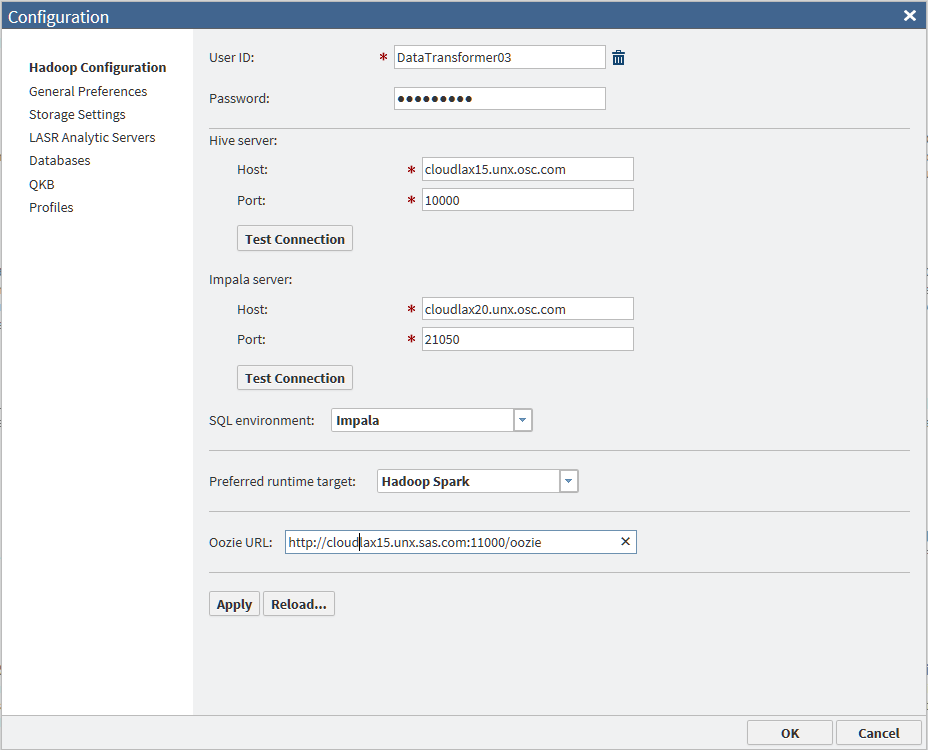
The values for Hive
server, Impala server, and Oozie
URL are often populated when SAS Data Loader is first
initialized. Review these settings and contact your Hadoop administrator
as needed.
Specify the appropriate User
ID. If you are using LDAP authentication, enter a Password.
To reconfigure SAS Data Loader
for a different Hadoop cluster, you must copy a new set of configuration
files and JAR files into the shared folder of the vApp. For more information
about configuring a new version of Hadoop, see SAS Data Loader for Hadoop: vApp Deployment Guide.
The fields and controls
in the Hadoop Configuration panel are defined
as follows:
User ID
The name of the user
account that is used to connect to the Hadoop cluster. If this field
can be edited, specify the name that is provided by your Hadoop administrator.
CAUTION:
Enter a
user ID only when using LDAP authentication.
Entering a user ID
in any other environment disables the use of the Cloudera Impala SQL
environment. If you are not using LDAP authentication, and a User
ID value is displayed, click the trash can icon to remove
that value.
When your cluster uses
a MapR distribution of Hadoop without Kerberos authentication, the User
ID field is populated from a configuration file when
you start the vApp. To change the User ID field,
first enter the new value in the file
vApp-home\shared-folder\hadoop\conf\mapr-user.json.
Next, restart the vApp to read the new value. Finally, open the Hadoop
Configuration panel and enter the new user ID.
Note: If your site
uses a MapR cluster, when the user ID is changed, review the settings
in the Configuration window. It is especially
important to ensure that the Maximum length for SAS columns setting
on the General Preferences panel is not blank. For more information,
see Replace User Preferences after User ID Changes in MapR or Kerberos Environments.
Password
The password for the
user account that is used to connect to the Hadoop cluster. If your
system administrator indicates that the cluster uses LDAP authentication,
a password is required. Enter the password that is provided by the
administrator.
CAUTION:
Enter a
password only when using LDAP authentication.
Entering a password
in any other environment disables the use of the Cloudera Impala SQL
environment.
The Password is
not editable if Kerberos security has been specified in the vApp.
Host (Hive server)
The fully qualified
host name for the Hive server on your Hadoop cluster. A continuously
operational Hive server connection is required by SAS Data Loader
for Hadoop. This value is always required.
Port (Hive server)
The port number on
the Hive server that receives client connection requests. This value
is always required.
Test Connection (Hive server)
Click this button to
validate your Host and Port values,
and to verify that the Hive server is operational.
Host (Impala server)
The fully qualified
host name for the Cloudera Impala server on your Hadoop cluster. This
value is required when the value of SQL environment is Impala.
This value is optional when the value of SQL environment is Hive.
To increase performance,
the Cloudera Impala server is used by certain SAS Data Loader directives
instead of Hive. To learn more, see Enable Support for Impala and Spark.
Port (Impala server)
The number of the port
on the Cloudera Impala server that receives client connection requests.
This value is required when the value of SQL environment is Impala.
This value is optional when the value of SQL environment is Hive.
Test Connection (Impala server)
Click this button to
validate your Host and Port values,
and to verify that the Impala server is operational.
SQL environment
Choose the Impala value
to specify Cloudera Impala as the default environment for new directives,
and to enable job execution in that environment. This value applies
only to the set of directives that support Impala, as listed in Enable Support for Impala and Spark.
Directives that do
not support Impala continue to run in the HiveQL environment as usual.
Individual instances
of the supporting directives can be configured to override the default
value.
Specify the Hive value
in the SQL environment field to establish
Hive as the default SQL environment for new directives.
Note: Changing this value does
not change the SQL environment of saved directives.
Preferred runtime target
Select the value Hadoop
Spark to enable new instances of the supporting directives
to run with Apache Spark by default. Apache Spark must be installed
and fully configured on the Hadoop cluster. If Apache Spark was detected
on the Hadoop cluster during the installation of the SAS In-Database
Technologies for Hadoop, then the Hadoop Spark value
will be set by default.
To learn more about
Apache Spark, including the directives than support it, see Enable Support for Impala and Spark.
Select the value MapReduce to
enable new directives to run with the MapReduce run-time target by
default.
Individual instances
of the supporting directives can be configured to override this default
value.
Oozie URL
Specify the HTTP address
of the Oozie web console, which is an interface to the Oozie server.
Oozie is a workflow
scheduler in Hadoop that manages the execution of jobs. SAS Data
Loader uses Oozie to copy data to and from databases such as Oracle
and Teradata, and to execute directives in the Spark run-time environment.
-
URL format: http://host_name:port_number/oozie/
-
URL example (using default port number): http://my.example.com:11000/oozie/
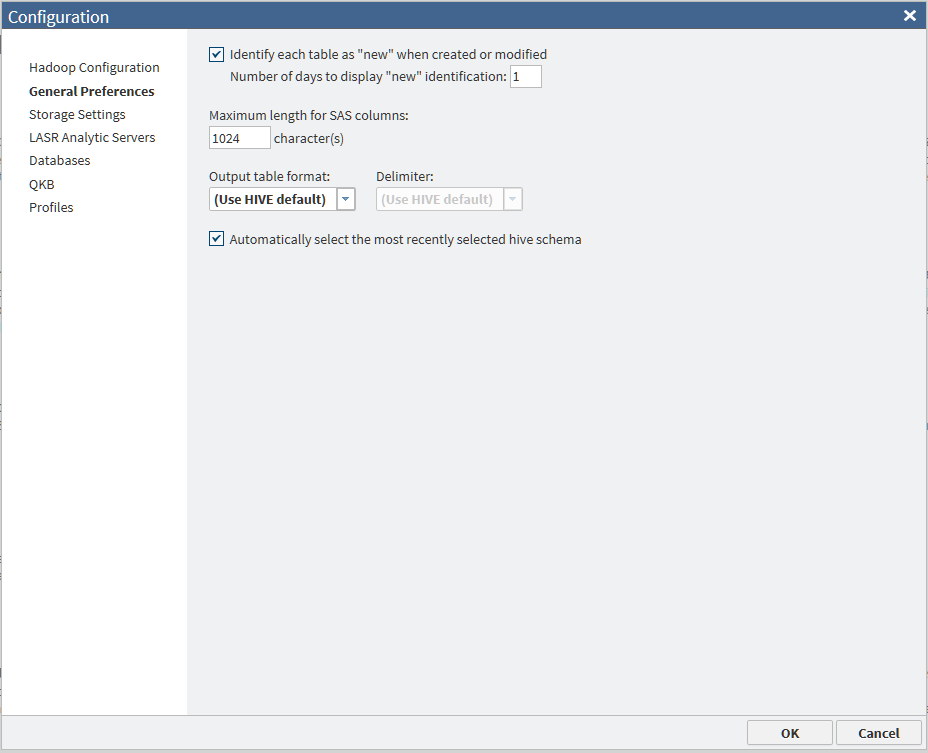
General Preferences Panel
Use the General
Preferences panel of the Configuration window
to specify various global options for SAS Data Loader.
You can change the following
default options:
Identify each table as "new"
specifies the number
of days in which tables are identified as “new” in SAS Data Loader.
The default value is 1 day.
Maximum length for SAS columns
specifies the default
maximum length of string columns of types such as VAR and VARCHAR
in certain directives. The default value of 1024 characters should
perform well in most cases. Strings that exceed the maximum length
are truncated when the source data is read into SAS. For more
information, see Change the Maximum Length for SAS Character Columns.
Output table format and Delimiter
specifies the default
file format and delimiter for target tables. Use the Output
table format drop-down list to select one of five output
table formats: Use HIVE default, Text, Parquet, ORC,
or Sequence.
The Delimiter field
is enabled when you select Text as the output
table format. Select from the drop-down list the character that is
applied by default to delimit the rows in target tables. Available
selections are Use HIVE default, Comma, Tab, Space,
or Other. If you select Other you
are required to enter a delimiter value. The value can consist of
a single character or 3-digit octal value. Valid values in octal values
range from 0 to 177, which is 0 to 127 in decimal. The octal value
indicates the ASCII character number of the delimiter.
For more
information, see Change the File Format of Hadoop Target Tables.
Note: If your cluster runs a MapR
distribution of Hadoop, or if Apache Spark is selected as the run-time
environment, then the Parquet output table format is not supported.
Automatically select the most recently selected
hive schema
If you frequently work
with the same data source across multiple directives, you can have
SAS Data Loader display the most recently used schema in the Source
Table and Target Table tasks.
Note: For more information,
see Viewing Data Sources and Tables.
Storage Settings Panel
Use the Storage
Settings panel in the Configuration window
to specify non-default storage locations for schema temporary files,
Hive, and HDFS.
The fields and controls
in the Storage Settings panel are defined
as follows:
Schema for temporary file storage
To specify a non-default
schema for temporary file storage, click Specify a different
schema and enter the name of an existing schema in Hive.
Hive storage location
To specify a non-default
Hive storage location, click Specify alternate storage
location. Then click the browse button  , or enter an HDFS path that can be read and written
by the user specified in the Hadoop Configuration panel.
, or enter an HDFS path that can be read and written
by the user specified in the Hadoop Configuration panel.
, or enter an HDFS path that can be read and written
by the user specified in the Hadoop Configuration panel.
The browse button displays
the Select Directory window, which lists
accessible directories only. For more information,
see Override the Default Hive Storage Location for Target Tables.
SAS HDFS temporary storage location
To specify a non-default
HDFS temporary storage location for SAS files, click Specify
alternate storage location. Next, click the , or enter an HDFS path that can be read and written
by the user specified in the Hadoop Configuration panel.
, or enter an HDFS path that can be read and written
by the user specified in the Hadoop Configuration panel.
The browse button displays
the Select Directory window, which lists
accessible directories only.
A non-default temporary
storage location might be required if directives cannot write to the
default directory. This can occur if the sticky bit is
set on the default directory, which typically is
/tmp.
When a directory's sticky bit is set, only the directory's owner,
a file’s owner, or the root user can rename or delete the directory
or files in the directory. This is a security measure to avoid deletion
of critical folders and their contents, even when other users have
full permissions. Contact your Hadoop Administrator to receive an
alternate directory that meets your needs.
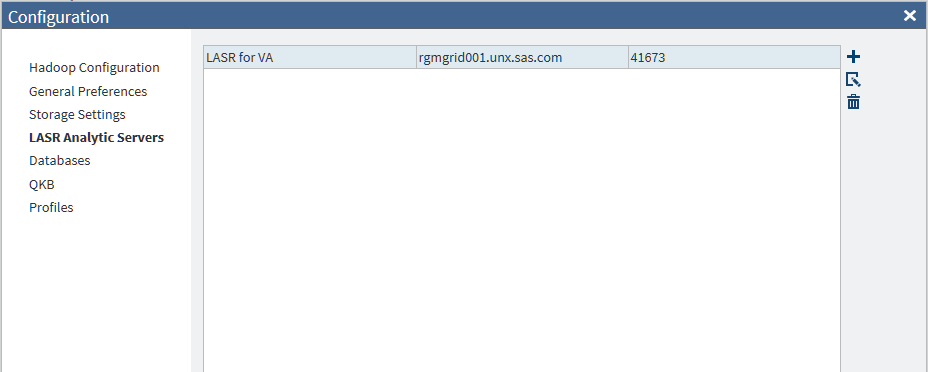
LASR Analytic Servers Panel
Overview
Use the LASR
Analytic Servers panel to configure connections to SAS
LASR Analytic Servers. The server connections can identify independent
SAS LASR Analytic Servers and grids of SAS LASR Analytic Servers.
The connections are required to use the directive Load Data to LASR.
To load data onto a
grid of SAS LASR Analytic Servers, the connection must be optimized
for massively parallel processing (MPP). To load data onto an independent
SAS LASR Analytic Server, the connection must be optimized for symmetric
multi-processing (SMP). The MPP or SMP configuration options are defined
as part of the configuration process.
To add or update a connection
to a SAS LASR Analytic Server or grid of servers, ensure that your
site meets the prerequisites in the following sections. When the prerequisites
are met, see Add or Update Connections to SAS LASR Analytic Servers.
General Prerequisites for SAS LASR Analytic Server
The
prerequisites in this section apply to all instances of SAS LASR Analytic
Server. Ask your SAS LASR Analytic Server administrator to verify
that the following prerequisites have been met:
-
SAS LASR Analytic Server must be release 2.5 or later. The server must be fully operational and configured to start automatically.
-
SAS Visual Analytics 6.4 or later must be installed and configured on the SAS LASR Analytic Server.
-
SAS LASR Analytic Server must be registered on a SAS Metadata Server.
-
SAS LASR Analytic Server must have memory and disk allocations that are large enough to accept Hadoop tables. Jobs created with the Load Data to LASR directive cannot ensure that sufficient storage is available in SAS LASR Analytic Server.
-
The GatewayPorts option on the SAS LASR Analytic Server must be enabled for the User ID that is specified in the LASR Server Configuration window.
If the GatewayPorts
option is not enabled, the Load Data to LASR directive will fail.
You will get an error about failing to load analytical extension for
the distributed computing environment. To set the GatewayPorts option
for a specific user, ask an administrator to perform the following
steps on the SAS LASR Analytic Server or to the head node on the SAS
LASR Analytic Server grid:
-
Log on as root or as a user with sudo.
-
Edit the file
/etc/ssh/sshd_config. For LASR_USER_ID (the User ID that is specified in the LASR Server Configuration window), make the following edits. -
To set the GatewayPorts option for a specific user, add this line to the end of the file:
Match User LASR_USER_ID -
Add the line to the end of the file:
"GatewayPorts clientspecified" -
Restart sshd. For example, in many Linux environments, you would issue a command similar to this:
service sshd restart
Additional Prerequisites for Kerberos Authentication
Display the Hadoop Configuration
panel of the Configuration window.
If the User ID field is not editable, the
Hadoop login for SAS Data Loader
has been configured for Kerberos authentication. The following additional
prerequisites apply.
-
The user ID used to log on to the Hadoop cluster and the user ID used to log on to SAS LASR Analytic Server must be identical. Take note of the User ID that is specified in the Hadoop Configuration panel. Ask the SAS LASR Analytic Server administrator to create an account for that user ID on the SAS LASR Analytic Server.
-
SAS Data Loader, the Hadoop cluster, and the SAS LASR Analytic Server must share a single Kerberos realm. The Kerberos realm for SAS Data Loader and the Hadoop cluster is specified in the SAS Data Loader: Information Center Settings window in the vApp. Ask the SAS LASR Analytic Server administrator to verify that the user ID on the SAS LASR Analytic Server is in the same Kerberos realm.
-
When SAS Data Loader is configured, a Kerberos user ID and realm are entered into the SAS Data Loader: Information Center Settings window in the vApp. When this information is saved, a public key for that user is placed in the shared folder for SAS Data Loader. Ask the SAS LASR Analytic Server administrator to copy this public key to the SAS LASR Analytic Server or to the head node on the SAS LASR Analytic Server grid. The public key must be appended to the authorized keys file in the .ssh directory of that user.
-
Review the fields in the LASR Server panel of the Configuration window. Ask the SAS LASR Analytic Server administrator to provide the information that is required to specify a connection in this window.
After these prerequisites
have been met, you can add a connection to a SAS LASR Analytic Server. See Add or Update Connections to SAS LASR Analytic Servers.
Additional Prerequisites When Kerberos Authentication Is Not Used
Display the Hadoop Configuration
panel of the Configuration window.
If the User ID field is editable, the Hadoop
login for SAS Data Loader
has been configured for no authentication or for an authentication
method other than Kerberos. The following additional prerequisites
apply.
-
The user ID used to log on to the Hadoop cluster and the user ID used to log on to SAS LASR Analytic Server must be identical. Take note of the User ID that is specified in the Hadoop Configuration panel. Ask the SAS LASR Analytic Server administrator to create an account for that user ID on the SAS LASR Analytic Server.
-
The user account above must be configured with Secure Shell (SSH) keys on the SAS LASR Analytic Server.
-
All banners must be disabled for the SSH login for the User ID that is specified in the LASR Server Configuration window.
Configure Secure Shell
(SSH) keys. To configure Secure Shell (SSH) keys on the SAS LASR Analytic
Server, ask the SAS LASR Analytic Server administrator to perform
these steps:
-
The administrator generates a public key and a private key for the SAS Data Loader user account and installs those keys in SAS LASR Analytic Server, as described in the SAS LASR Analytic Server: Reference Guide.
-
The administrator copies the public key file (for example, sasdemo.pub) from the SAS Data Loader Configuration directory.Note: Note: If MapR is the Hadoop environment, then the SSH key file is a PUB file named after the user name found in the mapr-user.json file (for example, etlguest.pub).
-
The administrator appends the SAS Data Loader public key to the file
~designated-user-account/.ssh/authorized_keys.If SAS LASR Analytic Server is configured across a grid of hosts, then the public key is appended in the head node of the grid.CAUTION:To maintain access to SAS LASR Analytic Server, you must repeat step 3 each time you replace your installation of SAS Data Loader for Hadoop.Note: It is not necessary to repeat this step if you update your vApp by clicking the Update button in the SAS Data Loader: Information Center.
Disable banners for
the SSH login. The SAS LASR Analytic Server might have banners enabled
for SSH logins. Login banners interfere with communication between
SAS Data Loader and SAS LASR Analytic Server. Accordingly, all banners
must be disabled for the SSH login for the User ID that
is specified in the LASR Server Configuration window.
To disable banners for
a specific user ID, ask an administrator to perform the following
steps on the SAS LASR Analytic Server or to the head node on the SAS
LASR Analytic Server grid:
-
Login as root or as a user with sudo.
-
Edit the file
/etc/ssh/sshd_config. For LASR_USER_ID (the User ID that is specified in the LASR Server Configuration window, make the following edits. -
If you want to disable banners for a specific user, add this line to the end of the file:
Match User LASR_USER_ID -
Locate any lines in the file that have the Banner option in them. Example:
Banner /etc/issue.net -
Comment out these lines by adding a number sign (#) in front of them. Example:
# Banner /etc/issue.net -
Restart sshd. For example, in many Linux environments, you would issue a command similar to this:
service sshd restart
Get connection information
from the SAS LASR Analytic Server administrator. Review the fields in
the LASR Server panel of the Configuration window. Ask
the SAS LASR Analytic Server administrator to provide the information
that is required to specify a connection in this window.
After these prerequisites
have been met, you can add a connection to a SAS LASR Analytic Server. See Add or Update Connections to SAS LASR Analytic Servers.
Additional Prerequisites for SSL Connections
If you want SAS Data
Loader to connect to a SAS LASR Analytic Server in a deployment where
the SAS Web Server is secured with Secure Socket Layer (SSL), you
must do the following tasks.
-
Contact the administrator who is responsible for SSL certificates for your site.
-
Obtain the SSL certificate file that is required to access the SAS LASR Analytic Server. The SSL file contains the public certificates for the trusted certification authorities (CA) for your site. The CA file must be PEM-encoded (base64). The name of the file will be cacert.pem.
-
Locate the shared folder (
SASWorkspace\Configuration) on the SAS Data Loader host. -
Create a subfolder named certs under the shared folder:
SASWorkspace\Configuration\certs. -
Copy the SSL certificate file to the certs subfolder:
SASWorkspace\Configuration\certs\cacert.pem.
After these prerequisites
have been met, you can add a connection to a SAS LASR Analytic Server,
as described in the next section.
Add or Update Connections to SAS LASR Analytic Servers
After the prerequisites
above have been met, you can add a connection to a SAS LASR Analytic
Server. Perform these steps:
-
In the SAS Data Loader directives page click the More icon
 and select Configuration.
-
Click SAS LASR Analytic Servers.
-
To configure a new connection to SAS LASR Analytic Server, click the Add icon
 . To change an existing connection to SAS LASR Analytic
Server, click that connection in the list, and then click the Edit icon
. To change an existing connection to SAS LASR Analytic
Server, click that connection in the list, and then click the Edit icon  . To delete a connection to SAS LASR Analytic Server,
select it and click the Delete icon
. To delete a connection to SAS LASR Analytic Server,
select it and click the Delete icon  .
.
-
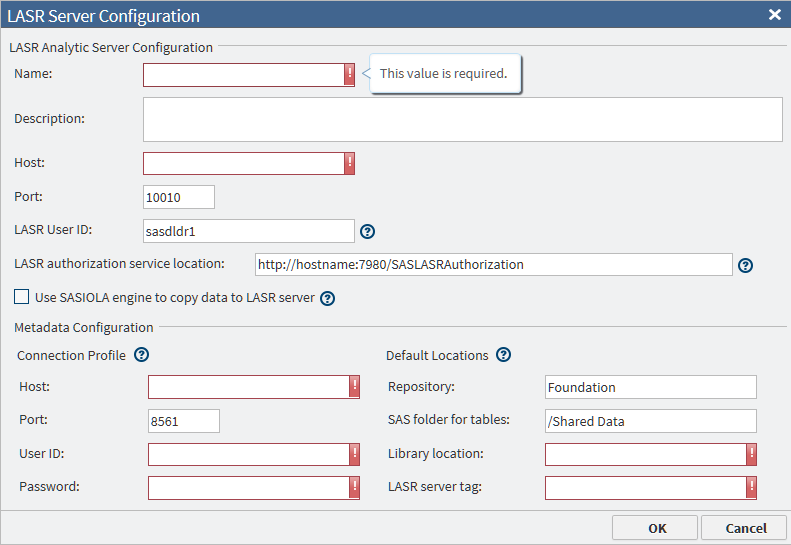
In the LASR Server panel of the Configuration window, enter or change your choice of server name and description in the Name and Description fields.
-
In the Host field, add or change the full network name of the host of the SAS LASR Analytic Server. A typical name is similar to lasr03.us.ourco.com.
-
In the Port field, add or change the number of the port that the SAS LASR Analytic Server uses to listen for connection requests from SAS Data Loader. The default port number is 10010.
-
If your Hadoop cluster uses Kerberos for authentication, then the value of the LASR User ID field is not used. It is assumed to be the same as the User ID that is specified in the Hadoop Configuration panel.If your Hadoop cluster does not use Kerberos for authentication, enter the name of the user account on the SAS LASR Analytic Server that received SSH keys, as described in Additional Prerequisites When Kerberos Authentication Is Not Used. Consult your administrator to confirm whether you should specify a user ID in this field and, if so, which user ID you should use. If no user ID is specified, the user sasdldr1 is used.
-
In the field LASR authorization service location, add or change the HTTP address of the authorization service. You can specify an HTTPS URL if you have done some additional set up. See Additional Prerequisites for SSL Connections.
-
If your SAS LASR Analytic Server is configured to run on a grid of multiple hosts, deselect Use SASIOLA engine to copy data to LASR server. Not selecting this field indicates that massively parallel processing (MPP) will be used in the SAS Data Loader jobs that use this connection.If your SAS LASR Analytic Server supports symmetric multiprocessing (SMP) on a single host, click Use SASIOLA engine to copy data to LASR server.
-
Under Connection Profile, in the lower of the two Host fields, add or change the network name of the SAS Metadata Server that is accessed by the SAS LASR Analytic Server.
-
In the lower of the two Port fields, add or change the number of the port that the SAS Metadata Server uses to listen for client connections. The default value 8561 is frequently left unchanged.
-
In the User ID and Password fields, add or change the credentials that SAS Data Loader will use to connect to the SAS Metadata Server. These values are stored in encrypted form.
-
Under Default Locations, in the Repository field, specify the name of the repository on the SAS LASR Analytic Server that will receive data from Hadoop. The default value
Foundationmight suffice. -
In the field SAS folder for tables, specify the path inside the repository on the SAS LASR Analytic Server that will contain the data that is loaded from Hadoop. The default value
/SharedDatamight suffice. -
In the Library location field, add or change the name of the SAS library on the SAS LASR Analytic Server that will be referenced by the Load Data to LASR directive.
-
In the LASR server tag field, add or change the name of the tag that the SAS LASR Analytic server will associate with each table that is loaded from Hadoop. The tag is required to uniquely identify tables.
-
Review your entries and click OK to return to the Configuration window.
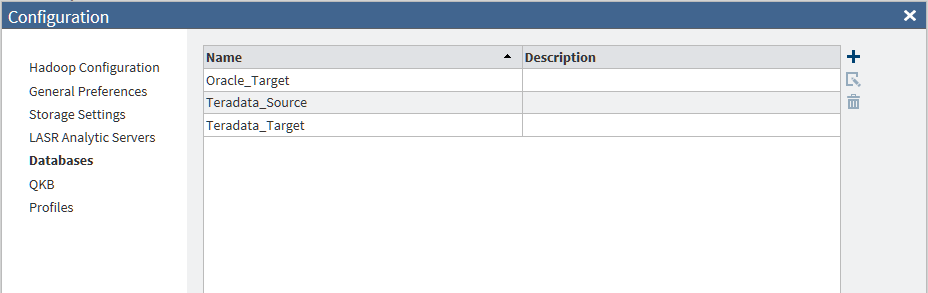
Databases Panel
Overview
Use the Databases
Panel to define connections to the databases that supply
data to Hadoop and receive data from Hadoop. SAS Data Loader directives
such as Copy Data to Hadoop and Copy Data from Hadoop require JDBC
connections in order to access tables in databases. The Databases panel
of the Configuration window enables you to
maintain these connections.
To prepare to add or
update database connections, ensure that the JDBC database driver
in Hadoop matches the driver in the SASWorkspace folder on your SAS
Data Loader host. As needed, see Copy JDBC Drivers to the SAS Data Loader Host.
When the JDBC drivers
are in place on your local host, see Add or Update Database Connections.
Copy JDBC Drivers to the SAS Data Loader Host
SAS Data Loader uses
the SQOOP and Oozie components installed with the Hadoop cluster to
move data to and from external databases. SAS Data Loader accesses
those same databases directly, to display schemas and tables. For
this reason, your instance of SAS Data Loader needs to receive the
same set of JDBC drivers that are installed in the Hadoop cluster.
During the installation
of SAS Data Loader, as described in the SAS Data Loader for Hadoop: vApp Deployment Guide, your
Hadoop administrator is asked to provide you with the required JDBC
drivers. Those are the drivers that you will install on in your SASWorkspace
folder.
You can also follow
these steps if your site adds support for new databases, after the
installation of SAS Data Loader:
-
As needed, ask your Hadoop administrator for a copy of the JDBC drivers that are installed on your Hadoop cluster.
-
On the SAS Data Loader host, navigate to the SASWorkspace folder and open the JDBCDrivers folder. Here is a typical path to the JDBCDrivers folder:
C:\Program Files\SAS Data Loader\2.x\SASWorkspace\JDBCDrivers
-
Copy the files for the JDBC drivers into JDBCDrivers folder.
-
Restart the vApp so that it can pick up the JDBC drivers.Note: Before you stop the vApp, check the Run Status directive to ensure that all jobs are stopped and saved.Note: Suspending the vApp is not sufficient to detect the new drivers.
SAS Data Loader now
has access to the JDBC drivers. The next task is to add connections
to the databases for which you have new JDBC drivers.
Add or Update Database Connections
After you have copied
the appropriate JDBC drivers into the shared folder on the SAS Data
Loader host, you can add connections to the corresponding databases.
-
Contact the administrators of the databases to which you want to connect. Ask for the usual information that you would need to connect to a database: host name, port, log on credentials, and so on.
-
In SAS Data Loader, click the More icon
 and select Configuration.
-
In the Configuration window, click Databases. To add a new database connection, click Add
 . To edit an existing database connection, click the
name of the connection, and then click Edit .
. To edit an existing database connection, click the
name of the connection, and then click Edit .
-
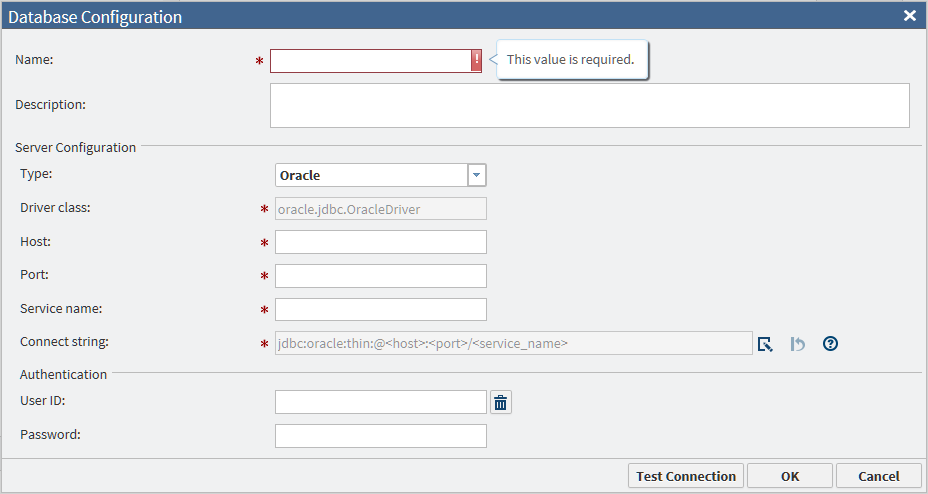
The values of Driver class and Connect string are generated automatically when you select either Teradata or Oracle in the Type field. For an Oracle connection that requires a Service ID (SID), enter the SID in the Database name field. If you select Other, you must obtain these values from the JDBC driver provider.
-
When the configuration data is ready, click Test Connection to verify that the connection is operational.
-
If the test fails for a new Oracle connection, then examine the Connect string field. If the string has either of the following formats, then change the string to the other format and test the connection again.
jdbc:oracle:thin:@raintree.us.ourco.com:1521:oadev

jdbc:oracle:thin:@raintree.us.ourco.com:1521/oadev
One version uses a final colon character. The other version uses a final slash character.To edit the Connect string field, click Edit.
-
Click OK to close the window. SAS Data Loader directives can now use this database connection.
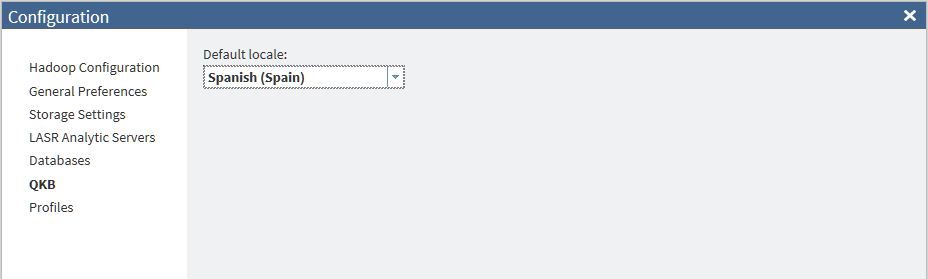
QKB Panel
Use the QKB panel
in the Configuration window to specify the
national language that is used by default in the Quality Knowledge
Base.
A SAS Quality Knowledge
Base (QKB) is a collection of files that store data and logic that
define data management operations such as parsing, standardization,
and matching. SAS Data Loader for Hadoop refers to the QKB when cleansing
data in Hadoop.
A QKB supports locales
that define how spoken language is written and used in geographic
regions.
To choose a different Default
locale, select a locale from the menu. The default locale
should match the typical locale of your source data.
You can override the
default locale in any of the data quality transformations in the Cleanse
Data directive. For more information
about this directive, see Cleanse Data.
Profiles Panel
Use the Profiles panel
to configure the reports that are collected on specified Hadoop tables
using the Profile Data directive. For more information
about this directive, see Profile Data.
Profile reports enable
you to assess the composition, organization, and quality of tables
in Hadoop.
Data profiling tasks
can be resource-intensive. Accordingly, the Profiles panel
of the Configuration window enables you to
change defaults, which can improve the performance of new profile
jobs.
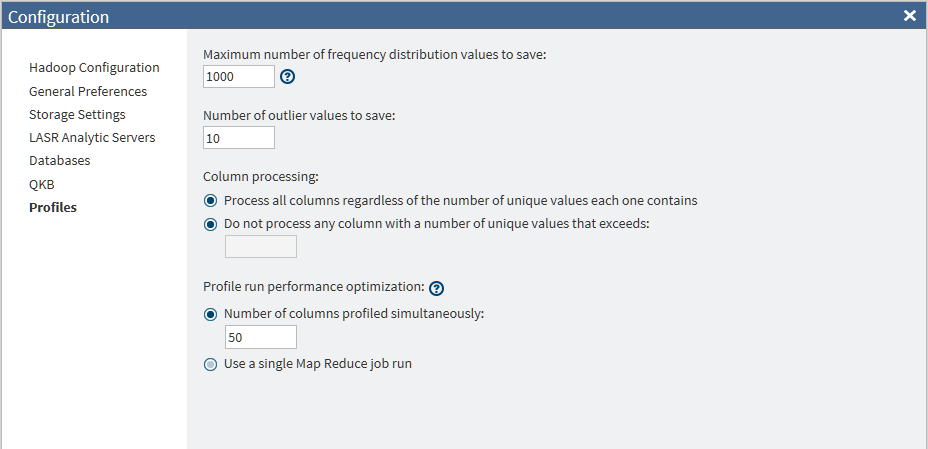
You can change the following
default options for profiles:
Maximum number of frequency distribution values
to save
specifies the maximum
number of frequency distribution values (1–99999999) to save
during the profile run. The default value is 1000. If there are more
frequency distribution values than this number, the less-frequent
values are combined into an Other frequency distribution.
Number of outlier values to save
specifies the maximum
number of outlier values (1–99999999) to save during the profile
run. The default value is 10, which indicates that the 10 highest
and 10 lowest values are saved.
Column processing
specifies how columns
are processed with regard to unique values. When you select Do
not process any column , the default number of 1000 appears
in the text box. Any column that has more than this number of unique
values is, in effect, an outlier column. Continued processing of outlier
columns adds little value to the profile report. You can increase
the performance of your profile jobs by excluding columns with unique
values.
Number of columns profiled simultaneously
specify the number
of columns that are processed simultaneously by default. The default
value of this field is 50.
Use a single MapReduce job run
select this option
when you primarily profile small tables with less than 50 columns.
Copyright © SAS Institute Inc. All Rights Reserved.