Inventorying Your Current SAS Deployment
Overview of Inventorying Your Current SAS Deployment
A key to successfully migrating
your SAS content—data and configuration—is knowing exactly
what SAS products you are running on each machine at your site. SAS
provides a tool to help you do just that. The SAS
Migration Utility sweeps a machine to locate your
current SAS content and performs a validation to ensure that the content
can be reliably migrated. During this analyze
phase, the migration utility also generates a migration analysis report.
Using this report, you can determine those SAS products found on your
current SAS system to be eligible for automatic migration with the
SAS Deployment Wizard.
You can obtain The SAS
Migration Utility in two ways: by downloading it separately from the
SAS Support Web site or by locating the version that is shipped with
your SAS 9.3 order. Later in this manual when you are instructed to
build a migration package, make sure that you use the version of the
migration utility that is shipped with your SAS 9.3 order. For more
information, see Create the Migration Package.
Complete a Migration Utility Checklist
The SAS Migration
Utility relies on a set of input values such as where you have installed
SAS and SAS Metadata Server connection information. We recommend that
you compile a list of the necessary input values before you run the
migration utility.
Note: If you have not installed
SAS in the same directory on each machine, then complete the following
table for every machine in your current SAS deployment.
SAS Migration Utility Checklist
|
Metadata server connection
profile pathname1
|
||
|
For more information,
see the sections under Review Product-Specific SAS Migration Utility Properties.
|
||
|
Xythos or non-Xythos
properties (if you are migrating a machine that contains a WebDAV
server)
|
||
|
JDBC connection credentials
for the Shared Services database.2
For more information,
see SMU.webinfpltfm.dbms.userid.
|
||
SMU.isMultipleTierMachine=
true
Set this property to true when multiple SAS tiers are deployed on the same machine. For more information,
see SMU.isMultipleTierMachine.
|
||
| 1You can use a connection profile, or provide the equivalent metadata server information about the migration utility command line or in a utility properties file. | ||
| 2(In SAS 9.3, this is referred to as the SAS Web Infrastructure Platform database.) | ||
| 3Required when you are migrating a SAS 9.2 middle tier only. | ||
Note: The connection profile that
you use should access the metadata server using a full qualified host
name or an IP address. Do not refer to the metadata server as
localhost or
its IP equivalent (127.0.0.1) unless all of
the machines in your SAS deployment are able to connect to the server
using that host name.
Prepare Your Metadata Repositories
Before you migrate your metadata
repositories, prepare for migration by performing the following steps:
-
For more information, see “Administering SAS Data Integration Studio” in SAS Intelligence Platform: Desktop Application Administration Guide appropriate for your version at http://support.sas.com/documentation/onlinedoc/etls.
Managing the Query Cache Library Folder
Before migrating to SAS 9.3,
you should remove data sets from the query cache library folder. Temporary
data sets should be deleted, and any permanent data sets should be
moved to a new folder and re-registered within SAS Management Console
with the appropriate library. Temporary data sets slow down migration.
SAS Web Report Studio 4.3 deletes all other libraries (such as other
data sets inappropriately placed in this folder for temporary data)
when it first executes with SAS 9.3.
By default, the query
cache library file system folder resides in the SAS configuration
directory in the
wrstemp subdirectory
(for example, SAS-configuration-directory\Levn\SASApp\Data\wrstemp).
If a path other than
the default was specified, you can locate the query cache library
folder by examining WebReportStudioProperties.xml, located in the
WEB-INF folder
under the Web container for SAS Web Report Studio. You can verify
this value in SAS Management Console by right-clicking the library,
choosing Properties, and confirming the value
displayed in the Options tab. (The Options tab
also shows the file system folder path for the query cache library
in the selected items display.)
SAS Migration Utility Requirements
Here
are the requirements for installing and running the SAS Migration
Utility:
-
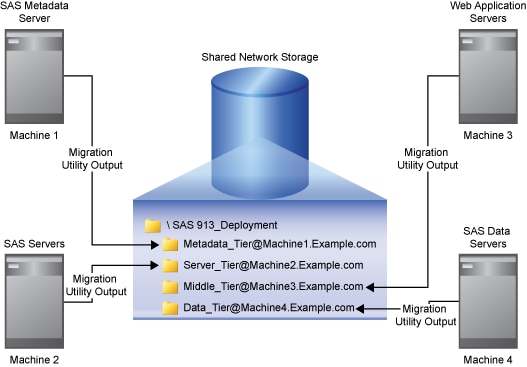
The migration utility must be run on every machine that is running the current version of the SAS Intelligence Platform. (Run the migration utility on machines that contain the SAS server tier or middle tier only. Do not run the migration utility on machines that contain SAS clients only.)For SAS multiple-machine deployments, we recommend that you copy the utility to shared network storage that is accessible from every SAS machine to avoid having to copy the migration utility separately on each machine. You can then log in to each machine and execute the utility from this shared network storage location.
-
On SAS multiple-machine deployments, the migration utility must be able to write to (and read from) its output directory.We recommend that the utility output directory be on shared network storage accessible to every SAS machine in the deployment. For an example, see the following figure:
If no shared storage is available, then you must copy the migration package to each successive machine to have the migration utility add the machine's content to the migration package. (The metadata server must be packaged first.) If you use File Transport Protocol (FTP) to copy the migration package, make sure that you specify the file transfer type to binary. -
The migration utility requires that each SAS machine contain the appropriate version of the Java Runtime Environment (JRE), documented at http://support.sas.com/resources/thirdpartysupport/index.html. (You can also download the necessary JRE from this Web site.)
Download the SAS Migration Utility
You do not have to wait for your SAS 9.3 order to arrive
to begin using the SAS Migration Utility. Simply go to the SAS product
download site to download the migration utility:
-
Ensure that you have met the requirements listed in the topic SAS Migration Utility Requirements.
-
Note: SAS also supplies a migration utility template file (smu.properties.template) that provides examples for how to use various properties. You can find the template file at the same URL where you download the SAS Migration Utility: http://www.sas.com/apps/demosdownloads/setupintro.jsp.
-
After you have downloaded the migration utility, move the utility to a storage location that is accessible to your current SAS deployment (such as a shared network drive).There is a unique SAS Migration Utility for each supported operating system family. If your current SAS deployment is a multi-platform deployment, you will have to download the appropriate migration utility for the operating systems on which you have deployed SAS: Windows, UNIX, and z/OS.Note: This version of the SAS Migration Utility is provided for users who have not yet received their SAS 9.3 software, and are interested in assessing the scope of migration for their currently installed products. When you receive your SAS 9.3 software, you should use the version of the SAS Migration Utility that is included with the order to perform the migration, guaranteeing compatibility with the versions of the products ordered.
Develop a Common SAS Migration Utility Properties File
As the SAS Migration
Utility is run from an operating system prompt or command line, typing
a set of invocation options can be error prone. If you deployed SAS
in a similar manner across multiple machines, you can benefit from
creating a common migration utility properties file and reduce the
amount of input you must enter on the migration utility command line.
Note: SAS supplies a migration
utility template file (smu.properties.template) that provides examples
for how to use various properties. You can find the template file
at the same URL where you download the SAS Migration Utility: http://www.sas.com/apps/demosdownloads/setupintro.jsp. SAS also ships the template with the SAS Software Depot
in the
smu subdirectory underneath utilities.
For more information, see Running the Migration Utility Using a Properties File.
-
Complete a migration utility checklist listed in the topic Complete a Migration Utility Checklist.
-
Add any necessary product-specific migration utility properties. (See the topic Review Product-Specific SAS Migration Utility Properties.)
-
Required SAS Migration Utility PropertiesSMU.SASROOT=C:\\Program Files\\SAS\\SASFoundation\\9.21SMU.webinfpltfm.dbms.userid2SMU.scs.allow.sync2SMU.isMultipleTierMachine3
1Paths containing spaces in properties files do not require double quotes. 2Required when you are migrating a SAS 9.2 middle tier only. 3Required when multiple SAS tiers are deployed on the same machine.
Review Product-Specific SAS Migration Utility Properties
Some SAS products have
unique properties that the SAS Migration Utility uses when creating
a migration analysis report, or later in the process when the utility
builds a migration package. For more information, see Product-Specific SAS Migration Utility Properties Overview.
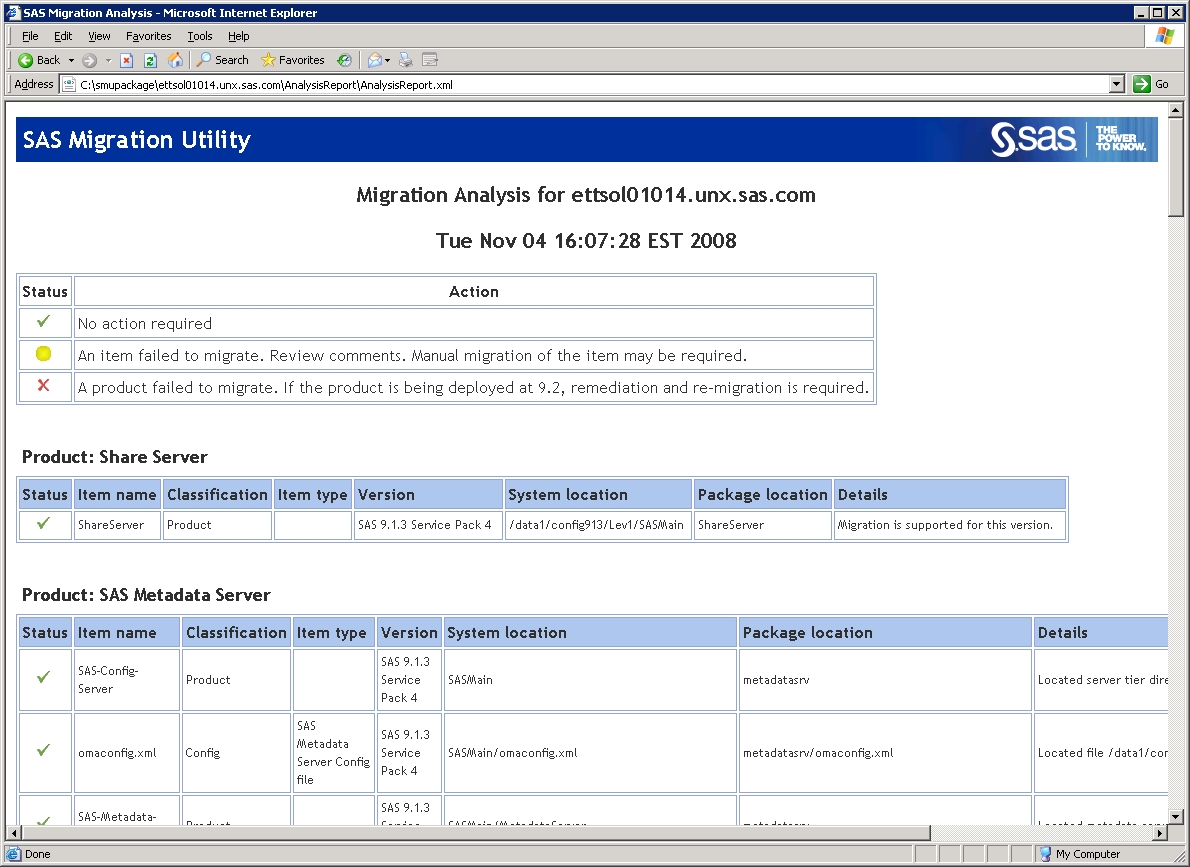
Create a Migration Analysis Report
The
SAS Migration Utility has two execution modes: an analyze mode and
a package mode. Before creating a migration package that the SAS Deployment
Wizard uses to perform the actual migration, we recommend that you
run the migration utility in analyze mode in order to create a migration
analysis report. This report is useful in helping you determine exactly
which SAS products are deployed on each machine in your current SAS
system.
-
For more information, see SAS Migration Utility Requirements.
-
For more information, see Back Up Your Current SAS System.
-
For more information, see Complete a Migration Utility Checklist.
-
If the version of the migration utility that you are using has changed from one that you have used previously, then be sure to delete the migration utility's output directory. (For example, in the past, you might have downloaded and run an earlier version of the migration utility to create an analysis report. If so, delete the output created by the older migration utility.)
-
Use the common migration utility properties file and the common connection profile you have developed, unless the target machine requires any special modifications (for example, SAS is installed on a machine-specific path).For more information, see Develop a Common SAS Migration Utility Properties File.
-
Add any necessary product-specific migration utility properties to your properties file. (See Review Product-Specific SAS Migration Utility Properties.)
-
Invoke the migration utility to run in analyze mode, using the following command from an operating system prompt or command line. If you are running the migration utility on a SAS 9.1.3 WebDAV tier, be sure to use the
-davtieroption or SMU.isdavtier property:For more information about migration utility commands, see SAS Migration Utility Overview.SAS 9.2 on Windows 64-bitsmu92_x64 -analyze -properties absolute pathname to property file -replaceNote: If you are including WebDAV content in your migration package, it does not matter where the WebDAV store is located in your current SAS environment. The migration utility copies WebDAV content to the configured WebDAV location in your 9.3 environment. In a default SAS 9.3 configuration, that WebDAV location is the SAS Content Server. -
To verify that the inventory report successfully completed, open the migration utility log file and scroll to the very end of the log. (The migrate.log file resides in the top-level directory of your migration utility output directory.)
-
If you have a multi-tier SAS deployment, you will need to create a migration analysis report for each machine. There are specific options depending on the tier, (for example,
-davtier). For more information, see SAS Migration Utility Overview.
View and Analyze Your Migration Analysis Report
With your migration
analysis report in hand, you and your SAS representative can determine
what, if any, further maintenance must be applied to your current
SAS products in order for your system to be eligible for automatic
migration with the SAS Deployment Wizard.
To view your migration
analysis report, point a Web browser to the AnalysisReport.xml file
in the
AnalysisReport subdirectory
underneath the output directory you specified when you last ran the
SAS Migration Utility.
Using the report, answer
these questions:
-
Is there content stored outside the configuration directory that I have to deal with after I migrate? (For more information, see Migrating Content Stored outside the SAS Configuration Directory.)
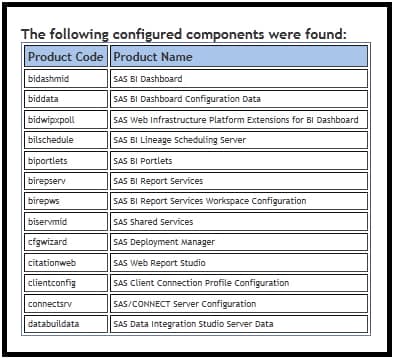
This list of configured
products can be helpful in creating a SAS 9.3 deployment plan to
use with the SAS Deployment Wizard during the installation and migration
task of your SAS 9.3 migration.
For more explanation
on analysis report messages, go to http://support.sas.com/migration/utilitynotes
View and Analyze the Migration Log
In addition
to studying your migration analysis report, the log file produced
by the SAS Migration Utility can also detect possible problems with
your content. The migration utility creates a log in the output directory
for each machine on which it is run (for example,
C:\migration_package\web_tier\migrate.log).
A Note about SAS Tables Stored under the SAS Configuration Directory
Even though the SAS
automated migration tools migrate SAS tables that reside under the
current SAS configuration directory and in a
SASEnvironment or Data folder,
the best practice is to store your SAS tables outside the SAS configuration
directory. Migrating large amounts of data encountered under the configuration
directory slows migration utility performance.