The PM Procedure

Example 5.6 Editing Progress
Once a project plan has been established and the project is under way, a major part of a project manager’s responsibility is to monitor the project as it progresses. This example uses the PM window to add progress information to the project and discusses some of the related editing functions.
In the final window of Example 5.5 (shown in Output 5.5.3), do the following:
-
Delete the baseline schedule using the Edit menu.
-
From the Edit menu, select Add Progress.
The resulting display is shown in Output 5.6.1. The Gantt View now shows the Actual Schedule bar (in cyan) between the Early Schedule bar and the Resource Schedule bar. It also displays a Timenow Line. Since no progress information has been entered, the Timenow Line (in cyan) is drawn at the beginning of the project and all the Actual Schedule bars show only a handle that can be used to drag progress for a particular task.
Output 5.6.1: Adding Progress Information to Project
You can enter progress information in several ways:
-
Drag the Timenow Line to update progress information for several tasks at once. The actual start and finish times (until the Timenow date) are set assuming that the tasks follow the resource-constrained schedule. (If there are no resource constraints, the tasks are assumed to follow the early schedule.)
-
Use the handle on the Actual Schedule bar for a given task to drag the progress bar.
-
Bring the Progress columns into view in the Table View and edit one of the Progress columns.
As an example, drag the Timenow Line to the tick mark corresponding to 15MAR04. The resulting window (after reordering and resizing some columns and scrolling the Gantt View) is shown in Output 5.6.2.
Output 5.6.2: Moving the Timenow Line
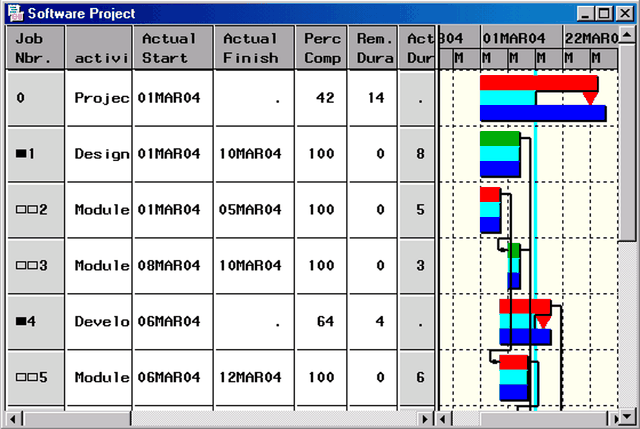
Note that some of the activities are completed while others are still in progress. If the project data are saved at this point,
the Schedule data set will have all the Progress variables (A_START, A_FINISH, PCT_COMP, and REM_DUR). However, for the PM procedure to be able to recapture the exact state of the schedule as it was saved, it also needs to
know the value of TIMENOW when the project data was last saved. This value (15Mar04 for the current example) is saved as a macro variable named TIMENOW (see the section Macro Variable TIMENOW).
To see how the Actual information can be used from one invocation of PROC PM to the other, save the project as displayed in Output 5.6.2 and then reinvoke PROC PM to continue editing the progress information. Note that if you are using the PROJMAN application, the value of TIMENOW is automatically saved by the application and used in subsequent editing of the project.
Recall from the last invocation of PROC PM that the data are saved in the data set SOFTOUT5. To use the saved progress information, invoke PROC PM as follows:
*  Use softout5 as the Activity data set and specify  ;
*  the Resource data set defined in the last example. ;
*  Save the schedule in softout6.                     ;
proc pm data=softout5 project=softattr
        calendar=calendar
        resourcein=resources
        date='1mar04'd interval=weekday
        projname='Software Project'
        out=softout6;
   act actid;
   succ succid;
   project pntid;
   duration duration;
   id activity;
   calid calid;
   *  Use the ACTUAL statement to specify the Progress variables  ;
   *  and the value of TIMENOW saved from the previous invocation ;
   actual / as=a_start af=a_finish
            remdur=rem_dur pctcomp=pct_comp
            timenow=&timenow;
   resource Tester Programmer / per=_date_;
   run;
The preceding program displays the PM window for the updated Software project. Now use the Table View to edit some of the Progress columns. To do so, you can either scroll to the Progress Columns or move these columns to the left in the Table View using the appropriate selection from the View menu (Figure 5.9).
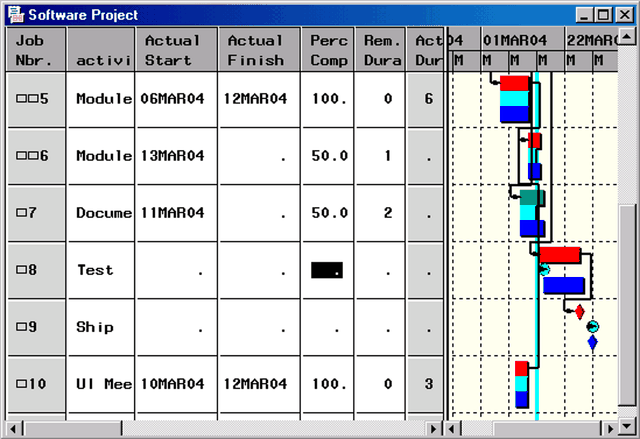
Task number 6 ('Module 2' under 'Develop') has a Remaining Duration value of 4. Now, you may notice that you have misjudged the amount of work involved and that you need only one more day to finish the task. Enter 1 in the Remaining Duration column. This editing change immediately causes the Percent Complete column to update to 50, indicating that 50% of the work is completed. The resulting effect on the project schedule is shown in Output 5.6.3 (the window has been scrolled down so that the second half of the project is visible). Note that reducing the duration of the 'Module' task did not affect the project end date; the duration of the project is still 24 days. Studying the schedule of the 'Document' and 'Test' tasks, you notice that the delay to the project is caused by the fact that the resource-constrained schedule of the task 'Test' is delayed due to resource constraints.
Output 5.6.3: Editing the Remaining Duration Column

In addition to revising the progress information for 'Module 2,' you also realize that the 'Document' task is 50% complete as of the Timenow date. Edit the Percent Complete column in the Table View, changing the value from 25.0 to 50.0. Immediately, the Remaining Duration column changes to 2. The resulting window is shown in Output 5.6.4. The project end date (for the resource-constrained schedule) is 28Mar04. Thus, the project duration is now reduced to 20 days.
Output 5.6.4: Editing the Percent Complete Column