Change the Node Markers in a Network or Statistical Graph
Note: You can also
change the markers that appear in some statistical graphs, such as
scatter plots and box plots.
The changes
described here override settings that have been made in the Edit Data
Attributes dialog box. For information about the Edit Data Attributes dialog box,
see Specify Data Attributes. Any changes that you make here remain in
effect only while the current project is open. If you close and then
reopen the project, the marker reverts to its default properties.
-
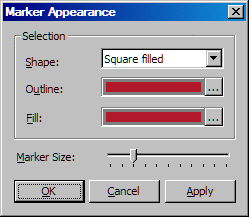
From the Shape list box, select the shape that you want for the markers. There are a number of shapes to choose from, and each can be either solid-filled or outline-only.Click the color selection buttons
 for Outline and Fill to open the Color dialog boxes for each, where
you can change the marker’s outline color and the fill color
respectively. The Fill area is available
only if you selected a filled shape for the marker.
The Color dialog box contains colors to choose from and the option to define your own color. For details, see Using the Color Dialog Box.
for Outline and Fill to open the Color dialog boxes for each, where
you can change the marker’s outline color and the fill color
respectively. The Fill area is available
only if you selected a filled shape for the marker.
The Color dialog box contains colors to choose from and the option to define your own color. For details, see Using the Color Dialog Box.