Introduction to the SAS Information Delivery Portal 2.0
Viewing and Managing Portal Content
Overview of Viewing and Managing Content
The portal provides a robust environment for viewing your organization's reports, graphs, Web pages, documents, and other data. After your portal team has deployed the portal within your organization, you can view content and run reports by selecting one of the active links in a portlet. You can also manage content from the portal. For example, after searching for a report, you can bookmark the report for future reference or e-mail the link for that report to someone else.
This section includes the following topics:
Note: For links to documents that explain how to perform these tasks, see Where to Find More Information.
Viewing a SAS Report
A SAS report is a report that has been created using SAS Web Report Studio and is stored in an established SAS format (SAS Report Model format). Reports can contain a graph, a table, or both.
Following is a sample report:
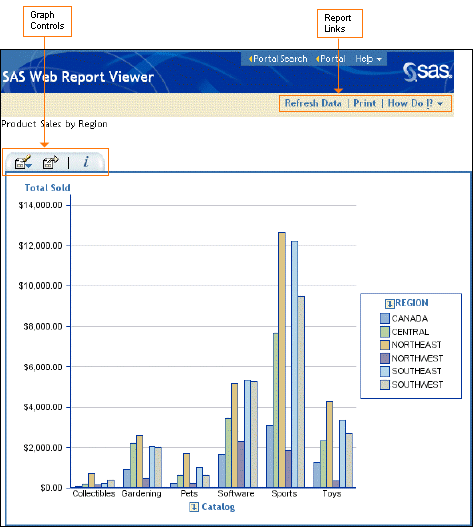
You can manipulate SAS reports in the portal as follows:
If the report contains a graph, then you can use the controls above the graph to filter, rank, or export the graph data to another application. You can also view information about the graph, including the data source type, and any filters that are applied.
If the report includes a table, then you can use the controls above the table to sort data and to move columns within the table.
Using the links supplied with the report, you can refresh and print the report. The How Do I? link opens a drop-down list of help topics.
If you add a report to your Bookmarks portlet, you can then publish and e-mail the report.
Viewing an Information Map
An information map is a collection of data items and filters that provides a business-specific view of physical data. An information map consists of SAS metadata that describes data in terms that users can readily understand. The information map enables business users to query data for specific business needs. An information map can be based on either OLAP data (multidimensional data on a SAS OLAP Server) or relational data (two-dimensional data on a SAS server or in a third-party database). Information maps are created using SAS Information Map Studio.
Here is a sample SAS Information Map that contains information about mail-order sales:
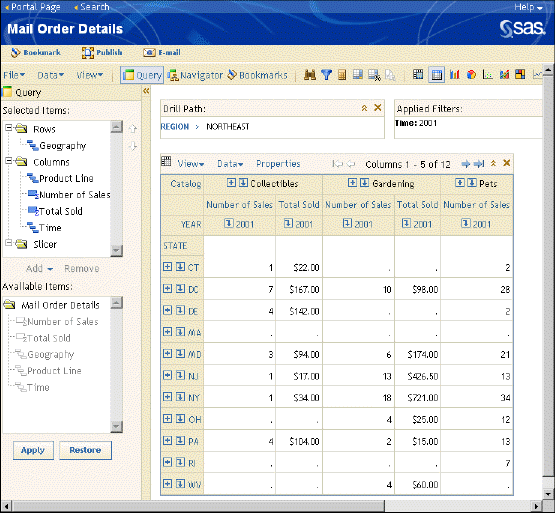
From the page, you can perform these tasks:
Select data items for your query. You can use the lists on the left side of the page to select which data items are used in your view. For OLAP data, you also select the axes to which the data items are assigned.
Filter data so that only a subset is displayed. In the figure, we have applied a filter so that the view shows data only for the year 2001.
Drill down on hierarchy members (OLAP data only). In the figure, we have drilled down to the states in the northeast region of the United States. We could drill down further to see sales data for a particular state.
Sort and rearrange the data. You can sort the table by any of the data items in the table. You can also rearrange the data items, and you can specify the number of rows and columns that are displayed. For OLAP data, you can move data items between axes.
Display the data as a graph. There are several types of graphs available, and you can display each type on the page.
Search for data (OLAP data only). You can find data cell values and hierarchical members.
Add totals and calculate new data items.
Export the data view as a SAS Report, Excel file, or PDF document.
Save the view that you have customized. After you edit your query, apply filters, and make other changes, you can save this view as a bookmark. The information map viewer has its own bookmark mechanism that is similar to the portal's bookmarks. This mechanism, called a data exploration, enables you to bookmark one or more views of an information map. When you reopen the information map, you can display the view that you bookmarked.
Note: You cannot make changes to information maps or to physical data. You can change only the view of the information map that is displayed in your portal. ![]()
Viewing Stored Process Output
After a chart or other item is published to a publication channel, the contents are static. The content is updated only when the chart is re-created and the results are published in a new package. This functionality is quite appropriate for some types of information. However, if your users require that the most recent information be available on demand, you can create a SAS Stored Process for this purpose.
A stored process is a SAS program that is stored in a central location and is available to be executed from the portal at your request. Stored processes are useful for creating output that contains the most current information available.
Stored processes can be set up to run in the background so that you can work on other tasks during processing. When a stored process is finished executing in the background, a message appears in your Alerts portlet. In order for stored processes to execute in the background, the portal must be installed with WebDAV support.
A stored process might present an input form that enables you to customize the output. The following display shows a sample input form for a stored process that reports catalog profits:
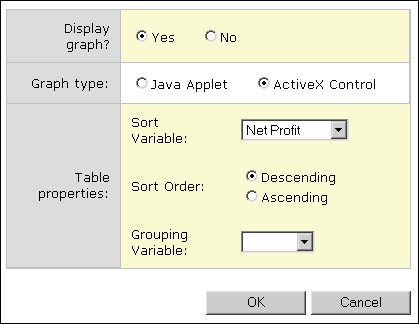
On this form, you would provide the requested information and select OK. Here is the result:
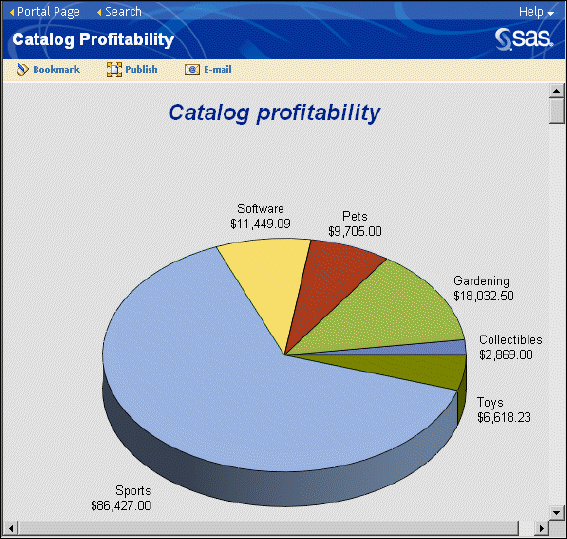
The portal provides links for bookmarking and publishing stored process output. You can also e-mail the URL address for the output.
Searching for Information
The portal enables you to associate keywords with items that you add to your portal. These keywords become part of the metadata that is associated with the item. If you share the item, others can search for it by using this metadata.
The Search tool, available from the portal banner, enables you to search for specific content that has metadata registered in the portal. The content that you can search includes applications, links, data explorations, syndication channels, files, information maps, packages, publication channels, reports, and stored processes. In addition, you can search for existing portal Web pages and portlets.
The Search tool is easy to use, and it has an intuitive interface, as shown in the following display:

For the keyword, you can enter a single word, multiple words, or a phrase. Alternatively, you can enter a single asterisk (*) wildcard to search all keywords without any filtering. You can search by entering an item's name, description, or keywords. For the content type, you can select any of the checkboxes, but you must select at least one content type as the basis for your search.
After performing a search, in the search results page you can bookmark items that you want to keep, and you can e-mail an item's URL address to someone else. If you have the appropriate authorization, you can also edit and delete items. For more information about bookmarks, or to see sample search results, see Using Bookmarks.
The Search tool is also available while you are adding pages, portlets, or content items to your portal. When you want to add an item to the portal, it's often helpful to search first to see if the item already exists. For example, if you want to add a link to a collection portlet, then while creating that link, you can click Search and then search for the link that you want.
Here is a sample Search page that is available when you add a link to a collection portlet:
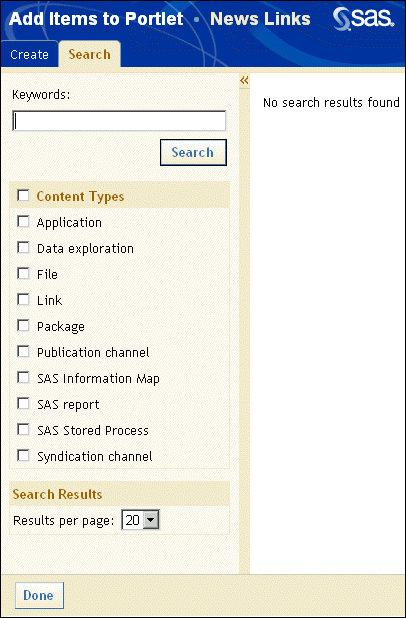
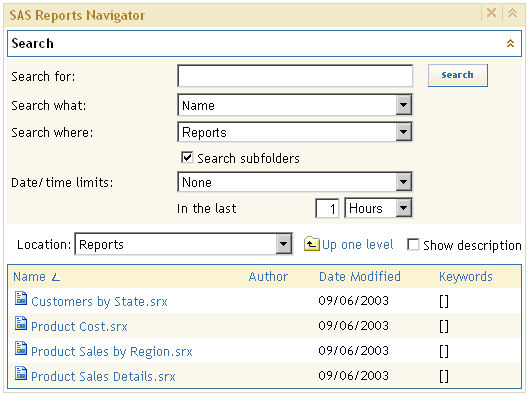
The portal provides another type of search tool in navigator portlets. While you are using a navigator portlet, you can search for items in the navigation tree. There are several filters that you can apply, including name, description, and keywords.
The following figure shows the search field within a sample navigator portlet:
Using Bookmarks
The search feature is often used in conjunction with bookmarks. When you locate an item through a search, you can bookmark that item, and the item is automatically added to your personal Bookmarks portlet.
For example, suppose that you want to create a portlet that contains links to news Web sites. You might first try searching for links that already exist in the portal. From the search results, you can bookmark the link items that you want to keep. You bookmark an item by clicking the Actions menu ![]() next to the item that you want to bookmark, and then by selecting Bookmark. A Bookmark icon
next to the item that you want to bookmark, and then by selecting Bookmark. A Bookmark icon ![]() appears next to the selected item, as shown in the following display:
appears next to the selected item, as shown in the following display:
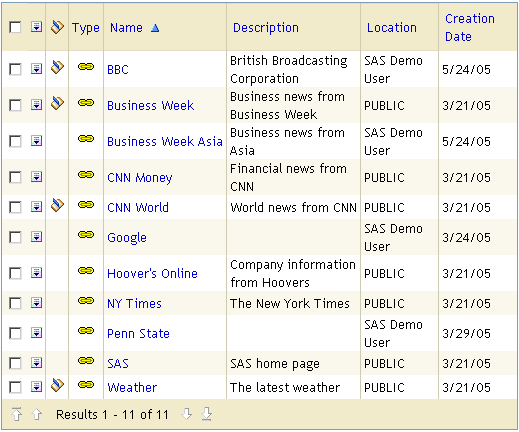
Notice that four items have been bookmarked in the list. These four items are automatically added to your Bookmarks portlet.
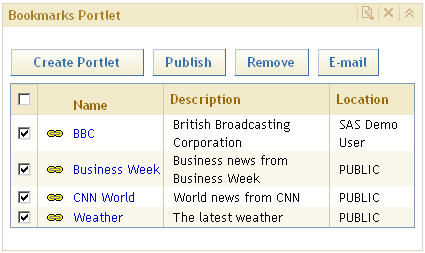
From the Bookmarks portlet, you can check particular items, and then select Create Portlet to add those checked items to a new collection portlet. You can also publish, e-mail, and remove checked items. For more information about publishing items, see the next section Viewing and Sharing Information That Is Published to Channels.
Viewing and Sharing Information That Is Published to Channels
Overview of SAS Publications
The portal enables you to view the contents of packages that have been created using the SAS Publishing Framework. A package can contain files, links, SAS Stored Processes, SAS Information Maps, and SAS reports. Packages can be published to a publication channel and also to a WebDAV (Web Distributed Authoring and Versioning) repository.
The portal provides several ways to view and share information that has been packaged and added to the portal environment:
You can search for a package, view the contents of the package, bookmark or e-mail a link to the package, and add the package to a collection portlet.
You can search for a channel and add the channel to a collection portlet.
You can subscribe to one or more channels. Following are some options available to you when you subscribe to a channel:
- If you add a Publication Channel Subscriptions portlet to your portal, the channel is added automatically to the portlet when you subscribe to the channel.
- When you subscribe to a channel, if you specify WebDAV as your transport, channel content will also appear in your WebDAV repository.
- When you subscribe to a channel, if you specify e-mail as your transport, channel content will also be e-mailed to you. (You receive e-mail only for content that is published to the channel using SAS Publishing Framework. You do not receive e-mail for content that is published from the portal.)
You can publish portal content to a channel or to a WebDAV location.
The following sections describe the process of subscribing to publication channels, viewing content that is published to those channels, and publishing content.
Subscribing to Publication Channels
Publication channels enable you to obtain continually updated information, and to share that information with others. A publication channel is a virtual communication path that is identified with a particular topic, organizational group, user audience, or other category (similar to the way a radio channel is identified with a particular frequency). Your organization defines channels using the SAS Publishing Framework, and your SAS administrator applies security in order to control which users and groups can access the channel.
After publication channels have been defined for your organization, you can subscribe to the channels and add them to portlets.
Note: You can perform the tasks that are associated with publications by using the Options menu on the banner. For links to documents that explain how to perform these tasks, see Where to Find More Information. ![]()
Before you can subscribe to publication channels, you must define a subscriber profile. (Depending on your role in an organization, this task might be performed for you. The portal administrator has the ability to define subscriber profiles for all portal users. The administrator can also set up subscriptions for users.)
Using WebDAV software that is included with the portal, you can define a profile that is associated with a document repository location. When you subscribe to a channel using this profile, then packages that are published to the channel are also stored in the WebDAV location that you specified. Regardless of the transport that is specified in your profile, all channels to which you subscribe automatically appear in your Publication Channel Subscriptions portlet. From that portlet, you can view content that is published to those channels.
In the following example, the first profile is defined for a publication channel. Channel packages that are associated with this profile can be viewed only in the portal. The second profile specifies a WebDAV delivery method. This means that channel content can be viewed in the portal, and it is also sent to a specified WebDAV location that is associated with this user.
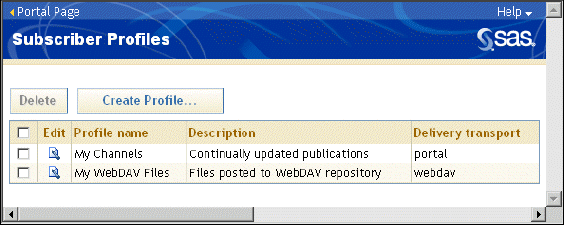
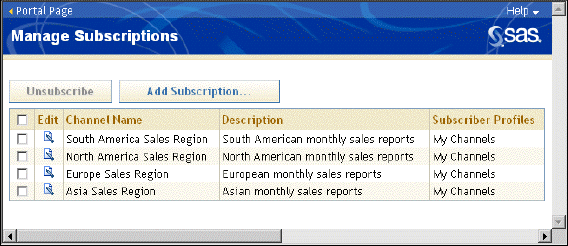
After defining a profile, you can subscribe to one or more channels. You must associate each subscription with one of the profiles that you have defined. The portal enables you to add and remove subscriptions in a Manage Subscriptions page.
Viewing and Sharing Publication Channel Output
The channels to which you subscribe are automatically added to your Publication Channel Subscriptions portlet, as shown in the following display:
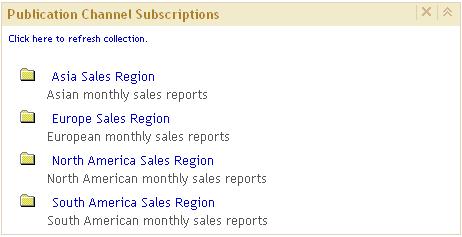
You can also search for channels, you can bookmark channels, and you can add channels to collection portlets.
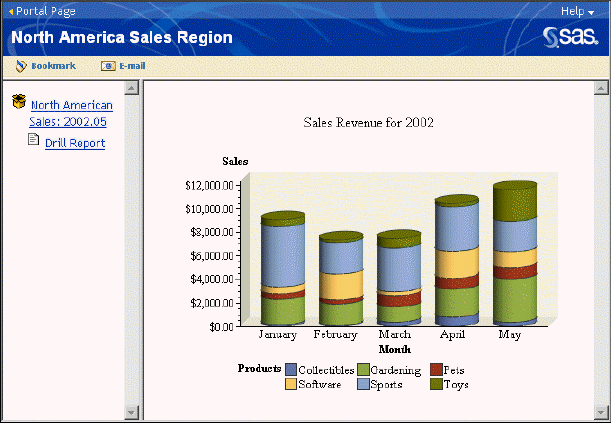
From a portlet, you can open a channel and view the packages that have been published to that channel. The following display shows the contents of the North American Sales Region channel. This channel contains a number of charts for sales in North America:
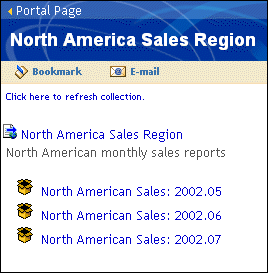
If you were looking at an actual package, you could drill down to obtain sales charts published in different months (2002.05 indicates May of 2002). From the drill-down, you can view any of the charts.
Here is one of the charts:
After you have opened a package, you can bookmark it or send an e-mail message that contains a link to the package.
The portal uses the default e-mail program that is defined in your browser to create an e-mail message. The URL address(es) for the content item(s) will appear in the body of the message. You can then enter the recipient's e-mail address and send the message. When a user accesses portal content through a URL address, the portal checks the user's credentials to determine if the content can be viewed.
Publishing Information to a Publication Channel or to a WebDAV Repository
From the portal, you can publish files, links, SAS Information Maps, SAS Stored Processes, and SAS reports to a publication channel.
Suppose you want to publish some links that you have bookmarked, as shown in the following display. In your Bookmarks portlet, you would check the items that you want to publish, and then select Publish. (For information about creating these bookmarks, see Using Bookmarks.)

After you select Publish, a Publish page is displayed in which you provide information about the package that you want to publish. You must provide a name for the package, and you can optionally provide a description and other information that others can use when searching for this package. You can also choose to publish to a document repository using WebDAV rather than to a channel. In this example, we are publishing to a channel.
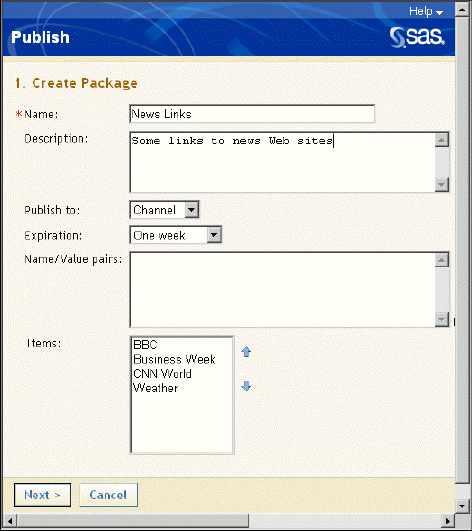
After completing the required information, you are prompted for the name of the channel to which you want to publish. For this example, we are publishing a package called News Links to the North America Sales Region channel, which we saw in Viewing and Sharing Publication Channel Output.
After you publish a package, when you open the corresponding channel once again and refresh it, you will see the new package listed.
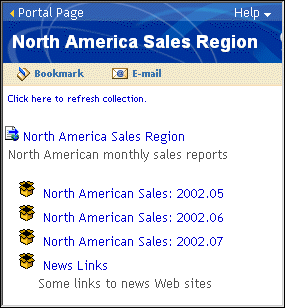
Other users who subscribe to this channel will see the package when they log on to the portal. If they open the package, they can view, bookmark, or e-mail the links.
Following are the characteristics of a package that you publish from the portal:
The package can be viewed in the portal by any user who has permission to view the channel to which you published. (The user might have to search for the package in order to see it.)
The package will appear automatically in a user's Publication Channel Subscriptions portlet if the user has subscribed to the channel.
The package is also stored in a persistent store location (either an archive or a WebDAV location) if one was specified when the channel was defined.
The package is also disseminated to subscribers' WebDav locations if they specified WebDAV as the transport in their subscriber profile.