HTML Output Formatter
Creating Custom Property Lists Interactively
To create custom property lists interactively, you must be running Release 6.12 of SAS software and have have SAS/AF installed. The FRAME interface used to customize your property lists is provided only in the HTML Formatter packages provided for Release 6.12. Be sure that you have installed the correct package.
The following topics are provided to assist you with creating property lists interactively:
- Accessing the Properties Window
- Specifying Global Settings
- Specifying Text Line Settings
- Saving a Property List
Accessing the Properties Window
To invoke the properties interface, submit the following line in the Program Editor:
%outprop(runmode=i);
Note: To specify an existing properties list, include the four-level filename with the macro. Using this method, you submit a command like the following:
   %outprop(runmode=i,
            proploc=SASUSER.HTMLGEN.MYPROP.SLIST);
The HTML Output Formatter Properties window appears showing the property settings contained in the properties list. If you did not specify a list, the Output Formatter uses the property list, SASUSER.HTMLGEN.OUTPROP.SLIST, if it exists. Otherwise, the Output Formatter uses the default property list, SASHELP.HTMLGEN.OUTPROP.SLIST. You cannot modify the default property list, so if this property list is displayed, be sure to select the Save As button.
The HTML Output Formatter Properties window has two panels. Continue with one of the following:
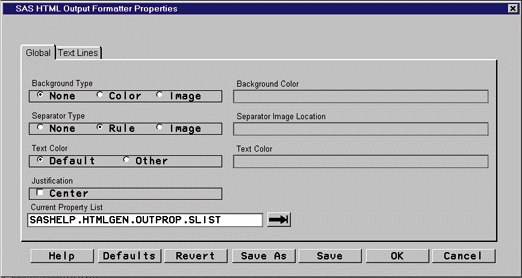
- Global: These settings apply to the entire HTML page that is created.
- Text Lines: These settings let you specify formatting information for individual elements.
Specifying Global Settings
Use the Global panel to specify the following:
- background for the HTML page
- separator to use between output pages
- color of the text
- justification for the text
- name of the property list that you want to use.
Use the Global panel according to the following instructions:
-
display the Global panel, select the Global tab.
-
Current Property List: To choose an existing property list, select the button next to the Current Property List display field. The Select window appears. Select the appropriate libref, catalog, and entry name for the list you want to modify. (Select a valid list, as this window displays all SLIST entries, not just property lists.) Select OK to exit the window. The name of the list you selected appears in the Current Property List display field and the settings change to reflect the settings in the list you selected.
-
Background: Select a background by doing one of the following:
-
To omit a background, do nothing as the default setting for Background Type is None. This setting uses the background color defined by your browser.
-
To specify a background color for your Web page, select the Color setting under Background Type. The Background Color entry field is now active. Type the color name or appropriate Red Green Blue (RGB) value. You can specify any color that is supported by your browser. Note that some browsers do not support the use of background colors.
-
To specify a background image for your Web page, select the Image setting under Background Type. The Background Image Location entry field is now active. Type the fully-qualified path and filename for the image you want to use. Note that some browsers do not support the use of background images.
-
-
Separator: Do one of the following:
-
To turn off the use of a separator between the pages of SAS output, select the None setting under Separator Type.
-
To use an image as a separator type, select the Image setting under Separator Type. The Separator Image Location entry field is now active. Type the fully-qualified path and filename for the image you want to use.
-
To use a rule separator, do nothing, as the default setting for Separator Type is Rule. This setting adds the <HR> tag everywhere a page break is indicated by the SAS procedure that created your output.
-
-
Text Color: To specify a color for your Web page text, select the Other setting under Text Color. The Text Color entry field is now active. Type the color name or appropriate RGB value. You can specify any color that is supported by your browser.
You can override the text color for specific output elements on the Text Lines panel.
The default setting for Text Color is Default. This setting uses the text color setting defined by your browser.
-
Justification: To center all the text on your HTML page, select the Center setting under Justification. This causes the Output Formatter to add a <CENTER> tag to the beginning of your HTML file and a </CENTER> tag to the end. This may cause unexpected output results, so use this option carefully. For example, <CENTER> tag combined with the <PRE> tag centers each line of text individually, which may cause problems for information aligned in columns.
By default, the Center setting is not selected.
- Finish using this panel by continuing with instructions in Panel Options.
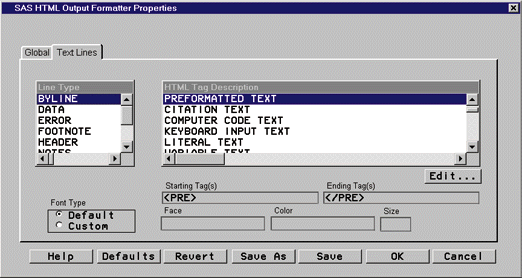
Specifying Text Line Settings
Use the Text Lines panel to:
- determine which HTML tags are being used to format an element
- customize the font for an element by specifying a face name, color, or size for the element
- customize the list by changing the HTML tags used to format an element or modifying the list of available tags.
Use the Text Lines panel according to the following instructions:
-
Select the Text Lines tab to display the Text Lines panel.
-
HTML Tag Description: Determine which HTML tag is associated with a line type.
All of the possible line types are listed in the Line Type list box. To determine which HTML tags are associated with an element, select the line type name from the Line Type list box. When you select a line type, the list in the HTML Tags list box scrolls so that the appropriate tag information is highlighted and at the top of the list. Font information is updated, too.
-
Font: Each element uses the default font type. The default font type is determined by your browser settings and the HTML tag associated with the element. When you customize the font for an element, you can specify a typeface, color, and size for the element. The Output Formatter inserts the appropriate <FONT> tag into the HTML file.
Note: Some browsers do not support the <FONT> tag.
-
To customize the font for an item, select the item from the Line Type list box.
-
Select Custom from Font Type. The Face, Color, and Size entry fields are now active.
-
To specify a custom typeface, type the font name in the Face entry field. Remember that the typeface you choose must be available to the user's browser.
-
To specify a color for an element, type a color name or the RGB (Red Green Blue) value in the Color entry field.
-
To change the size of an element, type
+N,N, or-N(whereNis an integer) in the Size entry field. The size of the text is increased or decreased based on the value you supply.
-
-
Associating HTML tags: You can change the HTML
formatting associated with any element.
Note: If you do change the HTML formatting, you should run your SAS procedures and make sure that the results of your formatting changes are acceptable before making the output available on the Web.
-
Select the element from the Line Type list box.
-
Scroll through the list of tags in the HTML Tags list box to locate the new tag you want to use. Select the new tag name.
-
-
Creating or modifying available HTML tags: From the Text Lines panel of the HTML Output Formatter Properties window, select the Edit... button. (This button is on the right of the Text Lines panel, just under the HTML Tags list box.) The Edit HTML Tags window appears.
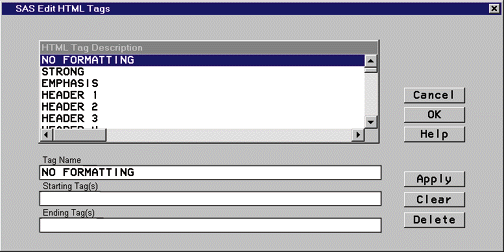
The available HTML tags are stored in the SASHELP.HTMLGEN.TAGS.SLIST file provided with the Output Formatter. You can change the HTML tags associated with a tag name, delete tags from the file, and add tags to the file. If you make changes to TAGS.SLIST, remember to test your changes before making pages available.
Note: When you modify the tags list, the Output Formatter saves your changes to SASUSER.HTMLGEN.TAGS.SLIST. When you run the Output Formatter, it uses the tags list in SASUSER first. If the file exists, it uses this file. If the file does not exist, it uses the file provided with the Output Formatter (SASHELP.HTMLGEN.TAGS.SLIST).
To add, delete, or modify tags, do the following:
-
To delete a tag from the list, select the tag name from the list box, then select the Delete button. Select Yes to verify that you want to delete the selected tag.
-
To change the tag name associated with an HTML tag pair, select the tag name that currently represents the tag pair. The tag name and the starting and ending tags appear in the entry fields at the bottom of the Edit HTML Tags window. Type the new tag name in the Tag Name entry field. Select the Apply button. The new tag name is added to the beginning of the list box.
-
To change the HTML tag pair associated with a tag name, select the tag name from the list box. The tag name and the starting and ending tags appear in the entry fields at the bottom of the window. Type the new HTML tags in the Starting Tag(s) field. Type the appropriate end tags, in the appropriate order, in the Ending Tag(s) entry field. Select the Apply button.
Note: Make sure that the starting and ending tags match; otherwise, you may receive unexpected results.
-
Add a new tag name and associated tag pair, type the new tag name in the Tag Name entry field. Type the new HTML tags in the Starting Tag(s) field. Type the appropriate end tags, in the appropriate order, in the Ending Tag(s) entry field. Select the Apply button. The new tag name is added to the beginning of the list box.
Note: Make sure that the starting and ending tags match; otherwise, you may receive unexpected results.
-
When you are finished modifying the tags list, select the OK button to return to the HTML Output Formatter Properties window.
-
-
Continue the instructions with Panel Options.
Panel Options
To finish using either panel, do one of the following:
-
To change the Global settings, select the Global tab and continue with Specifying Global Settings.
-
To change the Text Line settings, select the Text Lines tab and continue with Specifying Text Line Settings.
-
To save the custom property list, select Save or Save As. For information about saving a new property list, see Saving a property list.
-
To return all settings on both panels to the default property list settings, select Defaults.
-
To return the settings on both panels to the last saved settings, select Revert.
-
To save your changes and exit from this window, select OK.
-
To exit from this window without saving your changes, select Cancel.
Saving a Property List
You can change property list settings and save them.
Note: Use the OK or Save button rather than the Save As button, if the following two conditions apply:
- The library is not SASHELP, and
- You have write access to the specified location.
After specifying the settings on the Global and Text Lines panels, complete the following:
-
Select the Save As button.
The Save Property List window displays.
-
Type the name of the new property list in the SLIST Entry
field or use the selector to save to an existing entry, then
select OK.
The new file is created using the name you specified. This list file name now appears in the Current Property List field on the HTML Output Formatter Properties window.
You can now use this property list to format your Web-enabled
output by using the PROPLOC= attribute (if using
the Output Formatter in batch mode) or by specifying the
filename on the HTML Output Formatter window (if using the
Output Formatter interactively).