Installation Note 38753: Instructions for adding SAS® Foundation products to an existing SAS® 9.2 installation
 |  |  |
Instructions for adding new products to an existing SAS 9.2 installation can be found in the SAS® 9.2 Intelligence Platform Installation and Configuration Guide, in "Appendix 2, Managing your SAS Deployment." Instructions for installing Foundation products that do not require configuration can be found in the section "Add SAS Products that Do Not Require Configuration." Start-up commands for the SAS® Deployment Wizard are shown, and screen captures illustrate the process.
Provided below are sample screen captures of a product add-on for Windows. This example is for adding SAS products that do not require configuration to an existing SAS 9.2 installation. A common product add-on scenario is to add a product that was not installed originally or to add a new product that has been added to a new order. Adding the SAS/ACCESS® Interface to PC Files product to an existing installation, which is a common add-on situation, is illustrated in the example below.
Important: The following screen captures are representative of a product add-on. Your screens might vary since your actual add-on might be different. Be aware that the add-on process could go into "Update mode," which is correct and expected behavior.
- Begin the product add-on just as the original installation was started. This is usually done by running the setup.exe in the root of your SAS Software Depot. After you run setup.exe, the SAS® Deployment Wizard screen appears.
- Click OK to accept the default language, English.
- Click Next.
- Your product add-on installation might go into Update mode. If it does, a screen similar to the one shown below appears. This is normal behavior. If it goes into Update mode, click Next to apply maintenance. After maintenance has been applied, start from the beginning by running setup.exe again to proceed with the product add-on.
- If the SAS Software Depot includes more than one order, the next screen shows the selectable orders to choose from. Select the appropriate order and click Next.
- If a screen like the very next one appears, select only the entry for SAS Foundation: Click Clear All, select SAS Foundation, and then click Next.

- If this screen appears, select Install Additional Software and click Next.
-
Here, you see the available products. Select Clear All, select the product that you want to add. In this example, SAS/ACCESS Interface to PC Files is added.
Note: The entry for Base SAS® remains selected and is grayed out. This is normal behavior.

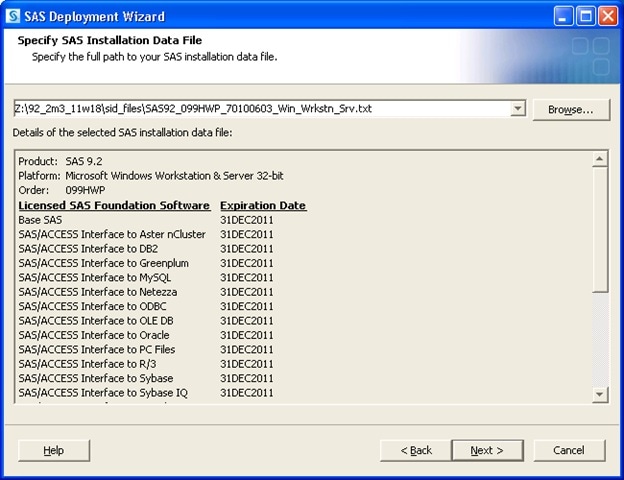
- Specify the SAS installation data file and click Next.
- Click Clear All to retain the default language English. Then click Next.
- Click Start.
- Click Next.
- Click Finish.
- Click Next.
- Click Finish.
- See SAS Note 13613: "Installing additional products after installing SAS® Foundation 9.1."
- See the section "Add SAS Products That Do Not Require Configuration" in the SAS® 9.3 Intelligence Platform Installation and Configuration Guide.
- See the section "Add SAS Products That Do Not Require Configuration" in the SAS® 9.4 Intelligence Platform Installation and Configuration Guide.


However, the type of order that is being used determines which of the next two screens you see.


Additional Information
Operating System and Release Information
| Product Family | Product | System | SAS Release | |
| Reported | Fixed* | |||
| SAS System | Base SAS | z/OS | 9.2 TS1M0 | |
| Microsoft® Windows® for 64-Bit Itanium-based Systems | 9.2 TS1M0 | |||
| Microsoft Windows Server 2003 Datacenter 64-bit Edition | 9.2 TS1M0 | |||
| Microsoft Windows Server 2003 Enterprise 64-bit Edition | 9.2 TS1M0 | |||
| Microsoft® Windows® for x64 | 9.2 TS1M0 | |||
| Microsoft Windows Server 2003 Datacenter Edition | 9.2 TS1M0 | |||
| Microsoft Windows Server 2003 Enterprise Edition | 9.2 TS1M0 | |||
| Microsoft Windows Server 2003 Standard Edition | 9.2 TS1M0 | |||
| Microsoft Windows XP Professional | 9.2 TS1M0 | |||
| Windows Vista | 9.2 TS1M0 | |||
| 64-bit Enabled AIX | 9.2 TS1M0 | |||
| 64-bit Enabled HP-UX | 9.2 TS1M0 | |||
| 64-bit Enabled Solaris | 9.2 TS1M0 | |||
| HP-UX IPF | 9.2 TS1M0 | |||
| Linux | 9.2 TS1M0 | |||
| Linux for x64 | 9.2 TS1M0 | |||
| OpenVMS on HP Integrity | 9.2 TS1M0 | |||
| Solaris for x64 | 9.2 TS1M0 | |||
| Type: | Installation Note |
| Priority: | N/A |
| Topic: | System Administration ==> Installation |
| Date Modified: | 2011-11-10 12:18:32 |
| Date Created: | 2010-02-16 12:47:54 |