Flow Tab in the Edit QKB Definition Window
DataFlux Data Management Studio 2.6: User Guide
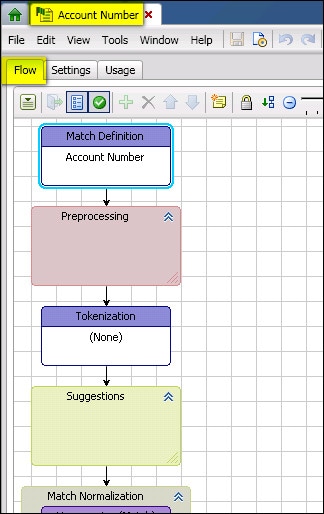
When you open a definition from the Quality Knowledge Base tab, the Edit QKB Definition window appears. It displays the flow diagram for that definition. The next display shows part of the flow for the Account Number Match definition, which is in the English (United States) locale for the Contact Information 24 QKB.
Flow Tab in the Edit QKB Definition Window
The diagram contains nodes that represent processing steps that are performed by the definition. Some nodes are organized into groups. You can add or modify nodes and test the output of individual nodes until you are satisfied with the behavior of the definition. When finished, you can save changes to the definition. The updated definition is then available for use in DataFlux Data Management Studio and in other SAS data management software.
When you make changes to a definition, an asterisk is shown next to name of the definition in the tab title. When closing a tab that contains an edited definition, you must choose whether to save or cancel your changes. If you choose to save changes, any changes you have made on other tabs will be also be saved.
The following sections describe the tabs on the edit QKB definition window: the Flow tab, the Settings tab, and the Usage tab.
The Flow tab shows the flow diagram for the definition. This tab contains a toolbar that can be used to manage the flow diagram and perform editing operations on the definition's nodes. The toolbar contains the following selections.
| Name | Description |
|---|---|
| Open | Open a definition or library that is referenced by a property in the selected node. This operation is enabled only when the selected node references some other definition or library. |
| Show/Hide Property View | Toggles on or off the properties dialog that shows the properties of the selected group or node. |
| Show/Hide Testing View | Toggles on or off the Test dialog that shows test output for the selected group or node . |
| Insert | Insert a new node into a group. Enabled only when a selected group can accept new nodes. Some groups allow multiple nodes; some allow only a single node. |
| Delete | Delete a node. Enabled only when a node can be deleted. |
| Move Up |
Move the selected node up relative to other nodes in its group. Enabled only when the selected node belongs to a group. |
| Move Down |
Move the selected node down relative to other nodes in its group. Enabled only when the selected node belongs to a group. |
| Insert Note | Add a Note object to the flow diagram. |
| Lock Diagram |
Lock the positioning of objects in the flow diagram to prevent accidental movement of objects. |
| Auto Layout |
Re-draw the diagram with objects positioned in a default layout. |
| Zoom Out/In |
Re-size the diagram for enhanced visibility. |
| Reset Zoom | Return to default Zoom setting. |
Each node in a definition represents a processing step performed by that definition. Nodes are arranged in a flow diagram, with the output of each node serving as input to the following node. Nodes have properties that you can edit to modify the behavior of the node.
Some nodes are organized into groups. A group is a logical collection of nodes that work together to perform a certain function. For example, the next display shows a number of groups in the Name parse definition, which is in the English locale for the Contact Information 24 QKB.

Node Groups in the Name Parse Definition
The groups shown in the previous display are Chopping, Morph Analysis, Lookup, and Normalization Regex Libraries. The easiest way to identify a group is by the double up-arrow at upper right of the group's icon in the flow. You can use this control to expand or collapse a group.
Some groups always contain exactly one node. Other groups can contain multiple nodes. If a group can contain multiple nodes, you can add or remove nodes from the group and rearrange the order of nodes within the group. For readability, you can re-size a group and/or drag it to a different location on the flow diagram. You can collapse or expand a group depending on whether you wish to view the nodes in that group. You can also change the colors of groups and nodes.
A node's properties affect only the behavior of that individual node. However, some groups have properties that can be edited to modify the behavior of all nodes in that group. See more about testing and editing groups and nodes in the sections describing the Properties and Test views below.
To expand or collapse a group, right-click on the group and choose Collapse Group or Expand Group in the context menu. Or select the group and choose Collapse Group or Expand Group in the action menu on the Flow tab. To change the color of a group or a node, right-click on the group or node and select Change Color in the context menu. Or select the group or node and choose Change Color in the action menu.
When a node in the flow diagram is displayed with a red circle with an X, this means that the node's properties are incomplete. If a group is displayed with a red circle with an X, this means that one or more of the group's nodes has incomplete properties. A definition will not function until the properties of all nodes are complete. Note that when a new definition is created, properties selections for many nodes might be incomplete. You must complete properties selections for all nodes before you can save the definition.
A QKB contains definitions developed for use with common types of data such as names, addresses, and phone numbers. Each data type contains one or more tokens. A token is a variable for the smallest meaningful part of a data value. For example, the next display shows the tokens in the Name data type in the Global locale for the Contact Information 24 QKB.
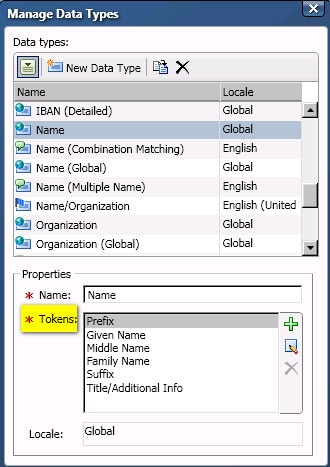
Tokens in the Name Data Type
The tokens used by a QKB definition are defined by the definition's data type. For example, the tokens used by the Name standardization definition are defined by the Name data type.
In a definition, a token is represented as a group. Typically each token group appears as a separate branch in the definition's flow diagram. A Tokenization node determines which portions of the input string are routed through each token's branch. The outputs of the different token branches are then combined to create an output for the definition. The next display shows some of the tokens in the flow for the Name standardization definition.
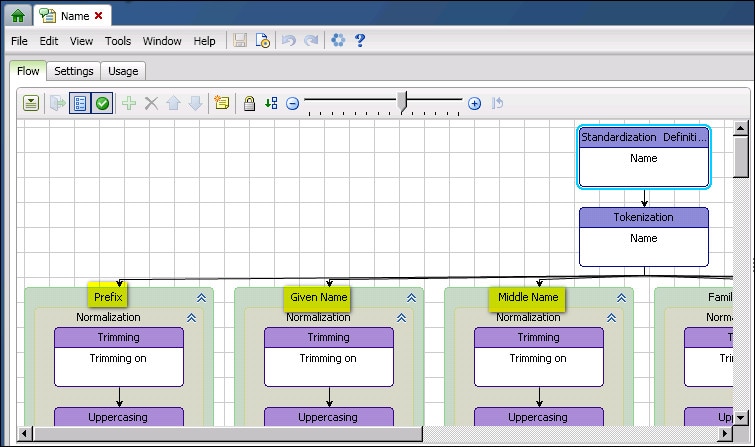
Tokens in the Flow for the Name Standardization Definition
When you select a node or group in the Flow tab, a Properties view appears on the right. You can toggle the Properties view on and off with the Show/Hide Property View on the Flow tab toolbar. You can edit the values of properties and then test the effects of your edits by viewing results for the selected node or group in the Test view. You can also add notes to a node or group in the Properties view. When notes are added, a note icon is displayed in the lower left-hand corner of the node or in the upper left-hand corner of the group.
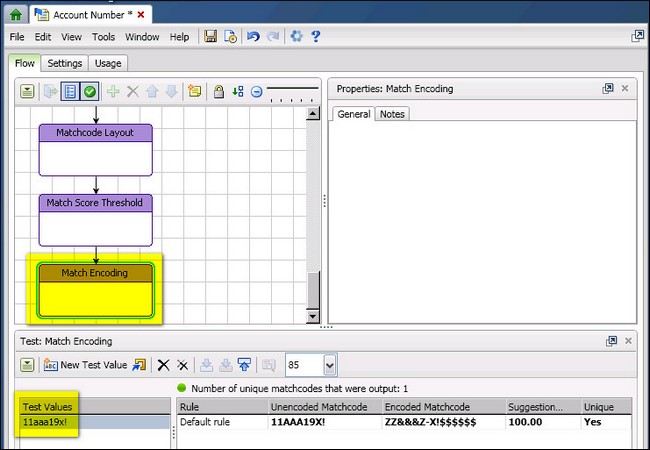
The Test view appears at the bottom of the Flow tab. You can toggle it on and off with the Show/Hide Testing View option in the Flow tab toolbar. Use the Test view to verify node outputs for specific test values, as shown in the next display.
Using the Test View to Verify Output for Sample Values
In the previous display, the Match Encoding node is selected in the Flow tab. A test value has been entered into the Test Values section on the left of the Test view. When the test value is selected, the output from the Match Encoding node is displayed on the right.
You can enter new test values manually or import new test values from a table or a text file. You can also modify existing values. To enter a new test value, click the New Test Value button on the toolbar or select New Test Value in the action menu. A new line is added in the Test Values list. Type a new test value at the prompt, and press Enter.
To import test values from a table or a text file, click the Import Test Values button on the toolbar or select Import Test Values in the action menu. Then choose whether to import values from a table or a text file. To edit an existing test value, click on the value in the Test Values list, make edits, and press Enter.
The section at bottom right of the Test view shows the output of a node. After you have entered one or more test values, select a test value and then select a node in the flow diagram. The output for the selected node is displayed. Select a different test value to see the node's output for that test value. Remember that the output of a node serves as the input for the next node in the flow diagram. To view the output of the next node, you can click on that node or you can select Step to Next Node on the toolbar or in the action menu.
To see the output for the previous node, click on the previous node or select Step to Previous Node on the toolbar or in the action menu. Note that transformations made by nodes might be conditional, so for some nodes the output is the same as the input. If you wish to step ahead to the next node that has a different output, select Step to Next New Result on the toolbar or in the action menu.
Some nodes in a definition contain references to QKB libraries such as Vocabularies, Grammars, and Schemes. When you select a library in a node, the contents of that library are used by the node when the node processes a string. You can open a library in the appropriate QKB library editor by clicking on the link in the Properties dialog for that node.
If you (or another user) make edits to a library that is used by one of the nodes in a definition in the QKB you are editing, you will see a pop-up message asking if you wish to reload the QKB. Reloading the QKB ensures that the in-memory copy of the QKB you are editing is in sync with the copy that is stored on disk, and that the test results shown in the Test window are up to date. Click Yes to reload. If you choose not to reload, your QKB will remain out of sync with the updated library until you close and reopen the QKB. (Note that choosing the Reload Active QKB menu item in the DataFlux Data Management Studio Tools menu will not reload the QKB you are editing. It will reload only the active QKB.)
The Settings tab shows the properties settings for the definition. These settings were assigned when the definition was created. The name of the definition can be changed on the Quality Knowledge Base tab. The other settings cannot be changed.
The Usage tab shows other definitions that use the current definition. This enables you to see what definitions will be affected if you edit this definition. The list on this tab shows the name of the affected definition, the type of the definition (such as Match, Standardization, or Gender Analysis), and the locale with which the definition is associated. The next display shows the Usage tab for the Proper (Name) case definition in the English locale for the Contact Information 24 QKB.
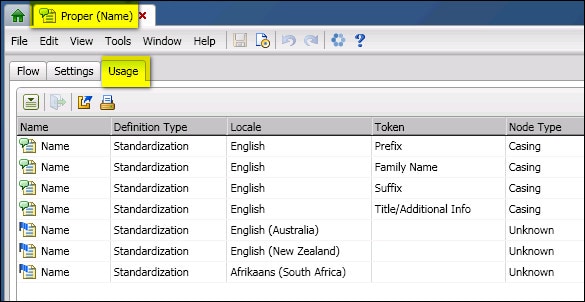
QKB Definitions that Use the Proper (Name) Definition
The list also shows the type of the node that refers to the definition you are editing, so that you can easily locate the relevant node if you choose to edit the affected Definition. Finally, where applicable, the list shows the token branch on which the relevant node is located in the affected definition. You can open a definition in this list by double-clicking or by selecting the definition and choosing Open in the action menu or by clicking the Open button on the toolbar. When you do this, a separate window opens showing the newly opened definition. You can also choose to print the list of affected files or export the list to a file.
|
Documentation Feedback: yourturn@sas.com
|
Doc ID: DMCust_QKB_Definition_Edit.html |