Step 4: Create the Remaining Options
About the Remaining Options
Now that you have defined
the data source and the role, you need to create the remaining options
for the task. These options represent the macro variables in the original
SAS program.
To complete this example,
you need to create options that enable you to specify this information:
-
whether the resulting numeric variable has the same name as the original character variable
-
the informat to use to read the existing variable
-
the width of the informat
-
the name of the output data source
As with all options,
you first must define these options in the
Metadata element.
Then you must specify how the options should appear in the user interface
by using the UI element.
Define These Options in the Metadata
To define these new
options, add the highlighted code to the
Options element:
<Options>
   <Option name="dataTab" inputType="string">DATA</Option>
   <Option name="dataGroup" inputType="string">DATA</Option>
   <Option name="rolesGroup" inputType="string">ROLES</Option>
   <Option name="optionsGroup" inputType="string">OPTIONS</Option>

   <Option name="samename" inputType="checkbox">Same name?</Option>
   <Option name="informatType" inputType="combobox">Category
      of informat:</Option>
   <Option name="numericChoice" inputType="string" returnValue="BEST">
      Numeric</Option>
   <Option name="dateChoice" inputType="string" returnValue="DDMMYY">
      Date</Option>
   <Option name="informatWidth" inputType="numbertext" minValue="1"
      defaultValue="10">Informat width:</Option>
   <Option name="outputDSName" inputType="outputdata" defaultValue="Test"
      required="true">Name of output data set:</Option>
</Options>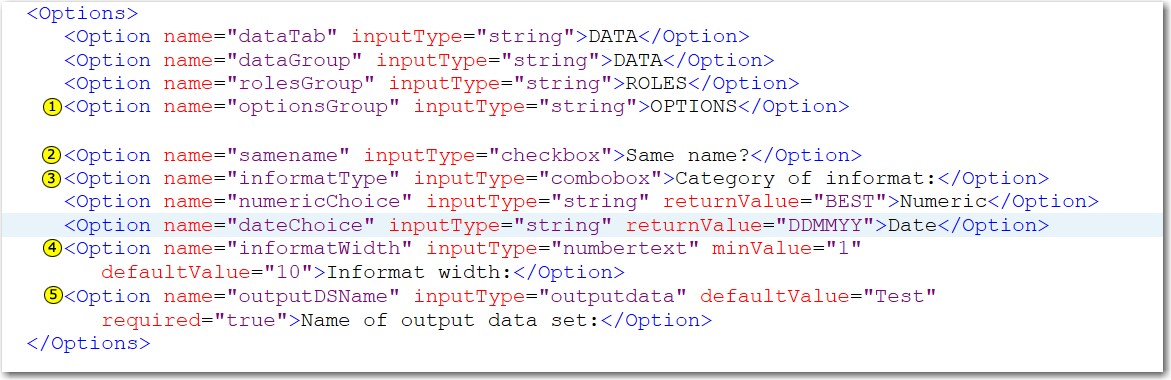
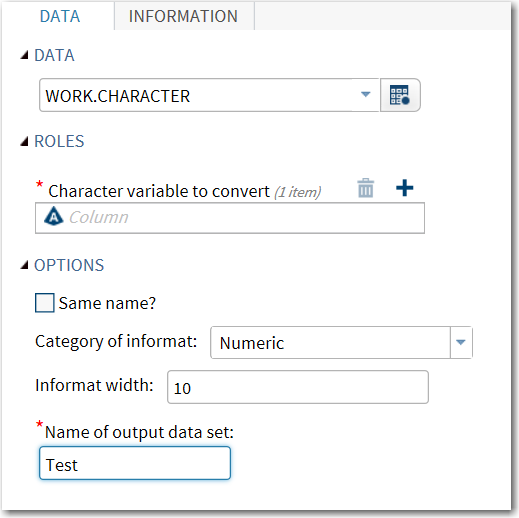
| 1 | This line defines the OPTIONS group in the metadata. The four new options appear under the OPTIONS heading on the DATA tab. |
| 2 | This
line defines the samename option, which enables
you to specify whether the resulting numeric variable has the same
name as the original character variable.
Because
inputType=checkbox,
this option appears as a check box labeled Same name? in
the user interface. (For more information about the available input
types, see SAS Studio: Developer's Guide to Writing Custom Tasks.)
|
| 3 | This
line defines the informatType option, which
enables you to specify the category of the informat. In this example,
the categories are numeric and date.
Because
inputType=combobox,
this option appears as a combobox control labeled Category
of informat. From the combobox control, the user can
select Numeric or Date.
|
| 4 | This
line defines the informatWidth option, which
specifies the width for the informat. Because inputType=numbertext,
this option appears as a numbertext control labeled Informat
width. Because defaultvalue=10,
the default value of the informat width is 10.
|
| 5 | This
line defines the outputDSName option, which
enables you to specify a name for the output data set. In the user
interface, this option appears as an outputdata control, which is
simply a text box where the user can specify the name of the output
data set. The defaultValue attribute is set
to Test. When you run the task, the output
data set appears on the OUTPUT DATA tab.
The default name that appears in the user interface is Test.
|
Add These Options to the User Interface
In the
UI element,
add the highlighted code to create the optionsGroup and
its options:
<Container option="dataTab">
   <Group option="dataGroup" open="true">
      <DataItem data="inlibname" />
   </Group>

   <Group option="rolesGroup" open="true">
      <RoleItem role="invarname" />
   </Group>

   <Group option="optionsGroup" open="true">
      <OptionItem option="samename" />
      <OptionChoice option="informatType">
         <OptionItem option="numericChoice" />
         <OptionItem option="dateChoice" />
      </OptionChoice>
      <OptionItem option="informatWidth" />
      <OptionItem option="outputDSName" />
   </Group>
</Container>

| 1 | This
line creates the OPTIONS group on the DATA tab.
Because open=”true”, this group
is expanded by default, so you can see all of the options in this
group. You can use the The options in the OPTIONS group
appear in the order in which you specified them in the
UI element.
In this example, the options are in this order: sameName, informatType,
informatWidth, and outputDSName.
|
| 2 | In
the Options element in the metadata, you
specified this code:<Option name="informatType" inputType="combobox">Category of informat:</Option>Because inputType=”combobox”,
the informatType option is a combobox control. You also defined the
two options (Numeric and Date)
that are available from the combobox control.<Option name="numericChoice" inputType="string" returnValue="BEST">Numeric</Option> <Option name="dateChoice" inputType="string" returnValue="DDMMYY">Date</Option> In the
UI element,
you specify the order in which these two options (Numeric and Date)
appear in the combobox control.
|
| 3 | This
line creates the Informat width text box.
In the metadata, you defined this option by using this code: <Option name="informatWidth" inputType="numbertext" minValue="1"
defaultValue="10">Informat width:</Option>Because
defaultValue=”10”,
a default value of 10 appears in the Informat width text
box when you generate the user interface.
|
| 4 | This
line creates the Name of output data set box.
In the metadata, you defined this option by using this code:<Option name="outputDSName" inputType="outputdata" defaultValue="Test"
required="true">Name of output data set:</Option>Because
defaultValue=”Test”,
a default name of Test appears in the Name of output data
set box when you generate the user interface.
|
Copyright © SAS Institute Inc. All rights reserved.