Step 3: Specify the Input Data Source and Identify Any Roles
About Input Data Sources and Roles
In the common task model
(CTM), you identify the input data source by using the
DataSource element.
You use the Roles element to identify how
a variable from the input data source is used in the task.
To add any options to
a task, you must first define the option in the metadata. Then you
must specify how to display the option in the user interface.
Define the Input Data Source in the Metadata Element
In the blank task, find
the
Metadata element:
<Metadata>
   <DataSources>
   </DataSources>

   <Options>
   </Options>

</Metadata>
Now, add the highlighted
code to the
DataSources element:
<DataSources>
   <DataSource name="inlibname">
   </DataSource>
</DataSources>
In the
DataSource element,
you are specifying a name for the input data source. You refer to
this name later in the task definition. In this example, the name
of the data source is inlibname.
Define the Character variable to convert Role in the Metadata
Now that you can select
the input data source, you need to identify the variable that contains
the values that you want to convert. You specify this variable by
using the
Roles element, which is a child
of the DataSource element.
Add the highlighted
code to the
DataSource element:
<DataSources>
   <DataSource name="inlibname">
   <Roles>
      <Role name="invarname" type="C" minVars="1" maxVars="1">
         Character variable to convert</Role>
   </Roles>
   </DataSource>
</DataSources>
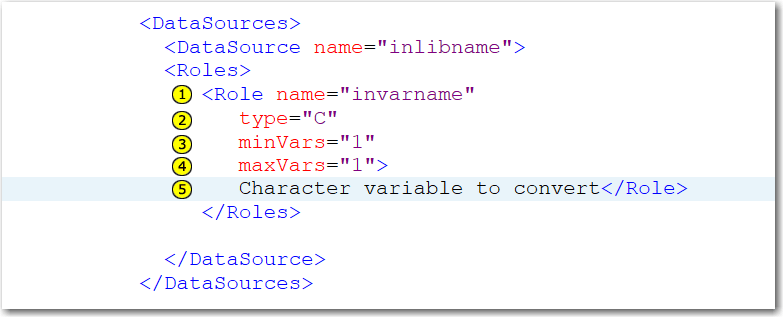
| 1 | The name attribute
specifies the name for the role. In this example, the name of the
role is invarname.
|
| 2 | The type attribute
specifies the type of variable that can be assigned to this role.
In this example, only character variables (represented by type=”C”)
can be assigned to this role. In the user interface for the task,
character columns are identified by the |
| 3 | The minVars attribute
specifies the minimum number of variables that must be assigned to
this role. In this example, a character variable must be assigned
to the Character variable to convert role
in order for the task to run, so minVars=”1”.
In the user interface for the task, a red asterisk appears next to
the name of this field to indicate that a variable is required. If
no variable is assigned to this role, the task cannot run.
|
| 4 | The maxVars attribute
specifies the maximum number of variables that can be assigned to
this role. In this example, only one variable can be assigned to this
role.
|
| 5 | Character
variable to convert is the label for this field in the
user interface.
|
Add the Input Data Source and Roles Fields to the User Interface
Now that the data source
and role are defined in the metadata, you need to create the fields
for the user interface.
In the previous section,
you defined the metadata for the data source field and the Character
variable to convert field. However, the final user interface
also shows a DATA tab, a DATA heading,
and a ROLES heading. To include these elements
in the user interface, you must define these elements in the metadata
by using multiple
Option elements.
To define these three
UI elements in the metadata, add the highlighted code to the
Options element.
</DataSources>
...
<Options>
<Option name="dataTab" inputType="string">DATA</Option>
<Option name="dataGroup" inputType="string">DATA</Option>
<Option name="rolesGroup" inputType="string">ROLES</Option>
</Options>
</Metadata>
In the
Option elements,
you specified the following information:
-
the name for each UI element. For example, the name for the DATA tab is
dataTab. You use this name again in theUIelement. -
the input type for these options. Because these are labels that appear in the user interface, the input type is a string.
Now that all of the
elements that you need (the DATA tab, the
group headings, the data source option, and the roles option) are
defined in the metadata, you can specify how you want these items
to appear in the user interface. In your example, here is the location
of the
UI element.
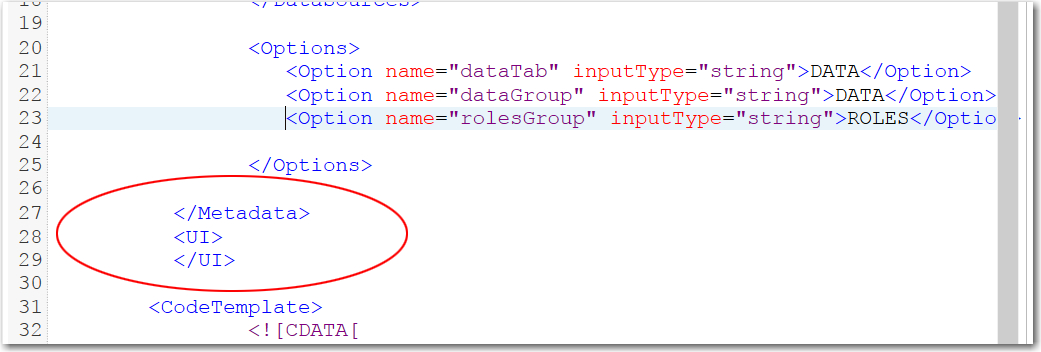
As you can see, the
UI element
follows the closing Metadata element. In
the UI element, add the following code:
<UI>
<Container option="dataTab">
<Group option="dataGroup" open="true">
<DataItem data="inlibname" />
</Group>
<Group option="rolesGroup" open="true">
<RoleItem role="invarname" />
</Group>
</Container>
</UI>
| 1 | Container elements
enable you to add tabs to your user interface. To create multiple
tabs, you need multiple Container elements.
In this code example,
you are creating only the DATA tab. You specified
the name (
dataTab) and UI label (DATA)
for this tab in the metadata. <Option name="dataTab" inputType="string">DATA</Option> Because only one container
is defined for this task, all the remaining UI elements appear on
the DATA tab.
|
| 2 | In
the first Group element, option=”dataGroup” refers
to the dataGroup name that you defined in
the metadata.<Option name="dataGroup" inputType="string">DATA</Option>In the user interface, the label for this group is DATA. The
DataItem element
creates the field for the input data source. In this example, the
name of the input data source is inlibname,
which was defined in the DataSource element
in the metadata.
|
| 3 | In
the second Group element, option=”rolesGroup” refers
to the rolesGroup name that you defined in
this code in the metadata.<Option name="rolesGroup" inputType="string">ROLES</Option>In the user interface, the label for this group is ROLES. The
RoleItem element
creates a field for selecting the character variable that you want
to convert. You defined this role in the Roles element
in the metadata. <DataSource name="inlibname">
<Roles>
<Role name="invarname" type="C" minVars="1" maxVars="1">
Character variable to convert</Role>
</Roles>
</DataSource>The name of this role
is
invarname. When displayed in the user
interface, the role is labeled Character variable to convert.
|
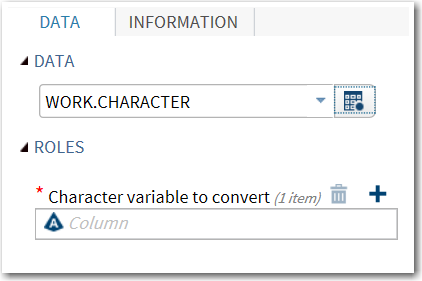
View the Data Source and Character variable to convert Options
Click  to generate the user interface for the task.
The user interface
includes a DATA tab with two groups (DATA and ROLES).
Two options (one for selecting the data source and one for assigning
a character variable to the Character variable to convert role)
also appear.
To create this user
interface, you had to complete these steps:
-
Define all elements in the metadata.
-
You defined the data source option in Define the Input Data Source in the Metadata Element.
-
You defined the Character variable to convert role in Define the Character variable to convert Role in the Metadata.
-
You defined the DATA tab, DATA group heading, and ROLES group heading at the beginning of Add the Input Data Source and Roles Fields to the User Interface.
-
-
Use the
UIelement to specify how these items appeared in the user interface. You defined the contents of theUIelement in Add the Input Data Source and Roles Fields to the User Interface.
Close the task and return
to the tab that contains the CTM code. Click  to save your CTM code.
Copyright © SAS Institute Inc. All rights reserved.