Managing Users and Groups

Understanding Users and Groups

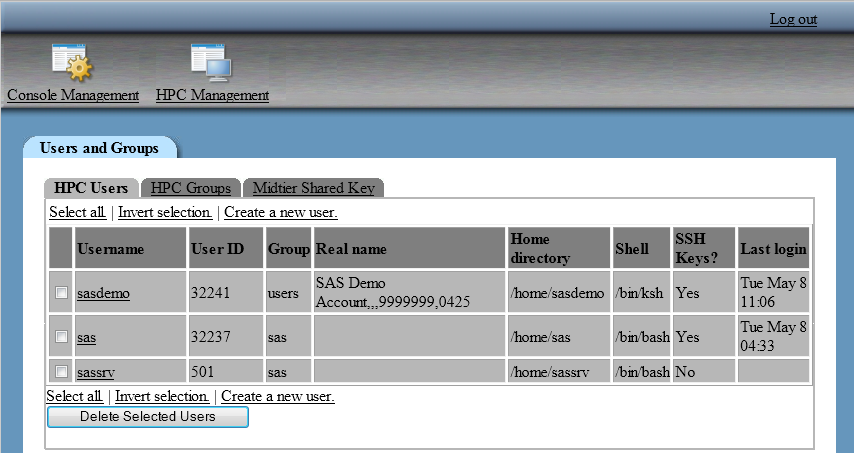
The users and groups module is used to create, manage, and propagate operating system user accounts and groups throughout the machines in the cluster. It also enables an administrator to generate and distribute SSH keys for each user account. The key generation can be performed as the account is propagated to the machines in the cluster, or it can be performed on existing accounts.
An important requirement for SAS Visual Analytics deployments is to append the SSH public key for the user account that runs JBoss to the authorized_keys files for operating system user accounts. This task can be performed automatically when creating user accounts with the HPC management interface. The public key can also be appended to the authorized_keys file for existing accounts.
The following display shows the interface for managing operating system users and groups.
Managing Users and Groups
HPC Management users and groups interface
The HPC Users tab shows the following information for each user account:
User Accounts Field Descriptions
Field
Description
Username
Specifies the user account name.
User ID
Specifies the UID for the user account.
Group
Specifies the primary group for the user account.
Real name
Specifies details about the user that make the user account more identifiable.
Home directory
Specifies the home directory for the user account.
Shell
Specifies the UNIX shell to use for the user account.
SSH Keys?
This field is set to Yes if the $HOME/.ssh/id_rsa file exists.
For environments that use Network File System (NFS) to manage home directories, this field is set to NFS. The console does not attempt to detect the existence of the id_rsa file.
Last login
Specifies the date of the last logon.

Configuring the Middle-Tier Shared Key

SAS Visual Analytics deployments require appending the SSH public key for the user account that runs JBoss to the authorized_keys files for user accounts that use the explorer and designer interfaces. Perform this step before you create users.
To configure the middle-tier shared key:
  1. Access the .ssh/id_rsa.pub file for the user account that is used to run JBoss. This file contains the SSH public key. Copy the contents of the file to your clipboard.
  2. Click HPC Management from the toolbar.
  3. Click Users and Groups.
  4. Click Midtier Shared Key and specify values for the following fields:
    Middle-Tier Shared Key Field Descriptions
    Field
    Description
    TKlasrkey location
    Specify the fully qualified path to the tklasrkey file. The default location is /opt/TKGrid/bin/tklasrkey.
    Shared Public Key
    Paste the contents of the id_rsa.pub file from your clipboard.
    Mid Tier Hostname
    (Optional) If you specify the host name for the machine that is used to run JBoss, then the host name is included in the authorized_keys file. This provides an additional measure of security.
  5. Click Save.

Create a User

To create a user:
  1. Click HPC Management from the toolbar.
  2. Click Users and Groups.
  3. Click Create a new user and specify values for the following fields:
    Create User Field Descriptions
    Field
    Description
    Username
    Specify the user account name, such as madupr or team1usr.
    User ID
    Select an option:
    Automatic
    the operating system selects an unused UID.
    Calculated
    (rarely used) the UID is created based on a Berkeley CRC and mkuid. The mkuid command assumes a standard naming convention for user names.
    Specified
    specify the UID to use. By default, this field shows the UID that is assigned if the Automatic option is used.
    The default option is Automatic.
    Real name
    Specify details about the user that make the user account more identifiable.
    Home directory
    Select an option:
    Automatic
    /home/$username is the home directory value.
    Directory
    specify the fully qualified path to use as the home directory or click the Browse button to select a location.
    The default is Automatic.
    Shell
    This field is not selectable or configurable. The default is /bin/ksh.
    Password
    Select an option:
    No password required
    sets the password to null.
    Normal password
    enter the plain-text password in the field.
    Pre-encrypted password
    enter a password in encrypted form.
    Password changed
    Specifies the last time the password was changed.
    Expiry date
    Specify the date on which the password should expire. You can enter the date or use the calendar. The default is no date.
    Minimum days
    Specifies the minimum number of days between password changes. The default is zero.
    Maximum days
    Specifies the maximum number of days between password changes. The default is 99999.
    Warning days
    Specifies the number of days that a password expiration warning is generated before a password expires. The default is zero.
    Inactive days
    Specifies the number of days that a user must be inactive before the user account is locked. The default is zero.
    Force change at next login?
    Select Yes to force the user to change the password after the next logon. The default is No.
    Note: This option is not available for deployments that use SUSE Linux Enterprise Server. In this case, edit the user account after it is created to force the change.
    Primary group
    Select a group name from the menu. This list is filtered to show GID values that are greater than or equal to 100.
    Propagate User
    Select Yes to add the user to each machine in the environment. The default is No.
    Generate and Propagate SSH Keys
    Select Yes to generate SSH keys and propagate them when the user is created. The default is No.
    Add Shared Midtier Key
    Select Yes to include the information from the Midtier Shared Key tab in the authorized_keys file for the user. The default is No.
    Create home directory?
    Select Yes to create the user’s home directory. Select No if the directory already exists. The default is Yes.
    Copy template files to home directory?
    Select Yes to copy standard environment files to the user’s home directory at creation time. The default is Yes.
  4. Click Create.
    If Propagate User was set to Yes, then the progress of adding the user to the machines in the environment is shown.
If a mismatch is detected on a machine, such as a UID already in use, then the change fails and the mismatch is reported.

About Editing and Deleting Users

You can edit a user by selecting the user name on the HPC Users tab. Unlike creating a user account, very few fields are available for edit. The following list identifies the fields that can be changed:
  • Password
  • Expiry date
  • Minimum days
  • Maximum days
  • Warning days
  • Inactive days
  • Force change at next login?
The field descriptions for these options are provided in Create User Field Descriptions.
You can also delete users individually or in groups by selecting the check box for the user on the HPC Users tab and then clicking Delete Selected Users.

SSH Key Management Features

As described in the section about creating users, the console can generate and propagate SSH keys. In addition, the console can append a middle-tier shared key to the authorized_keys file for the user. These two features, SSH key generation and propagating the middle-tier shared key, can also be performed on existing user accounts.
To use these features, edit the user by selecting the user name on the HPC Users tab, select the radio button for the features that you want to use, and click Save.

Create a Group

To create a group:
  1. Click HPC Management from the toolbar.
  2. Click Users and Groups.
  3. Select the HPC Groups tab and then click Create a new user. Specify values for the following fields:
    Create Group Field Descriptions
    Field
    Description
    Group name
    Specify the name for the group, such as finance or team1.
    Group ID
    Select an option:
    Automatic
    the operating system selects an unused GID.
    Calculated
    (rarely used) the GID is created based on a Berkeley CRC and mkgid.
    Specified
    specify the GID to use. By default, this field shows the GID that is assigned if the Automatic option is used.
    The default option is Automatic.
    Members
    Select users from the list and use the buttons to specify the members of the group.
  4. Click Create.
If a mismatch is detected on a machine, such as a GID already in use, then the change fails and the mismatch is reported.

About Editing and Deleting Groups

You can edit a group by selecting the group name on the HPC Groups tab. Users can be added as members of the group. This action sets secondary group membership for the user account.
You cannot delete a group if it is used as the primary group for any user accounts.