Securing Cubes
About OLAP Member-Level Permissions
OLAP member-level
permissions enable you to limit access to SAS OLAP data using filters.
Each filter consists of an MDX expression that subsets the data in
a dimension as appropriate for a particular user or group. The filters
are stored in the metadata as permission conditions. This feature
relies on the SAS OLAP Server for enforcement. At query time, the
server performs the filtering to determine which dimension members
should be returned to the user that submitted the query. This ensures
that the filters are applied every time the data is accessed.
When you use OLAP member-level
permissions, it is essential to understand these points:
-
The SECURITY_SUBSET option can affect results. See About the SECURITY_SUBSET Option.
Assign OLAP Member-Level Permissions
Follow these steps to
assign a permission condition to one or more members in a given dimension,
for a selected user or group.
Tip
If you want to use the same
dimension in multiple cubes, create a shared dimension. See Developing and Managing Shared Dimensions. See also the example Setting Member–Level Permissions.
Identity-Driven Properties
Use the following identity-driven
properties in your MDX filters to subset the users that receive member-level
permissions.
This property translates
to optional, site-specific values such as Employee ID. Those values
are not automatically stored in the metadata repository and need to
be loaded and maintained.
This property resolves
to the name of the requesting group identity (for example, Portal
Admins Group).
This property returns
the name of either the requesting group identity or the requesting
user identity, depending on whether the user ID is a group login or
a personal login.
See also the example Setting Identity-Driven Security.
About the SECURITY_SUBSET Option
After you have set the
necessary permission conditions for dimension members, you must indicate
whether the OLAP server includes these permission conditions when
processing cube queries. In order for a cube to control the roll-up
values for designated members, the SECURITY_SUBSET PROC OLAP option
must be set to YES when the cube is built. The SECURITY_SUBSET option
is used in conjunction with permission conditions to specify whether
the roll-up values include only the members in the permission condition
or all of the members in the cube. If you set SECURITY_SUBSET=YES,
then the cell values are recalculated at query time based on the security
subset defined by the active permission conditions for the given user.
If you set SECURITY_SUBSET=NO, then the OLAP server does not recalculate
the cell values. The default value (NO) includes all members within
a total.
Example: Using Member-Level Permissions
This example demonstrates
how you can use member-level permissions. These are the security goals
in this example:
The following figure
depicts the relevant parts of a company's organization structure and
of the OLAP cube against which the company runs executive reports.
Notice that the levels in the cube's Geography dimension closely correspond
to the depicted organizational structure.
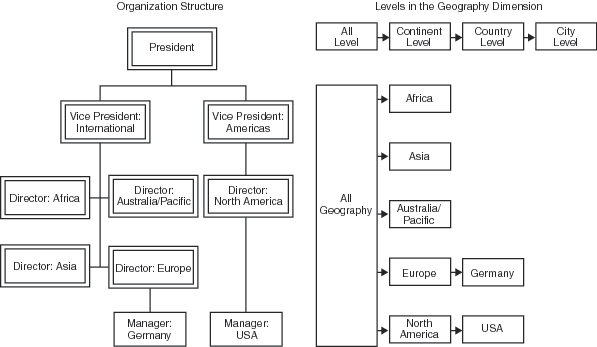
For example, the following table contains MDX expressions
that you could use to subset the data based on each executive's area
of responsibility.
Integrated Windows Authentication and Single Sign-On
Single Sign-On (SSO) to SAS IOM Bridge servers
Single sign-on (SSO)
is an authentication model that enables users to access a variety
of computing resources without being repeatedly prompted for their
user IDs and passwords. This functionality enables a client application
to connect to a SAS IOM Bridge Server as the currently logged-on user.
For example, single sign-on can enable a user to access SAS servers
that run on different platforms without interactively providing the
user's ID and password for each platform. Single sign-on can also
enable someone who is using one application to launch other applications
based on the authentication that was performed when the user was initially
logged on to the system.
SSO and SAS OLAP Cube Studio
When you have logged
on to a metadata server in SAS OLAP Cube Studio, you can perform a
variety of functions, including building a cube and saving the metadata
for that cube, editing cube metadata, and viewing cube properties.
Some functions within SAS OLAP Cube Studio also require a workspace
server or an OLAP server in addition to the metadata server. These
functions include Build Physical Cube, Incremental Cube Update, Calculated
Members, and Cube View. Single sign-on enables you to seamlessly access
these servers without having to provide your login credentials. Two
technologies are available in SAS 9.2 to accomplish this:
Integrated Windows Authentication
A client and server
engaged in Integrated Windows authentication use Microsoft's Security
Support Provider Interface (SSPI) to choose the best security package
for their configuration. When you first open SAS OLAP Cube Studio,
you are prompted to log on to a metadata server with a connection
profile that you have previously created. This connection profile
contains information about the metadata server, including the machine
ID, port ID, user ID, and password. There is also a check box labeled Use Integrated Windows authentication (single sign-on). If this check box is selected, then you will use Integrated Windows
authentication (IWA) to connect to the servers (metadata server, workspace
server, and OLAP server). You will not need to provide a user ID or
password when you open SAS OLAP Cube Studio. The user ID and password
of your current Windows session will be used. By default this option
is not selected when you create a connection profile in SAS OLAP Cube
Studio.
Trusted Peer Connection
The other authentication
technology is a trusted peer connection. This method depends heavily
on the integrity of the client environment. The IOM Bridge protocol
client obtains the identity of the user of the client application
from the system environment. When a trusted peer connection is being
used, you are prompted during an initial login for your user ID and
password when connecting to a metadata server. This is the behavior
of previous versions of SAS OLAP Cube Studio. However, when a connection
to a workspace server (submitting procedure code) or a connection
to an OLAP server (cube viewer) is made in SAS 9.2 OLAP Cube Studio,
you are no longer prompted to log on. The connection is created using
the metadata server login credentials.
Exporting Code
In SAS OLAP Cube Studio,
you can export PROC OLAP code that you have created while using various
functions and wizards, including Cube Designer, Aggregations Tuning,
and Incremental Update. The Export Code function enables you to save
PROC OLAP code to a designated file. When using the Export Code function,
some of the metadata connection profile information is saved to the
file. The host and port information for the metadata server is saved
to the exported file. In addition, the information is displayed on
the Finish page of the different wizards. However, the user ID and
password are not saved to the exported file or displayed on the Finish
page. This is because single sign-on authentication removes the need
to display or save the user ID and password.
Security for Drill-through Tables
Different users of cube
data might have different security and access restrictions that must
be complied with and applied when querying the underlying data for
a cube. When selecting a data table for drill-through, you might need
to define user restrictions for certain data in the drill-through
table. The SAS Metadata LIBNAME engine is used to assign the drill-through
table library on a per-session basis. This allows client credentials
to be used when determining which columns the user can see. Columns
which have ReadMetadata permissions denied on the drill-through table
will not be visible to the user. If access is denied for a column
on the drill-through table, that level must also be denied Read access
in the cube. Conversely, if a level is denied Read access in the cube,
that column in the drill-through table must have ReadMetadata access
denied. For more information about the SAS Metadata LIBNAME engine
see the topic “Pre-assigning Libraries” in the SAS Intelligence Platform: System Administration Guide.
-
You cannot drill down in an OLAP cube if there are discrepancies between the physical table and the metadata that is defined for the table. You can update the metadata for the table by using the Update Metadata function in SAS Management Console or SAS Data Integration Studio. If the table is part of a job in SAS Data Integration Studio, then check the code for the job to verify that there are no LENGTH statements that would cause a mismatch to occur.
Applying Batch Security with Permission Tables
When applying permissions
to a cube, you might need to address permissions for different combinations
of users, groups, SAS OLAP Servers, schemas, and cubes, as well as
different elements of the cube, including the dimensions, hierarchies,
levels, and measures. For example, you might need to grant ReadMetadata
and Read access to the group that contains specific cube users. Or
you might need to restrict Read access for different components of
a cube (dimension, hierarchy, level, or measure) using MDX conditions
for each cube component, per user, consumer, or group. These various
combined permission settings can be easily created and managed with
batch security that is applied through permission tables.
Starting in the third
maintenance release for SAS 9.2, you can specify batch security in
SAS OLAP Cube Studio and SAS Data Integration Studio with the Manage
Permission Tables function. The Manage Permission Tables function
enables you to create a special SAS data set known as a permission
table that contains cube access controls for submitting in bulk. A
permission table is a table of access control information that can
later be applied to a cube with batch SAS code. The Manage Permission
Tables dialog box enables you to create and modify permission tables
as well as import access controls (permissions) from a cube or an
OLAP schema. You can also execute the code interactively or export
the code to a file for use in a stored process or deployed job flow.
When a cube is created,
security for that cube is determined by the permission settings that
are found in the cube metadata. In SAS OLAP Cube Studio, permission
tables will appear in the metadata tree as a table. You must have
WriteMetadata access to create and modify permission tables. To access
the Manage Permission Tables function in SAS OLAP Cube Studio, select Tools Manage Permission Tables. The Manage Permission Tables dialog box appears.

