Import Models
In this exercise you import models into SAS Model
Manager, set model properties, and map the model variables. The imported
models are SAS code models. The SAS code for the first model is the
LOGISTICS procedure, whereas the SAS code for the second and third
models consists of DATA step fragments. To import SAS code file, at
least three component files are required: the model score code, the
model input file, and the model output file. For prediction or classification
models, you also must prepare model target files.
Import SAS Code Models
-
Expand the
2011 version in the
Delinquency project and right-click
Models folder.
Then select
Import from Local Files
. The
Local Files window appears.
-
-
In the left pane, expand
the
Desktop folder and select
<drive>:\Tutorial2\Samples\model1.
-
Type
Model 1 in the
Name box.
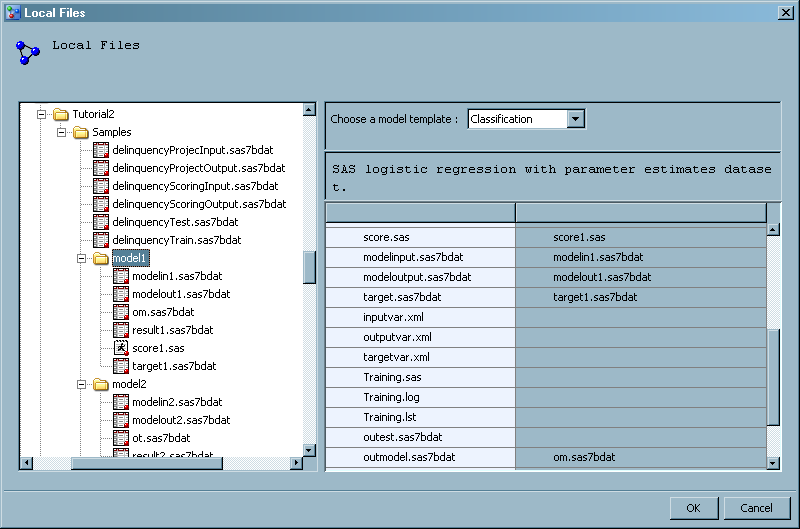
For each filename in the Object column, click the filename and drag
it to the corresponding option box. This action maps the tutorial
model component filenames to the SAS Model Manager model component
filenames.
Here is the
Local Files window after the files have been mapped.
-
-
-
Open the
Local Files. In the left pane, expand the
Desktop folder and select
<drive>:\Tutorial2\Samples\model2.
-
Type
Model 2 in the
Name box.
For each filename in the Object column, click the filename and drag
it to the corresponding option box. This action maps the tutorial
model component filenames to the SAS Model Manager model component
filenames.
-
-
-
Open the
Local Files window. In the left pane, expand the
Desktop folder and select
<drive>:\Tutorial2\Samples\model3.
-
Type
Model 3 in the
Name box.
For each filename in the Object column, click the filename and drag
it to the corresponding option box. This action maps the tutorial
model component filenames to the SAS Model Manager model component
filenames.
-
-
Examine the
Models folder to verify that it contains the three models.
Right-click the folder and select
Expand All Items to examine the model files.
Set Model Properties
Set the properties for
the model. SAS Model Manager requires that the
Score Code
Type be set to
Data Step if
the score code is a DATA step fragment, or be set to
SAS
Program if the score code is a SAS procedure. Follow
these steps.
-
Select
Model
1. Click the
Description field
and enter
first model for tutorial 2.
-
Select
Model
2. Click the
Score Code Type box and select
DATA Step.
-
Select
Model
3. Click the
Score Code Type box and select
DATA Step.
Map Model Variables to Project Variables
When the names of the
model output variable are not identical to the names of the project
output variables, you must map the variables. To map model output
variables to project output variables, follow these steps:
-
Map model variables
for the first model. Right-click
Model 1 in
the
Models folder and then select
Set Model Output Mapping. Ensure that the following
model variables are mapped to their respective project variables.
To map a model variable to a project variable, click in the box in
the
Model Variables column, select a variable,
and click
OK.
-
Map model variables
for the second model. Select
Model 2 in the
Models folder and then click the
Model Mapping tab in the right pane. Click
Edit. Ensure
that the following model variables are mapped to their respective
project variables. To map a model variable to a project variable,
click the box in the
Model Variables column
and select a variable. Click
OK when you
are finished.
-
Map model variables
for the third model. Select
Model 3 in the
Models folder and then click the
Model Mapping tab in the right pane. Click
Edit. Ensure
that the following model variables are mapped to their respective
project variables. To map a model variable to a project variable,
click the box in the
Model Variables column
and select a variable. Click
OK when you
are finished.
Update the Life Cycle (Optional)
To update the Development
milestone, follow these steps:
-
In the
Delinquency project, expand
2011Life CycleDevelopment.
-
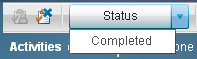
Select the
Import models task. Click the
Status box and select
Completed.
-
Select the
Development milestone to refresh the property values.
Select
Import models. The
Completed
Date and
Completed By fields
have been updated with today's date and your user ID.
-
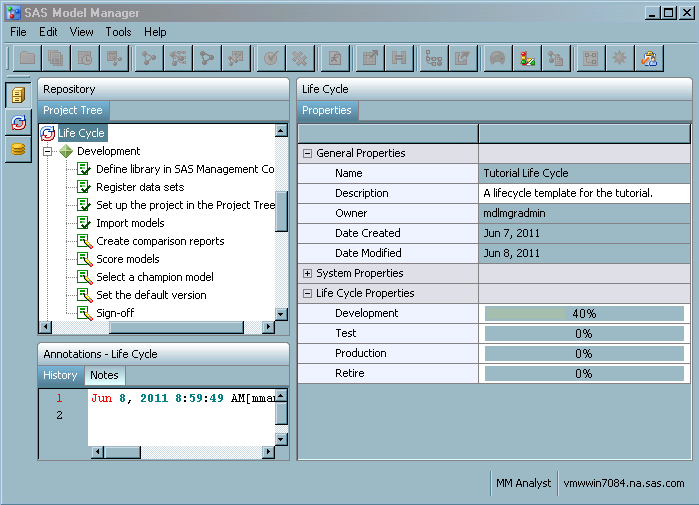
Click the
Life Cycle node to examine its properties. The value
for
Date Modified is today's date. The
Develop property displays a bar chart that shows the
percentage of completed tasks for this milestone.
Update the Workflow Process (Optional)
To complete the activities
in the associated workflow process, follow these steps:
-
Click

from the SAS Model Manager main window to view the
workflow process activities in your workflow inbox. Workflow Console
is launched in a Web browser, and displays the Activities category
view.
Note: The list displays only the
activities for which you are the actual owner or are assigned as a
potential owner, and that have the state of
Started.
-
From
the
Activities category view, select an activity
name, and click
to claim an activity.
Note: You can select an activity
name and click

to release an activity that you had previously claimed.
-
(Optional) Enter a property
value or change an existing property value in the
Properties pane.
-
(Optional) Add a comment
to the activity using the
Comments pane.
-
Select a status value
to complete the activity. The workflow process continues to the next
activity.
-
Repeat steps 2 through
5 for the activities that you completed during this tutorial.
Copyright © SAS Institute Inc. All rights reserved.