Import Models

In this exercise you import models into SAS Model Manager from the SAS Metadata Repository, a PMML model file, and a SAS Enterprise Miner package file. Then you map the model variables. Before you import the model, verify that the model type is identical to the value of the project Model Function property, classification. For more information, see Create a New Project.

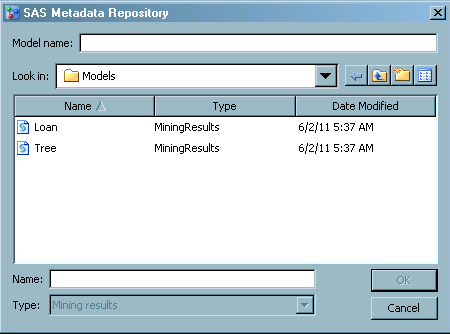
Import Models from a SAS Metadata Repository

If your SAS Enterprise Miner 5.1 (or later) model files are registered in the SAS Metadata Repository, then you can use SAS Model Manager to import the files. If you do not have SAS Enterprise Miner models that have been registered in the SAS Metadata Repository, you can review these steps.
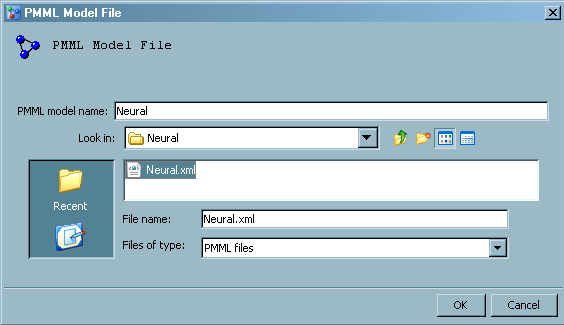
To import a model that is registered with SAS Enterprise Miner, follow these steps to understand the process:
  1. Expand the 2011 version in the Loan project and right-click the Models folder. Then select Import fromthen selectSAS Metadata Repository. The SAS Metadata Repository dialog box appears.
  2. Navigate to the location of the folder that contains the SAS Enterprise Miner models. Select a model from the folder.
    Import model from SAS Metadata Repository
  3. Click OK. After SAS Model Manager processes the request to import the model, the new model appears in the Models folder of your project's version.

Import PMML Models

PMML (Predictive Modeling Markup Language) is an XML-based standard for representing data mining results. PMML is designed to enable the sharing and deployment of data mining results between vendor applications and across data management systems. You can use SAS Model Manager to import PMML 3.1 (or later) models that are produced by another software application, such as SAS Enterprise Miner.
To import a PMML model, follow these steps:
  1. Expand the 2011 version in the Loan project and right-click the Models folder. Then select Import Fromthen select PMML Model File. The PMML Model File dialog box appears.
  2. In the PMML model name field, enter Neural.
  3. Navigate to the location of the folder that contains the PMML files. For this example, use <drive:>\Tutorial3\Samples\Neural\ that was installed by the SAS Model Manager administrator. For more information, see Prepare Tutorial 3 Data Sets and Models.
  4. Select the Neural.xml file and click OK.
    Import PMML model from SAS Enterprise Miner
  5. Examine the Models folder to verify that it contains the models. Right-click the folder and select Expand All to examine the model file.

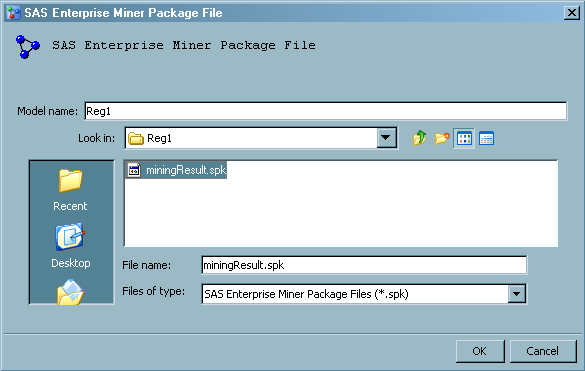
Import SAS Enterprise Miner Model Package Files

SAS Enterprise Miner package files, or SPK files, contain complete model information. You can import SAS Enterprise Miner models even if they are not registered in the SAS Metadata Repository. For information about how to create a package file, see the SAS Model Manager: User's Guide.
To import a SAS Enterprise Miner model that was saved as package file, follow these steps:
  1. Expand the 2011 version in the Loan project and right-click the Models folder. Then select Import Fromthen selectSAS Enterprise Miner Package File. The SAS Enterprise Miner Package File dialog box appears.
  2. In the Model Name field, enter Reg1.
  3. Navigate to the location of the folder that contains the SAS Enterprise Miner package files. For this example, use <drive:>\Tutorial3\Samples\Reg1 that was installed by the SAS Model Manager administrator. For more information, see Prepare Tutorial 3 Data Sets and Models.
  4. Select the miningResult.spk file and click OK.
    Import model from a SAS Enterprise Miner package file
  5. Repeat steps 2 through 4 to import a second package file that is located in <drive:>\Tutorial3\Samples\Tree1. Name the model Tree 1.
  6. Examine the Models folder to verify that it contains the models. Right-click the folder and select Expand All to examine the model files.

Map Model Variables to Project Variables

When the names for the model output variable are not identical to the names for the project output variables, you must map the variables.
To map model output variables to project output variables, follow these steps:
  1. Map model variables for the first model. Select Reg1 in the Models folder, click the Model Mapping tab in the right pane, and click Edit. Set the following mapping and click OK:
    Project Variables
    Model Variables
    score
    EM_EVENTPROBABILITY
  2. Map model variables for the second model. Right-click Tree 1 in the Models folder, and select Set Model Output Mapping. Set the following mapping and click OK:
    Project Variables
    Model Variables
    score
    EM_EVENTPROBABILITY

Update the Model Life Cycle (Optional)

To complete the milestone task for adding the models, follow these steps:
  1. In the Loan project, expand 2011then selectLife Cyclethen selectDevelop.
  2. Select the Import models task. Select the Status box and select Completed. The Date Completed and Completed By fields have been updated with today's date and your user ID.
  3. Click the Life Cycle node to examine its properties. The value for Date Modified is today's date. The Development property displays a bar chart that shows the percentage of completed tasks for this milestone.

Update the Workflow Process (Optional)

To complete the activities in the associated workflow process, follow these steps:
  1. Click My Workflow Inbox from the SAS Model Manager main window to view the workflow process activities in your workflow inbox. Workflow Console is launched in a Web browser, and displays the Activities category view.
    Note: The list displays only the activities for which you are the actual owner or are assigned as a potential owner, and that have the state of Started.
  2. From the Activities category view, select an activity name, and click Claim the activity to claim an activity.
    Note: You can select an activity name and click Release the activity to release an activity that you had previously claimed.
  3. (Optional) Enter a property value or change an existing property value in the Properties pane.
  4. (Optional) Add a comment to the activity using the Comments pane.
  5. Select a status value to complete the activity. The workflow process continues to the next activity.
    Activity Status Menu
  6. Repeat steps 2 through 5 for the activities that you completed during this tutorial.
Note: For more information, see Tutorial 10: Using Workflow Console.