Working with Galleries
About Galleries
Galleries are collections
or groups of reports that are generated by SAS IT Resource Management
and placed in the SAS Content Server. Creating and working with galleries
enables you to identify and group reports based on common variables.
Grouping reports into manageable subsets enables you to view, evaluate,
and analyze the performance and capacity of your IT infrastructure
efficiently. For more information about the report properties that
you can use as criteria for including reports in a gallery, see the
chapters about report definitions and the ITRM Report Definition task
in the SAS IT Resource Management 3.4: Reporting Guide. For more information
about creating and using filters in the Gallery workspace,
see Filter Reports.
Create a Gallery
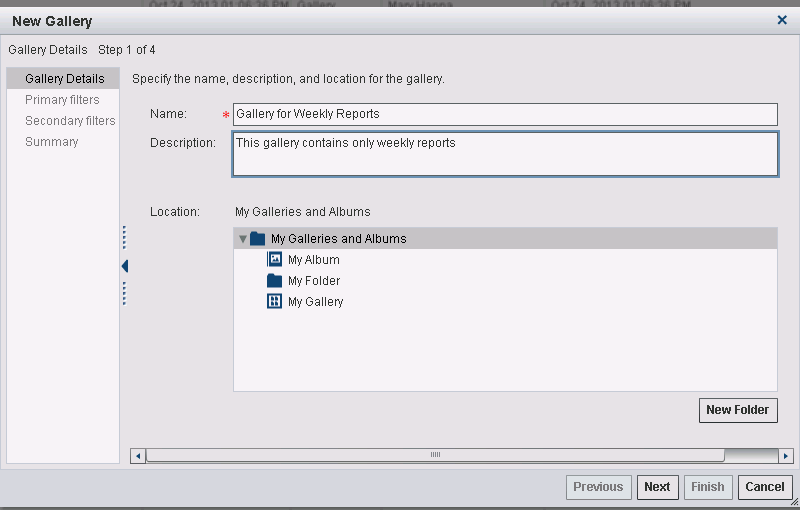
Gallery Details: Step 1 of 4
-
-
In the Location group box, select the folder where this new gallery will be stored. If you do not want to use one of the existing folders, then click the New Folder button. This action launches the New Folder dialog box that enables you to create and define a new folder. When you are finished, the wizard returns you to the Create Gallery wizard.
-
Click Next to specify the primary filters that will be used to subset the reports into the gallery. Continue to Primary Filters: Step 2 of 4.
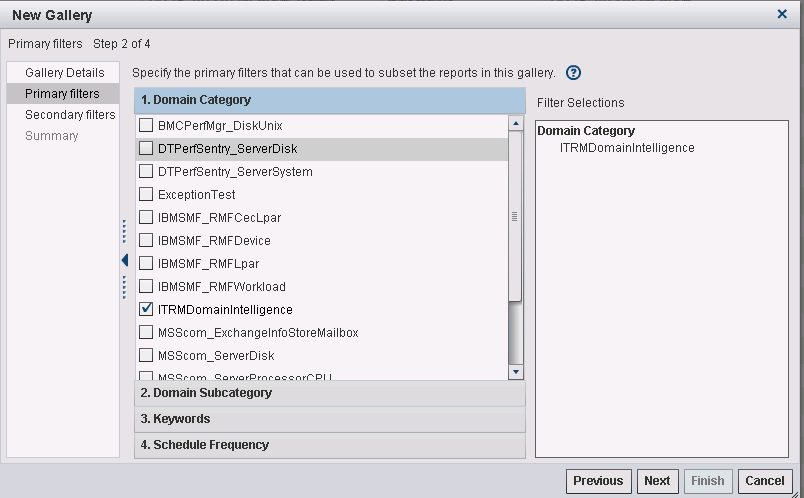
Primary Filters: Step 2 of 4
After you complete Gallery Details: Step 1 of 4, specify the primary filters.
-
On the Primary Filters page, select the primary filters that designate the criteria for reports that make up the gallery. Filters limit the number of reports that are in the gallery. For example, you might choose to create a gallery that includes only reports that were defined to run weekly (Schedule Frequency) and that are available for a particular adapter data source (Domain Category) or keyword.The following example shows the domain ITRMDomainIntelligence selected as a primary filter for a gallery. This domain is used to identify the sample reports that ITRM Report Center provides.Primary Filters Page of the Create Gallery Wizard
 The values that appear in this list are based on the reports that are in the SAS Content Server at the time. It is likely to be a subset of the values that are available from SAS Enterprise Guide and from the exception system. You can also add your own values in the case of user-defined sources.ITRM Report Center uses these filter variables in report properties to identify, filter, and sort the reports. For more information about working with the ITRM Report Definition task and report definitions, see the SAS IT Resource Management 3.4: Reporting Guide. To locate the SAS IT Resource Management documentation, use the Products Index at http://support.sas.com/documentation/index.html.Here are the four groups of primary filters that you can use to refine the set of reports in the gallery:
-
Schedule Frequency for the time period on which the reports are run, such as daily, weekly, and monthly.Note: The Schedule Frequency filter, specified in the SAS Enterprise Guide ITRM Report Definition task, is a filter value that suggests when the corresponding report job should run. It does not schedule report jobs and is not necessarily indicative of the date properties of the corresponding reports.
-
Click Next to specify the secondary filters that are used to further subset the reports into the gallery.Note: By default, primary filters must reduce the number of reports to no more than 100,000 before you can continue to subset the reports further with secondary filters. If the primary filters that you specify on this page do not reduce the number of potential reports to 100,000 or less, then an error message appears and you cannot continue. You must specify more primary filters to reduce the number of potential reports for the gallery. Secondary filters should reduce the number of reports to no more than 3,000 before you can finish creating the gallery. Galleries are limited to 3,000 reports. Your ITRM Report Center administrator can configure these report limits to a lower value for your organization if necessary. (To update the default report limits for the primary and secondary filters, use the SAS Administrative ID.) For more information, see the “Administrative Tasks” chapter of the SAS IT Resource Management 3.4: Reporting Guide.Continue to Secondary Filters: Step 3 of 4.
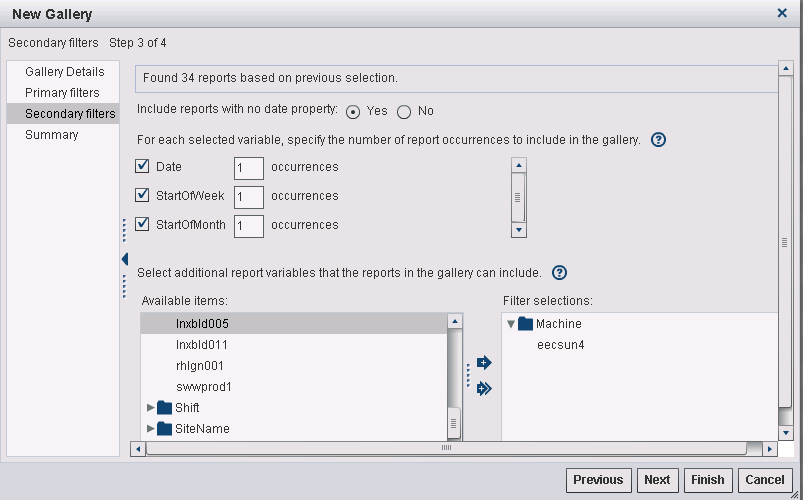
Secondary Filters: Step 3 of 4
After you complete Primary Filters: Step 2 of 4, specify the secondary filters.
-
On the Secondary Filters page, select the secondary filters that designate additional criteria for reports that make up the gallery. Secondary filters enable you to further subset the reports that meet the primary filter criteria that you selected on the previous page.This page shows the number of SAS IT Resource Management reports that are in the SAS Content Server and meet the criteria that you specified with the primary filters on the previous page. You can select Finish to accept the default filters for Date, StartOfWeek, and StartOfMonth. Alternatively, you can continue to reduce the number of reports in the gallery by selecting secondary filters.
-
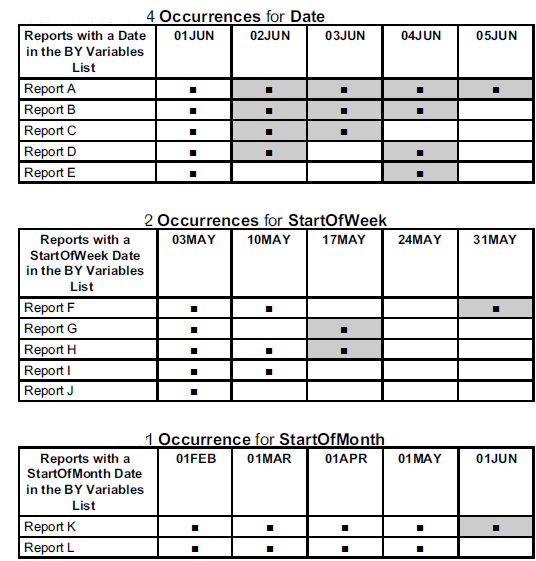
In the Occurrences field, specify the maximum number of instances (1 to 99) of the date variable that you want to include in the gallery. If a report includes a corresponding date variable that is within this range, then the report is included in the gallery.The range begins with the date of the most recent BY variable for the given time variable (Date, StartOfWeek, or StartOfMonth) and includes the next latest dates within the range.
-
Select additional secondary filters to further subset the reports in the gallery. These secondary filters are listed in the Available items box and are based on the primary filters that you selected on the previous page. Use the right arrow to move selected filter variables to the Filter selections box. To deselect a filter variable, select the filter in the Filter selections box and click the left arrow to move the filter back to the Available items box.If you do not select an additional report variable, then the reports in the gallery can include any of the variables for that secondary filter category. If you select at least one variable, then the reports in the gallery can include only the variables that you selected from the secondary filter group.Note: The gallery contains reports that have all of the selected BY variables. For example, in a domain category for VMware, the BY variables might be Host and Cluster. You might want to view only reports that contain a certain host within a certain cluster. To do so, when you create the gallery, on the Secondary filters page, select the desired values for Host and for Cluster from the Available items box. Later, when you view the gallery, reports that contain the selected Host and Cluster values are returned.
-
Note: If the gallery that is created contains reports in excess of the SecondaryReportCount value (a value set by the SAS Administrator), then this error message appears:
<nn>
                                    reports are fetched which has exceeded the administrator's recommended
                                    limit of <value-of-the-secondary-report-count>.
                                    You can proceed and create this gallery understanding that only <value-of-the-secondary-report-count>
                                    reports will be included.
Your SAS administrator can configure this report limit to a lower value for your organization if necessary. For more information, see the “Administrative Tasks” chapter in the SAS IT Resource Management 3.4: Reporting Guide.Continue to Summary: Step 4 of 4.
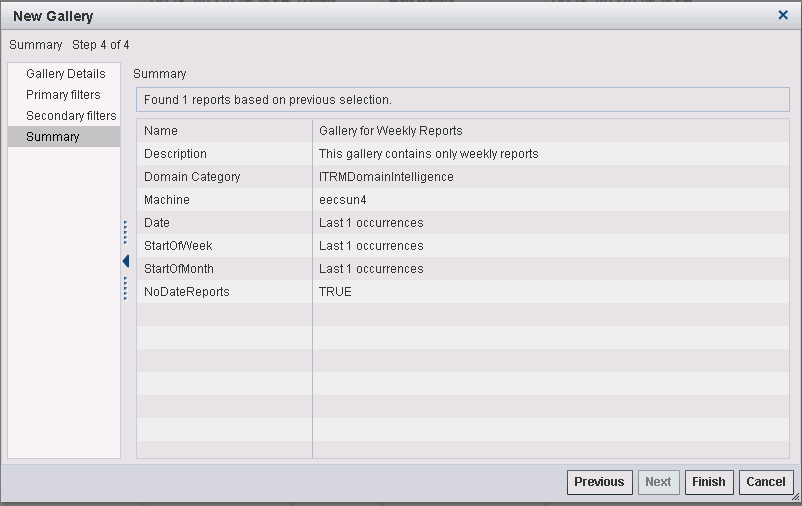
Summary: Step 4 of 4
After you complete Secondary Filters: Step 3 of 4, view the summary.
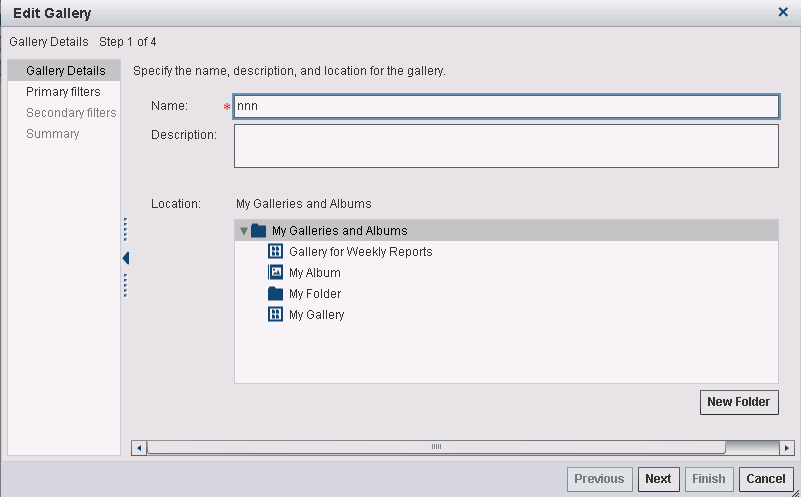
Edit a Gallery
To edit a gallery,
perform the following steps:
-
On the other pages of the wizard, you can modify the values in the Primary Filters and Secondary Filters pages as needed. For more information about how to complete the fields on these pages, see Create a Gallery.


Delete a Gallery
You can delete a gallery
to remove it from ITRM Report Center. Deleting a gallery does not
delete the reports that it contains from the SAS Content Server.

Copyright © SAS Institute Inc. All rights reserved.