In order
for SAS Information Map Studio to access a data table, the table's
metadata must be defined in a SAS Metadata Repository. You can use
Data Library Manager in SAS Management Console to create metadata
definitions for data libraries and their associated tables. The definitions
are then stored in the SAS Metadata Repository and available for applications
to use.
The
information that is specified for each library definition corresponds
to options in a SAS LIBNAME statement. For information about the correlation
between the options that are specified in Data Library Manager and
those that are specified in the LIBNAME statement, see the Data Library
Manager Help.
Note: SAS Management
Console is required only for the purpose of registering your data
in the metadata repository—it is not required for creating
an information map. If you do not have access to this software, contact
your metadata administrator for help with the steps in this chapter.
To define a SAS library
for this scenario:
-
Start
SAS Management Console if you haven't already done so.
-
Select
StartProgramsSASSAS Management Console 9.2 from your Windows desktop.
-
When you
start SAS Management Console, the application either uses the default
connection profile (if you specified a default profile during a previous
session), or it displays the
Connection Profile dialog box.
To choose
a profile in the
Connection Profile dialog
box, select
Open an existing connection profile. From the drop-down list, select the connection profile that you
want to use for this scenario, and click
OK.
-
If you
saved your user ID and password in the connection profile, or if you
are using Integrated Windows authentication, then the SAS Management
Console main window will be displayed and you can proceed to the next
step. Otherwise, you will be prompted to specify your user ID and
password in order to log on to the metadata server and display the
SAS Management Console main window.
-
Select
the
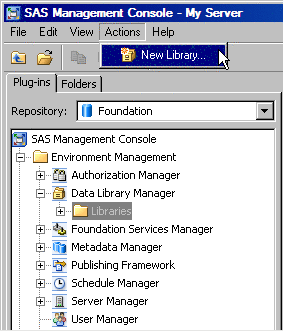
Plug-ins tab in the SAS Management Console
main window and expand
Data Library Manager.
-
Select
the
Libraries folder, and then select
ActionsNew Library from the menu bar to start the New Library Wizard.
-
Select
the library type that you will be working with. Selecting a library
type is equivalent to specifying an engine in a LIBNAME statement.
Because you are working with SAS tables in this scenario, select
SAS BASE Library from the
SAS Data folder and click
Next.
-
On the
next page, enter
Sample Employee Data
in the
Name field. The name that you enter
is used to identify the library in SAS Management Console—it
is not the libref that is specified in the LIBNAME statement.
-
Specify
a description (optional) and a SAS folder location for the library.
Click
Next.
-
The next
page lists the SAS Application Servers that have already been defined
by using Server Manager in SAS Management Console. Use the arrow button
to select the application server that you want to use to access the
Sample Employee Data library and its tables. Click
Next.
-
On the
next page, enter the following values for the library's properties:
-
In the
Libref field, specify a one- to eight-character libref
for the SAS library. For example, you can enter
SAMPDATA
.
-
In the
Engine field, make sure that
BASE is selected as the SAS engine to use when accessing SAS tables in
this library.
-
In the
Path Specification section, specify the location of
your tables on the SAS Workspace Server that is associated with the
application server that you will use. Any paths that have already
been specified for other libraries are listed in the
Available
items list. Use the arrow button to move a path from
the
Available items list to the
Selected items list. For this scenario, the tables that
you use are, by default, located in
C:\Program Files\SAS\SASFoundation\9.2\core\sample
. (The tables might be located in a different directory, depending
on where SAS is installed on your workspace server machine.)
If the
path for these tables is not in the
Available items list, click
New to display the
New Path Specification dialog box, and then specify
the path. Click
OK, and then click
Next.
-
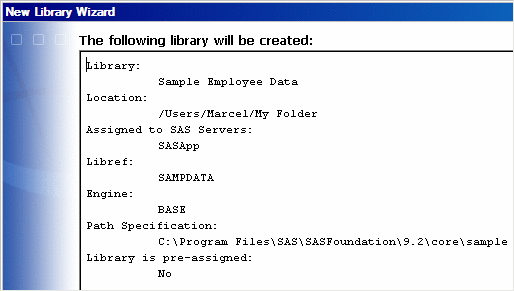
The last
page of the wizard lists all of the information that you specified
in the wizard. To make any corrections, click
Back. When all of the information is correct, click
Finish to define the library.
Tip
After you define
the library, it is added to the bottom of the list of libraries in
the
Libraries folder. To sort the libraries
in alphabetical order, you must refresh the window.