Create a Connection Profile

Before you can start SAS Information Map Studio or SAS Management Console, you must create a connection profile. A connection profile defines the connection between a SAS Metadata Server and a SAS business intelligence client application such as SAS Information Map Studio or SAS Management Console.
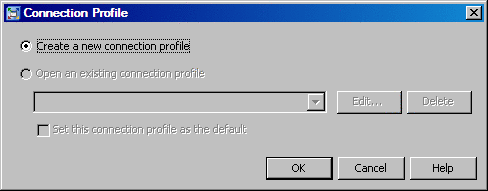
If you already have a connection profile for the metadata server that you want to use for this scenario, proceed to the next section. If you do not have an existing connection profile, complete these steps:
  1. Select Startthen selectProgramsthen selectSASthen selectSAS Management Console 9.2 from your Windows desktop.
    Note: If the Connection Profile dialog box is not automatically opened, select Filethen selectConnection Profile from the SAS Management Console menu bar.
  2. In the Connection Profile dialog box, select Create a new connection profile, and then click OK to start the New Connection Profile wizard.
    Connection Profile dialog box
  3. The first page of the wizard explains the function of the wizard. Click Next.
  4. On the Connection Profile page, specify a name for the profile (for example, My Server) and click Next.
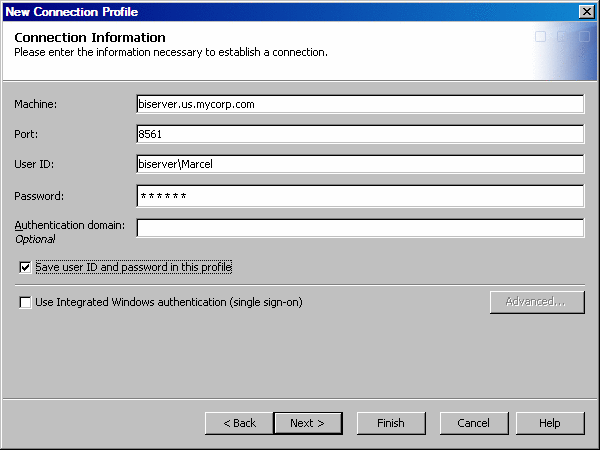
  5. On the Connection Information page, specify the following values, which are required in order to connect to the metadata server. If you do not know what values to specify, contact your metadata administrator.
    1. In the Machine field, specify the fully qualified name of the computer that the metadata server runs on.
    2. In the Port field, specify the port number for the metadata server.
    3. If your site supports Integrated Windows authentication, select the Use Integrated Windows authentication check box and click Next. If your site does not support this feature, proceed to step d.
    4. In the User ID field, specify the user ID that you use to log on to the metadata server. If your metadata server runs in a Windows environment, you must fully qualify the user ID by using the domain or machine name that you specified when your login was defined. Use the following format when you specify your value:
      Windows-domain-name\user-ID
      Note: For the metadata server, you must have at least one login definition that contains a user ID that corresponds to the user ID that you specify here. For information about login definitions, see the SAS Management Console: Guide to Users and Permissions.
    5. In the Password field, specify the password for the user ID.
    6. (Optional) In the Authentication Domain field, specify an authentication domain to associate with the user ID and password. If you do not specify an authentication domain, then the user ID and password that you provide are associated with the DefaultAuth authentication domain.
    7. (Optional) If your site does not support Integrated Windows authentication, then you can save the user ID and an encrypted version of your password in the connection profile by selecting the Save user ID and password in this profile check box. If you do not select this option, the client application will prompt you for a user ID and password each time the connection profile is accessed.
      Connection information
    8. Click Next.
  6. The confirmation page lists all of the information that you specified in the wizard. If you need to make any corrections, click Back. When all of the information is correct, click Finish to create the profile and enter SAS Management Console.