Using the Program Editor
Overview of Using the Program Editor
The SAS text editor windows,
Program Editor, and NOTEPAD, work similarly to other Windows editors.
Therefore, you can edit your SAS code without learning how to use
a new text editor.
Switching from the Enhanced Editor to the Program Editor
Because the Enhanced Editor is the active editor by default when you start SAS, you must take one of the following
actions to switch editors at start-up:
For more information about the NOENHANCEDEDITOR system option, see ENHANCEDEDITOR System Option: Windows .
-
Start SAS using the NOENHANCEDEDITOR system option.
-
Instead of accessing the Enhanced Editor in the Preferences dialog box, use the menu to set the option:
-
Select Tools
 OptionsPreferencesView.
-
Deselect the Use Enhanced Editor check box.
-
Click OK.
-
You can always access
the Program Editor window from the View menu.
Opening Files
To
open a file in the Program Editor:
-
With the editor window active, do one of the following:SAS displays the Open dialog box.
-
Click the Open toolbar button (the opened file folder)
-
Type
dlgopenin the command bar -
Select File and click Open
-
-
Use the Open dialog box to select the file that you want to include. By default, SAS looks for files with the .sas file extension (which contain SAS code, by convention). However, you can change the default by adjusting the Files of type field. (If you change the selected file type, SAS will remember that selection, and present it as the default the next time you open a file for that window during the SAS session.)Note: To change the default directory for the Open dialog box, either start SAS using the SASINITIALFOLDER system option or change the current working directory. For more information, see SASINITIALFOLDER System Option: Windows and Changing the SAS Current Folder .
-
If the file that you are including contains SAS code that you want to submit, check the Submit box before clicking OK.Note: If you select Submit , it remains selected each time you use the Open dialog box to open a file. You must deselect it if you do not want to submit the contents of the file that you want to open.
You can also drag and
drop a file into the Program Editor from the Windows Explorer or the My
Favorite Folders window. To drag and drop a file:
-
Open the source window.
-
Position the source window and the Program Editor window so that both are visible.
-
In the source window, find and select the file that you want to open; click and hold down the left mouse button
-
Drag the file over the Program Editor window and release the left mouse button.
If you open a file with
lines longer than 256 characters in the Program Editor window,
the lines are truncated unless you use the INCLUDE command with an
LRECL= value equal to the number of characters in the longest line,
and you set either the AUTOWRAP or AUTOFLOW command to ON. If you
want to use the Open dialog box to open a
file with lines longer than 256 characters, use the FILENAME statement
to set up a fileref with the appropriate options and then use the
fileref, enclosed in double quotation marks, in the Filename field
in the Open dialog box.
If you recall a SAS
program that has more than 256 characters on a line into the Program
Editor, the Program Editor wraps the line on to the next line. A line
that is greater than 256 characters and wraps onto the next line is
considered one line of code.
Using Line Numbers
Line numbers are turned off by default under Windows.
You can enter
numbers on in the command
bar to display line numbers in the Program Editor window.
You can also enter nums to turn line
numbers on and off.
You can also control
line numbers using the Editor Options dialog
box when the Program Editor or NOTEPAD is the active window. To open
the Editor Options dialog box:
-
Type
edopin the command bar or select ToolsOptionsProgram Editor -
Select the Editing tab.
-
Select Display line numbers and click OK.
Moving the Insertion Point
The insertion point movement keys (arrow keys, PgUp,
PgDn, and so on) function the same way in SAS text windows as they
do in other Windows applications.
Pressing the Ctrl key
with the left arrow (word left) or right arrow (word right) causes
the insertion point to move one word at a time. When advancing through
text, the word-left and word-right commands stop at the end of the
text on a line and at the beginning of the first word on a new line.
You can move to the top of a file by pressing Ctrl+PgUp or to the
bottom of a file by pressing Ctrl+PgDn.
Pressing the Home key
causes the insertion point to go to the beginning of the current line
unless the command line (not the command bar) is active in the active
window. Pressing the Home key when the command line is active causes
the insertion point to toggle between the current insertion point
position in the text and the command line. The F11 key moves the insertion
point to the command bar. You can toggle the command line on and off
using the COMMAND command or by selecting Command line in
the Preferences dialog box View tab.
Using Tabs
Many text editors
retain tab characters. Other editors expand tabs into space characters.
The SAS Program Editor window expands tabs
into space characters. Pressing the Tab key inserts spaces and moves
any text to the right of the insertion point.
Understanding Line Breaks
Conceptually, line breaks are at the end of the line
rather than at the beginning. Pressing the Enter key creates a line
break. To delete a line break, press the Backspace key at the beginning
of a line or press the Delete key at the end of the line.
Selecting Text
You can use the mouse or the Shift key in combination
with the insertion point movement keys to select text. The marking
of an area of text continues until you release the mouse button or
release the Shift key. To select all of the text in the active window,
select the Edit menu and then select Select All.
Here are some advanced text selection methods:
-
Double-click a single word to select it. To select an entire line, hold down the Ctrl key as you click on the line that you want.
-
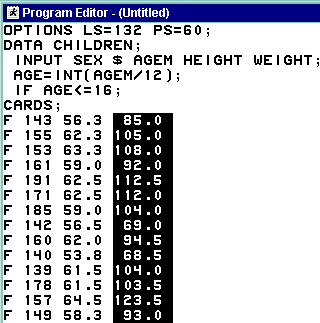
Use the Alt key as you hold down the mouse button and drag the mouse to select a rectangular block (or column) of text (as illustrated below.)
-
Use the Shift key in combination with the mouse button to select the text between the current text insertion point and the position in the text where you click. You can also use this technique to extend a text selection. (You can use this feature only within the current page.)
If
characters are selected and you start entering text, the marked area
is replaced with the new text. This action occurs even if you have
moved the mouse pointer away from the marked area. For information
about marking and copying text with a mouse, see Using the Clipboard .
To unmark text, click
the left mouse button in the window. Alternatively, you can unmark
text by selecting Deselect from the Edit menu
or you can press the Esc key. Entering the WNAVKEYUNMARK ON in the
command bar also enables unmarking with the arrow navigational keys.
Deleting Text
The Delete key deletes the currently
selected text, if there is any. Otherwise, it deletes the character
to the right of the insertion point. To delete from the insertion
point to the end of the current line, press Alt+Delete. To delete
from the insertion point to the end of the current word, press Ctrl+Delete.
To delete from the insertion point to the start of the current word,
press Ctrl+Backspace.
You can also use the Edit menu
to delete text. To delete all text in the window, click Clear
All. To delete only selected text, click Clear. To delete selected text and copy that text to the Windows clipboard, click Cut.
Finding and Replacing Text
To find text
-
Open the Find dialog box by selecting EditFind
-
Supply the following information:Find textEnter a text string to find. The initial value of this field is the last text string that was used in a search.DirectionSelect the Up or Down check box. Up specifies to search from the insertion point position toward the beginning of the file. Down specifies to search from the insertion point position toward the bottom of the file.Match whole word onlySelect the check box to specify that a match of the text must be a whole word and not part of a word.Match caseSelect the check box to specify that upper- and lowercase characters must match exactly.
-
Click Find Next.
To find and replace
text
-
Open the Replace dialog box by selecting EditReplace
-
Supply the following information:Find textEnter a text string to find and replace. The initial value of this field is the last text string that was used in a search.Replace withEnter the replacement string.DirectionSelect either the Up or Down check box. Up specifies to search from the insertion point position toward the beginning of the file. Down specifies to search from the insertion point position toward the bottom of the file.Match whole word onlySelect this check box to specify that any match of the text must be a whole word and not part of a word.Match caseSelect this check box to specify that upper- and lowercase characters must match exactly.
-
Click Find Next.
-
If the text is found, click one of the following:
-
Replace to replace this single occurrence of the text with the replacement string.
-
Replace All to replace all occurrences of the text in the file with the replacement string.
-
Dragging and Dropping Text
The following table lists the places from which you
can drag text and to which you can drop the selected text.
|
Text Source
|
Text Destination
|
|---|---|
|
any SAS text window
|
another SAS window that
supports text editing (such as the Program Editor window)
|
|
any SAS text window
|
another Windows application
that supports text drag and drop
|
|
a Windows application
that supports text drag and drop
|
any SAS window that
supports editing
|
|
Windows Explorer (text
file item)
|
any SAS window that
supports editing
|
To drag and drop text
from one window to another:
-
Arrange your windows, if necessary, so that both the source and target windows are visible on the display.Note: Instead of arranging your windows so that the target window is visible, the target window becomes the active window when you drag the selected text to the target window's button on the window bar.
-
Select the desired text from the source window.
-
Click and hold the left mouse button with the pointer on the selected text.
-
With the mouse button still pressed, drag the text to the target window.
-
Move the insertion point to the position where you want to insert the text. (If you plan to just submit the text as SAS code for processing, position the insertion point anywhere in the window).
-
Release the mouse button. The text is either included at the point where you positioned the insertion point, or it is submitted to SAS for processing. (The default action depends on the type of the target window.)
You can override the default action of the drag and drop by initiating
the drag and drop using the right mouse button. This action is called
nondefault drag and drop. When you drag the selection to the target
SAS window and release the mouse button, SAS displays a pop-up menu
to let you choose which action to perform.
Summary of Drag-and-Drop Actions is a summary of drag-and-drop actions available for the
possible target windows in SAS.
|
Data
|
Target
|
Default
Action
|
Nondefault
Actions
|
|---|---|---|---|
|
text
|
SAS text editor
|
move
|
move, copy, cancel
|
|
text
|
PROGRAM
EDITOR
|
copy
|
copy, submit, cancel
|
|
file
|
SAS text editor
|
not valid
|
not valid
|
|
file
|
PROGRAM
EDITOR
|
move
|
copy, submit, cancel
|
|
file
|
LOG, OUTPUT
|
submit
|
submit, cancel
|
The actions that occur
when you drag text out of a SAS window into another Windows application
depend on the target application. In most cases, dragging and dropping
text between SAS and other applications actually moves the text from
one window to another (that is, the text is cut from one window and
placed in the other).
You
can change that behavior by applying a drag-modifier—a key
that you press while you drag and drop. To copy text from one window
to another (instead of moving it), press and hold the Ctrl key before
and during the drag and drop. When you release the mouse button to
drop the text, release the Ctrl key as well.
Drag Scrolling
While dragging text to a SAS text editor window, you
can cause the target window to scroll vertically or horizontally.
This action lets you drop text in a window area that is not currently
visible.
Once you have selected
the text and drag it to the SAS text editor window, pause near the
border of the SAS text editor window. The window scrolls in the direction
of that border. For example, to cause the target window to scroll
down, drag the mouse pointer just above the bottom border of the window
and pause.
Drag scrolling happens
only when you pause near the drop area border; it does not occur if
you drag quickly past the border.
Using Rich Text Format Text
When you copy text out of a SAS window to the clipboard and paste it into the window
of another application, the text retains all of the
format information that it had in SAS (except for color) if the target window accepts
RTF formatting. For example, the Windows Notepad application does not preserve formatting,
but Microsoft WordPad and many word processors do. The same is true when you drag
text out of SAS and drop it in another application window.
If the display font is Sasfont, any text that you copy out of SAS is formatted with the SAS Monospace
TrueType font. If your text has other highlighting attributes, such as underline,
those attributes are also transferred to the target window in the other application
(provided the target window supports rich text format (RTF)).
Saving Files
To
save the contents of the Program Editor window, click the Save toolbar button (the drive icon). If the file is to be saved
for the first time, the Save As dialog
box appears for you to name the file.
To save a file with
a new name:
-
Select FileSave As
-
Select a folder in the Save in field.
-
Enter a filename in the Filename field.
-
Select a file type from the Save as type field.
-
Click OK.
Note: To change the default directory
for the Save dialog box, either start SAS
using the SASINITIALFOLDER system option or change the current working
directory. For more information, see SASINITIALFOLDER System Option: Windows
and Changing the SAS Current Folder .
Saving Program Editor Files Using Autosave
To ensure that you do not lose any
of your work in the Program Editor, SAS can automatically save your
files at an interval that you specify. The interval can range from
0 (Autosave off) to 480 minutes. The default interval is 10 minutes.
The autosave file is saved as pgm.asv in the current folder or in the location specified by the AUTOSAVELOC system option.
To enable or disable
autosave and set the interval:
-
Select ToolsOptionsPreferencesEdit tab
-
Select or deselect Autosave every.
-
Set the interval by entering a number between 1 and 480 in the minutes box.
You can also use the
WAUTOSAVE command to enable, disable, and set the interval. WAUTOSAVE
INTERVAL=minutes turns on autosave
using minutes as the interval.
For
more information about the Autosave feature, see Edit Preferences , WAUTOSAVE Command: Windows , and AUTOSAVELOC= System Option in SAS System Options: Reference.
Understanding Unique Features of the Editor
The following features of a SAS text editor window are
different from the standard features of other editors commonly used
in the Windows environment:
-
A SAS text editor window enables you to move the insertion point past the last character entered on a line or past the last line of text entered.
-
You can mark an area of text, move the mouse pointer away from the marked area, and the marked text remains marked.
-
You can unmark text by pressing the Esc key.
-
You can use Shift + Tab to delete blank space characters back to the last tab stop.
Copyright © SAS Institute Inc. All Rights Reserved.