Using the Enhanced Editor
Enhanced Editor Features
While retaining some familiar Program Editor features, the Enhanced Editor enables you to do the following:
-
use color-coding to identify SAS and SCL program elements as well as HTML and XML document elements. Color-coding settings can be saved in a color scheme.
-
create and format your own keywords.
-
automatically indent the next line when you press Enter.
-
view the high-level flow of your SAS program or see each detailed statement by expanding or contracting sections of SAS procedures, DATA steps, and macros.
-
create macros that record and play back program editing commands by using the keyboard macro recorder.
-
create shortcuts for entering text using abbreviations.
-
bookmark lines of code for easy access to different sections of your program or document.
-
customize keyboard shortcuts for most Enhanced Editor commands.
-
open multiple views of a file. You can open multiple files (.sas program files) in multiple Enhanced Editor windows.
-
access Help for the SAS language by placing the insertion point within the language element name and pressing F1.
Using the Enhanced Editor Window
Overview of the Enhanced Editor Window
The parts of the Enhanced Editor window
are shown in the following display:
Enhanced Editor Window
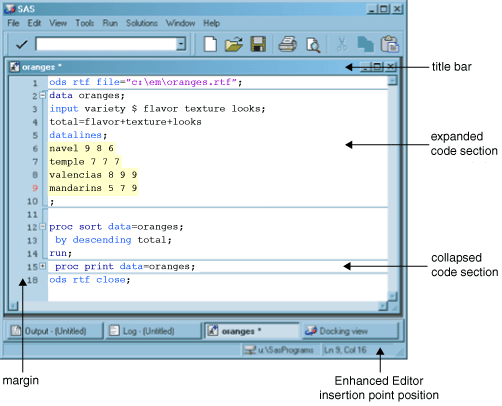
The title bar contains the Enhanced Editor icon and the name of the file. If the file
is new, the filename is Editor Untitledx,
where x is a window number.
An asterisk ( * ) in the
title bar indicates that any changes to the file have not been saved.
expanded code section
An expanded code section
displays all of the code within the code section. It is indicated
in the margin by the minus sign ( - ).
collapsed code section
A collapsed code section displays only the signature line of code (the line of code that contains the keyword). It is indicated in the margin
by the plus sign ( + ).
Enhanced Editor insertion point position
Part of the main SAS window, the Enhanced Editor insertion point position displays
the insertion point line and column position.
margin
You use the margin
on the left side of the Enhanced Editor window
to do the following:
-
select one or more lines of text
-
expand and collapse code sections
-
display line numbers, code section brackets, and bookmarks.
You can move between Enhanced Editor windows by taking either of the following actions:
-
selecting an Enhanced Editor window
-
entering
wnexteditorwpgmin the command bar.
Opening Files
The following table shows different methods of opening files in the Enhanced Editor.
|
Actions
|
Instructions
|
|---|---|
|
Open a new file
|
Do one of the following:
|
|
Open an existing file
by using the Open dialog box
|
Open the dialog box
by using one of the following:
Select the file.
Click Open.
Note: You can also open an existing
file by using the Most Recently Used File List.
You can set the Recently Used File List option by accessing Tools
|
|
Open multiple individual
files by using the dialog box
|
|
|
Open an existing file,
bypassing the Open dialog box
|
Do one of the following:
|
|
Open multiple views
of an opened file
|
When you open multiple
views of a file, changes that you make in any view of the file are
made simultaneously in all views.
|
|
Append a file to an
opened file
|
|
|
* The Enhanced Editor must be the active window.
|
|
Note: To change the default directory
for the Open dialog box, either start SAS
using the SASINITIALFOLDER system option or change the current working
directory. For more information, see SASINITIALFOLDER System Option: Windows and Changing the SAS Current Folder .
Saving Files
An
asterisk ( * ) that appears
in an Enhanced Editor window title bar indicates that the editor contains text that has not been saved
to disk. Enhanced
Editor windows that display the name Editor
Untitled in the title bar are new files that have never
been saved. The x indicates
a window number.
To save the contents
of the Enhanced Editor window, click the Save toolbar button (the storage device). If the file is to be saved for the first time,
the Save As dialog box appears for
you to name the file.
To save a file with
a new name
-
Select File
 Save As
 -
Select a folder in the Save in field.
-
Enter a filename in the Filename field.
-
Select a file type from the Save as type field.
-
Click Save.
Note: To change the default directory
for the Save dialog box, either start SAS
using the SASINITIALFOLDER system option or change the current working
directory. For more information, see SASINITIALFOLDER System Option: Windows and Changing the SAS Current Folder .
If SAS ends unexpectedly, you can recover the contents of Enhanced Editor windows
if the autosave feature is selected in the Preferences dialog box. The Enhanced Editor autosave files are saved in the operating environment
Application Data folder with the filename
Autosave
                           of filename.$AS
, where filename is the name of the file. Under Windows, the pathname for the Application Data folder is c:\Users\user-ID\AppData\Roaming.
For example, the path to the autosave file for MYPROGRAM.SAS in folder
C:\TEMP would be C:\Users\my-user-ID\AppData\Roaming\SAS\EnhancedEditor\
Autosave of myprogram.$AS
SAS deletes autosave
files when a file is saved, when the Enhanced Editor window closes, or when a SAS session ends normally. If you have renamed a file and
SAS ends abnormally, you can find the autosaved file under the original filename.
The application data
folders are hidden by default by the operating system. To view the
folders from the operating system:
-
Select StartComputerOrganizeFolder.
-
Select Search OptionsView.
-
Select Show hidden files and folders.
-
Deselect Hide extensions for know file types.
-
Select Apply and OK.
For information about setting the autosave feature,
see Edit Preferences and WAUTOSAVE Command: Windows.
Note: To prevent the loss of data
when overwriting an existing file, the Enhanced Editor saves the contents
to a temporary file, SASuuuu.tmp,
where uuuu is a unique hexadecimal
value. The original file is replaced with the temporary file and the
original file’s created date is preserved. After you save and
replace the files, the temporary file should not exist. If the temporary
file still exists, verify that the contents of the original file have
been updated, and then delete the temporary file.
Using Multiple Views of the Same File
You can see different
parts of the same file simultaneously by opening multiple views of
the same file. While you are working with multiple views, you are
working with only one file, not multiple copies of the same file.
To open multiple views
of the same file:
-
Make the file the active window.
-
Select WindowNew Window
The filename in the title bar is appended with a colon and a view number. Here is
an example: myfile.sas:1 and myfile.sas:2.
Changes that you make
to a file in one view, such as changing text or bookmarking a line,
occur in all views simultaneously. Actions such as scroll bar movement,
text selection, and expanding or contracting a section of code occur
only in the active window.
Scrolling and Line Number Commands
The Enhanced Editor supports a limited number of scrolling and line number commands.
All Enhanced Editor
commands can be entered only from the command bar.
The Enhanced Editor supports the following scrolling commands:
|
Command
|
Description
|
|---|---|
|
UP
|
Move one page toward
the beginning of the file.
|
|
DOWN
|
Move one page toward
the end of the file.
|
|
LEFT
|
Move one page to the
left.
|
|
RIGHT
|
Move one page to the
right.
|
You can display line
numbers either by selecting Show line numbers in
the Enhanced Editor Options dialog box or
by entering
nums in the command bar.
To suppress line numbers, either deselect Show line numbers or
type nums again in the command bar.
All line number commands
begin with a colon ( : ). A space is not required between the command
and the number. These commands are entered in the main command bar
or in the command bar that is specific to that window. The following
line number commands are supported:
|
Command
|
Description
|
Default Value of n
|
Maximum Value Allowed
|
Example
|
|---|---|---|---|---|
|
:In
|
Insert n lines
after the current line.
|
1
|
9999
|
:I4
Inserts 4 lines after
the current line
|
|
:IAn
|
Insert n lines
after the current line.
|
1
|
9999
|
:IA4
Inserts 4 lines after
the current line
|
|
:IBn
|
Insert n lines
before the current line.
|
1
|
9999
|
:IB2
Inserts 2 lines before
the current line
|
|
:Dn
|
Delete n lines
starting at the current line.
|
1
|
9999
|
:D3
Deletes three lines,
starting with the current line.
|
|
:Rn
|
Repeat the block of m lines,
starting with the current line, n times.
A space is required between n and m.
|
1
|
9999
|
:R1 6
Repeats six lines, starting
with the current line, one time.
|
Moving the Insertion Point
The Enhanced Editor accepts numerous key sequences for moving the insertion point,
as shown in the following
table. Use the key sequence Ctrl + G to access the Go To Line dialog
box. All other key sequences move the insertion point as defined.
|
Use this key sequence...
|
To move the insertion
point....
|
|---|---|
|
Up arrow
|
up one line
|
|
Down arrow
|
down one line
|
|
Left arrow
|
left by one character
|
|
Right arrow
|
right by one character
|
|
Page Down
|
down a page
|
|
Page Up
|
up a page
|
|
Home
|
to the beginning of
the current line
|
|
Ctrl + Home or
Ctrl + Page Up
|
to the beginning of
the document
|
|
End
|
to the end of the current
line
|
|
Ctrl + End or
Ctrl + Page Down
|
to the end of the document
|
|
Ctrl + up arrow
|
toward the top of the
file while scrolling up
|
|
Ctrl + down arrow
|
toward the bottom of
the file while scrolling down
|
|
Ctrl + right arrow
|
to the start of the
next word
|
|
Ctrl + left arrow
|
to the start of the
previous word
|
|
Ctrl + ]
|
to the matching parenthesis
or bracket
|
|
Ctrl + G
|
to a specific line number
|
|
Alt + up arrow
|
to the first visible
line
|
|
Alt + down arrow
|
to the last visible
line
|
|
Alt + right arrow
|
to the next case change
or word boundary
|
|
Alt + left arrow
|
to the previous case
change or word boundary
|
|
Shift + Tab
|
backward to the previous
tab stop
|
In addition to using
key sequences, you can move the insertion point up by one page, down
by one page, to the left by one page and to the right by one page
by using the UP, DOWN, LEFT, and RIGHT commands in the command bar.
By default, when you
click the mouse pointer past the end of a line, the insertion point
is placed immediately after the last character in a line.
To enable the Enhanced Editor to place the insertion point past the end of a line:
-
Select ToolsOptionsEnhanced
EditorGeneral.
-
Select the Allow cursor movement past end of line check box.
-
Click OK.
Selecting and Editing Text
Use the following mouse and keyboard shortcut actions
to select and manipulate text.
|
Text Selection
|
Instructions
|
|---|---|
|
One or more lines of
text using the margin
|
|
|
Single or multiple characters,
or whole lines of text
|
|
The following keyboard shortcuts
are also available to select text.
|
To...
|
Instructions
|
|---|---|
|
Extend a selection in
a particular direction
|
Press the Shift key
and then press a directional arrow.
|
|
Extend a selection one
character at a time
|
Press Shift + left arrow
or right arrow
|
|
Unmark selected text
|
Press any directional
key
|
|
Copy selected text
|
Press Ctrl + C or select Edit
|
|
Cut selected text
|
Press Ctrl + X or select Edit
|
|
Paste from the clipboard
|
Press Ctrl + V or select Edit
|
|
Move selected text
|
|
|
To highlight a column
of code or data
|
Press the Alt key +
the left mouse button. Drag to select.
|
Text that you select
appears in reverse video.
For a complete list
of selection keyboard shortcuts, see the Selection category in Keyboard Shortcuts within the Enhanced Editor .
Note: In addition to using commands
from the Edit menu, you can use editing commands
that are available from the pop-up menu when you click the right mouse
button in the Enhanced Editor window.
Dragging Text
To move or copy text
-
Select the text, place the pointer over the selected text, and hold down the left mouse button.
-
To move the text
-
Drag the text to the location.
-
Release the left mouse button.
-
-
To copy the text
-
Press the Ctrl key.
-
Drag the text to the desired location.
-
Release the left mouse button.
-
To disable drag and
drop editing
-
Select ToolsOptionsEnhanced
EditorGeneral.
-
Clear the Drag and drop text editing check box and click OK.
Finding and Replacing Text
To find text
-
Open the Find dialog box by selecting EditFind.
-
Supply the following information:Find textEnter a text string to find. The initial value of this field is the last text string that was used in a search.Find inClick the Find in box to specify whether to search in the code only, in the comments only, or in both the code and comments.DirectionSelect either the Up option or the Down option. Up specifies to search from the insertion point position toward the beginning of the file. Down specifies to search from the insertion point position toward the bottom of the file.Match whole word onlySelect the check box to specify that a match of the text must be a whole word and not part of a word.Match caseSelect the check box to specify that upper and lowercase characters must match exactly.Regular expression searchSelect the check box to specify that the text string is a regular expression. A regular expression uses special characters as wildcards to search for a string or substring. For a selection of special characters that you can use in regular expressions, click the arrow that is located to the right of the Find text field.
-
Click Find Next.
To find and replace
text
-
To search only within a subset of text, select the text.
-
Open the Replace dialog box by selecting EditReplace
-
Supply the following information:Find textEnter a text string to find and replace. The initial value of this field is the last text string that was used in a search.Replace withEnter the replacement string.Find inClick the Find in box to specify whether to search in the code only, in the comments only, or in both the code and comments.DirectionSelect either the Up option or the Down option. Up specifies to search from the insertion point position toward the beginning of the file. Down specifies to search from the insertion point position toward the bottom of the file.Match whole word onlySelect this check box to specify that any match of the text must be a whole word and not part of a word.Match caseSelect this check box to specify that upper- and lowercase characters must match exactly.Regular expressions searchSelect this check box to specify that the text string includes a regular expression. A regular expression uses special characters as wildcards to search for a string or substring. For a selection of special characters that you can use in regular expressions, click the right arrow that is located to the right of the Find text field.
-
Click Find Next.
-
If the text is found, click one of the following:
-
Replace to replace this single occurrence of the text with the replacement string.
-
Replace All to replace all occurrences of the text in the file with the replacement string.
-
Replace in Selection to replace all occurrences of the text that is within selected text with the replacement string.
-
Checking for Coding Errors
To assist you in finding coding errors, the Enhanced Editor
-
color-codes program elements, quoted strings, and comments.
-
searches for ending brackets or parentheses when you press Ctrl + ].
-
searches for matching DO-END pairs when you press Alt + [.
See the following table
for suggestions about finding coding errors.
|
Code Error Type
|
Instructions
|
|---|---|
|
Undefined keywords
|
Select Tools
When SAS recognizes
a keyword, the keyword changes to the defined colors. You can easily
spot undefined keywords by looking for the colors that you selected
for undefined keywords.
|
|
Unmatched quoted strings
|
Look for one or more
lines of the program that are the same color.
Text following a quotation mark remains the same color until the string is closed
with a matching quotation mark.
|
|
Unmatched comments
|
Look for one or more
lines of the program that are the same color.
Text that follows an
open comment symbol ( /* ) remains the same color until the comment
is closed with a closing comment symbol ( */).
|
|
Matching DO-END pairs
|
Place the cursor within
a DO-END block and press Alt + [.
The cursor moves first
to the DO keyword. If one of the keywords is not found, the cursor
remains as positioned.
When both of the keywords
exist, pressing Alt + [ moves the cursor between the DO-END keywords.
|
|
Matching parentheses
or brackets
|
Place the cursor on
either side of the parenthesis or bracket. Press Ctrl + ].
The cursor moves to
the matching parentheses or bracket. If one is not found, the cursor
remains as positioned.
|
|
Missing semi-colons
( ; )
|
Look for keywords that
appear in normal text.
|
For a list of the components
that you can color-code, select ToolsOptionsEnhanced Editor
Options. Select the Appearance tab.
The components are listed in the File elements box.
For more information about defining colors for program components,
see Setting Appearance Options .
Using Automatic Indenting and Tabs
When you press Enter, you automatically indent the next
line by the amount of space that the current line is indented. If
you prefer not to use automatic indention:
-
Select ToolsOptionsEnhanced
EditorGeneral
-
In the Indention box, select None.
In addition to automatic
indenting, you can indent by using the Tab key. Pressing the Tab key
moves the insertion point and any text to the right of the insertion
point by the amount of space that you specified in the Tab
size field of the Enhanced Editor Options dialog
box.
Tab characters can be
replaced by spaces either when you press the Tab key or when you open
a file. To insert spaces instead of tab characters when you press
the Tab key, select the Insert spaces for tabs check
box. To replace tab characters with spaces when you open a file, select
the Replace tabs with spaces on file open check
box.
Note: Changing the tab size modifies
tab settings to the new value in all Enhanced Editor windows.
Bookmarking Lines
When you bookmark a line, you create a line marker that
is used to easily access that line. A vertical rectangle in the margin
indicates that the line is bookmarked. The following table shows
the keyboard shortcuts that you can use with bookmarking.
Note: Bookmarks are not saved with
the file when the specific Enhanced Editor window
is open.
|
Action
|
Keyboard Shortcuts
|
|---|---|
|
Bookmark a line
|
Ctrl + F2 on an unmarked
line
|
|
Unmark a line
|
Ctrl + F2 on a marked
line
|
|
Go to the next bookmark
|
F2
|
|
Go to the previous bookmark
|
Shift + F2
|
Using Abbreviations
You can define a character string so that when you enter it and then press the Tab key or the Enter key, the string
expands to a longer character string. For example, you could define the abbreviation
my-v9-sas-files, which would expand to C:\Users\user-ID\Documents\My SAS Files\9.4';.
Abbreviations are actually macros that insert one or more lines of text.
To create an abbreviation
-
Press Ctrl + Shift + A or select ToolsAdd
Abbreviation
-
In the Abbreviation field, enter the name of the abbreviation.
-
In the Text to insert for abbreviation field, enter the text that the abbreviation expands into.
-
Click OK.
To use an abbreviation, enter the abbreviation. When an abbreviation is recognized,
a tooltip displays the expanded text. Press the Tab key or the Enter key to accept the abbreviation.
To modify an abbreviation
-
Press Ctrl + Shift + M or select ToolsKeyboard
MacrosMacros.
-
Select the abbreviation from the list of current macros.
-
Click Edit.
-
Select the string in the Keyboard Macro Contents field.
-
Click Modify.
-
Enter your modification in the Insert String dialog box and click OK.
-
Click OK in the Edit Keyboard Macros dialog box.
-
Click Close in the Macro dialog box.
To delete an abbreviation
-
Press Ctrl + Shift + M or select ToolsKeyboard
MacrosMacros
-
Select the abbreviation from the list of Current Macros.
-
Click Delete.
-
Click Close.
Using Word Tips
You can use Word Tips to help in understanding
the abbreviations that you add.
To use Word Tips, you
must first add abbreviations.
-
Press Ctrl + Shift + A.
-
Add the abbreviation and corresponding text.
-
Click OK to accept, or click Cancel to discard.
Word tips automatically
appear as you type.
To accept a Word Tip,
press Enter. To ignore the Word Tip, press Esc or continue typing.
To recall a Word Tip:
-
Position the pointer so that it immediately follows the abbreviation.
-
Press Alt + F1.
Submitting Your Program
You can submit either a complete program or a specified
number of lines of your program, beginning with the first line.
Note: The maximum line length is
6K bytes.
|
Submitting a Complete
Program
|
Instructions
|
|---|---|
|
When you open the program
in the editor
|
Select the Submit check
box.
|
|
From the Enhanced Editor
|
Do one of the following:
|
Use the
SUBTOP command to submit either the first line or a specified number
of lines of a program.
|
Submitting Partial Programs
|
Instructions
|
|---|---|
|
Only the top line of
a program
|
Do one of the following:
|
|
A specified number of
lines, beginning with the first line
|
|
For more information, see SUBTOP Command: Windows .
The Enhanced
Editor Options dialog box provides the Clear
text on submit setting for you to specify whether you
want the contents of the Enhanced Editor window
to be cleared after you submit your program. For more information,
see Setting Enhanced Editor Options .
If a line of data in
a DATALINES or CARDS statement is greater than 256 characters long,
the data is read into one observation. You do not need to specify
the LRECL option in the FILENAME statement as you do when you submit
a long line of data using the Program Editor.
Obtaining the Filename and Full Path of Submitted Programs or Catalog Entries
When you submit code or a catalog entry from the Enhanced Editor, the filename
or catalog entry name and their respective folders are placed in these environment
variables:
SAS_EXECFILEPATH
contains the full path of the submitted program or catalog entry. The full path includes
the folder and the filename.
SAS_EXECFILENAME
contains only the name
of the submitted program or the catalog entry name.
You can then extract the filename and full path for use in your SAS programs.
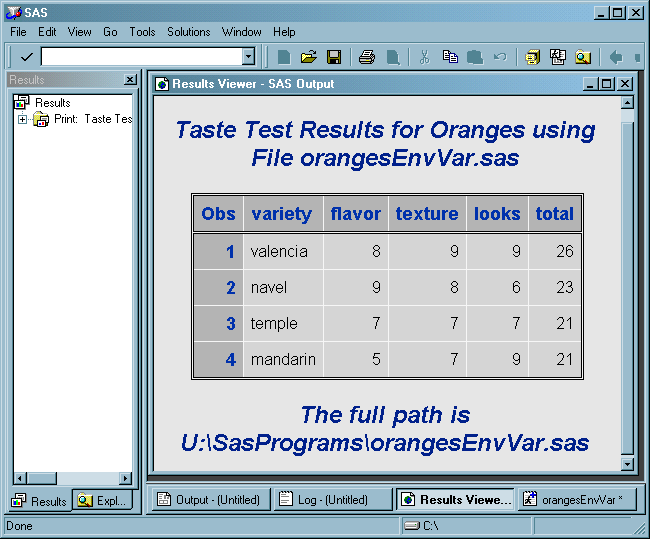
After the following DATA step runs and the data is sorted, the PRINT procedure includes
the filename in the title and the full path in the footnote of the procedure output.
The results
are shown in the display.
data oranges;
   input variety $ flavor texture looks;
   total=flavor+texture+looks;
datalines;
navel 9 8 6
temple 7 7 7
valencias 8 9 9
mandarins 5 7 9
;

proc sort data=oranges;
   by descending total;
run;

proc print data=oranges;
title 'Taste Test Results for Oranges using File ' %sysget(SAS_EXECFILENAME);
footnote 'The full path is ' %sysget(SAS_EXECFILEPATH);
run;
The resulting output displays the filename in the title and the full path in the footnote:
Using an Environment Variable to Place a Filename in DATA Step
Output
These environment variables are set only when code is submitted using the Enhanced
Editor in the Windows environment. They are not set when you submit SCL code, when
you submit
code in a batch session, or when you use the Program Editor.
However, when SAS is running in batch mode, you can obtain the full path (which includes the filename) by submitting
%sysfunc(getoption(SYSIN)). The following macro can be used to obtain the full path in both a batch session
and an interactive session by using the Enhanced Editor: %let execpath=" ";
%macro setexecpath;
%let execpath=%sysfunc(GetOption(SYSIN));
%if %length(&execpath)=0
%then %let execpath=%sysget(SAS_EXECFILEPATH);
%mend setexecpath;
%setexecpath;
%put &execpath;You can also use the following %PUT macro statements to display the filename and full
path in the SAS log:
%put Submitted file path is %sysget(SAS_EXECFILEPATH).;
%put Submitted file name is %sysget(SAS_EXECFILENAME).;
CAUTION:
The values
for these environment variables can be overwritten if subsequent programs
are submitted while an interactive procedure is active.
The environment variables are set to the last submitted program. If a program starts
an interactive procedure and subsequent programs are submitted while the interactive
procedure is still active, the environment variables are set to the filename and full
path of the latest submitted program. The filename and full path of the
program that submitted the interactive procedure are no long available.
Using Keyboard Shortcuts
The Enhanced Editor provides extensive keyboard shortcuts for the Enhanced Editor.
Keyboard Shortcuts within the Enhanced Editor provides a complete list of commands and their default
keyboard shortcuts. The following table shows some of the more useful
keyboard shortcuts.
|
Keyboard Shortcut
|
Task
|
|---|---|
|
Get help for a SAS procedure
|
Press the mouse button
and place the insertion point within the procedure name and press
F1
|
|
Add a new abbreviation
|
Ctrl + Shift + A
|
|
Toggle expand current
line
|
Alt + Num *
|
|
Collapse all code sections
|
Alt + Ctrl + Number
pad -
|
|
Expand all code sections
|
Alt + Ctrl + Number
pad +
|
|
Toggle marker on the
current line
|
Ctrl + F2
|
|
Go to the next marked
line
|
F2
|
|
Go to the previous marked
line
|
Shift + F2
|
|
Go to line
|
Ctrl + G
|
|
Go to the beginning
of the file
|
Ctrl + Page Up
|
|
Go to the end of the
file
|
Ctrl + Page Down
|
|
Convert selected text
to uppercase
|
Ctrl + Shift + U
|
|
Convert selected text
to lowercase
|
Ctrl + Shift + L
|
For
information about defining keyboard shortcuts, see Using Keyboard Shortcuts to Customize the Enhanced Editor .
Using Keyboard Macros
A keyboard macro is a series of Enhanced Editor commands and instructions that
you group together as a single command to accomplish
a task automatically. Instead of manually performing a series of time-consuming, repetitive
actions, you can create and run a single macro. You run a macro from the Tools menu or by using a keyboard shortcut.
For information about defining a keyboard shortcut for using macros,
see Using Keyboard Shortcuts to Customize the Enhanced Editor .
You can create a macro
by recording it from the Enhanced Editor window:
-
Start recording either by pressing Alt + Shift + R or by selecting ToolsKeyboard MacrosRecord New Macro
-
Execute the sequence of actions to accomplish the task.
-
Stop recording either by pressing Alt + Shift + R or by selecting ToolsKeyboard MacrosStop Recording
-
If you want, define a keyboard shortcut to run the macro. For information, see Using Keyboard Shortcuts to Customize the Enhanced Editor .
An alternative way to
create a macro is to add commands by using the Create
Keyboard Macro dialog box. To create the macro:
-
Open the Keyboard Macros dialog box by pressing Ctrl + Shift + M or by selecting ToolsKeyboard
MacrosMacros
-
Click Create to open the Create Keyboard Macro dialog box.
-
Enter the name of the macro in the Keyboard macro name field.
-
Enter a description of the macro in the Keyboard macro description field.
-
The Keyboard macro contents box lists the commands in the order in which they are executed.To add a command, select the command from the Commands box and click the Insert Selected Command button (the double arrow). Repeat this step until all commands are listed in the Keyboard macro contents box.You can reorder commands by selecting the command in the Keyboard macro contents box and clicking the UP or DOWN arrows.To delete a command, select the command and click Delete.
-
When all of the commands are present in the box and are ordered correctly, click OK.
-
In the Keyboard Macros dialog box, click Close.
To run a macro, use
a keyboard shortcut or
-
Select ToolsKeyboard MacrosRun Macro
-
In the Run Macro dialog box, select a macro and click Run.
To edit a macro
-
Open the Keyboard Macro dialog box by pressing Ctrl + Shift + M or by selecting ToolsKeyboard MacrosMacros
-
Select a macro and click Edit to open the Edit Keyboard Macro dialog box.
-
To add a command, select a command from the Commands box and click the Insert Selected Command button.To modify a command, first ensure that you can modify the command by selecting the command from the Keyboard macro contents box. If a command can be modified, the Modify button is active. Click Modify to open a dialog box that enables you to modify the command.To delete a command, select the command in the Keyboard macro contents box and click Delete.To reorder a command, select the command and click the up or down button.
-
When the commands are in the correct order, click OK.
To delete a macro
-
Press Ctrl + Shift + M or select ToolsKeyboard
MacrosMacros
-
Select the macro and click Delete.
-
Click Yes in the Delete Macro dialog box.
-
Click Close.
This example lists the
steps to create an RSUBMIT statement, an ENDRSUBMIT statement, a blank
line between these statements, and tabs by the amount that you specified Tabs
size field in the Enhanced Editor Options dialog
box.
-
Select ViewEnhanced Editor
-
Select ToolsKeyboard MacrosRecord New Macro and click OK in
the message box.
-
In the Enhanced Editor window:
-
Press Enter.
-
Type
rsubmit; -
Press Enter.
-
Press Enter.
-
Type
endrsubmit; -
Press the UP arrow.
-
Press the Tab key.
-
Select ToolsKeyboard MacrosStop Recording
-
The resulting macro
contains the following commands:
Insert carriage return
Insert character ['r']
Insert character ['s']
Insert character ['u']
Insert character ['b']
Insert character ['m']
Insert character ['i']
Insert character ['t']
Insert character [';']
Insert carriage return
Insert carriage return
Insert character ['e']
Insert character ['n']
Insert character ['d']
Insert character ['r']
Insert character ['s']
Insert character ['u']
Insert character ['b']
Insert character ['m']
Insert character ['i']
Insert character ['t']
Insert character [';']
Move cursor up
Insert character ['|']
Keyboard macros can
be shared by multiple users. You can import or export them to or from
a folder by selecting ToolsKeyboard MacrosMacros
For Keyboard Macros
only, click Assign Keys and choose a new
shortcut key for each macro. Do not assign shortcut keys for Abbreviations.
To export a keyboard
macro, click Export, select a folder from
the Save in field, enter a filename in the Filename box,
and click OK.
Note: You need to reassign the
keyboard shortcut keys after importing the keyboard macros to avoid
overwriting keyboard shortcut keys. The Abbreviations do not have
key assignments.
Using Collapsible Code Sections
Collapsible code sections enable you to expand or collapse one or more sections
of
code. A section begins with a step keyword, a comment, or spaces above a section word
or comment. A section ends with the next step keyword, a comment, or space above the
next section word or comment. Step keywords include the DATA statement, the PROC statement,
and the %MACRO statement. The signature line is the line in which the step keyword
appears.
An expanded section is indicated by a minus sign in the margin next to the signature
line. To collapse a section, click the minus sign.
A collapsed section is indicated by a plus sign in the margin, and the signature line
is the only line of code that is displayed. To expand a section, click the plus sign.
Note: The collapse and expand
feature is not saved with the program, The feature is in effect only
while the current editor window is open.
The Enhanced Editor When Collapsible Code Segments Are Enabled
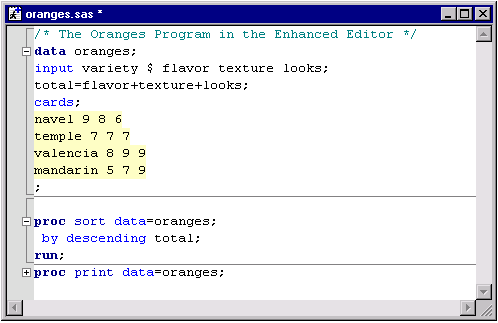
Brackets in the margin
and a section line across the editor window mark the beginning and
end of a section. If you do not want to see either the brackets or
the section line, you can suppress them by using the Enhanced
Editor Options dialog box.
To disable collapsible
code sections, or brackets and lines, select ToolsOptionsEnhanced EditorGeneral and select the appropriate
settings:
-
Clear the Collapsible code sections check box to disable collapsible code sections.
-
Clear the Show section lines in text check box to disable section lines in the editor.
-
Clear the Show section brackets in margin check box to suppress section brackets in the margin.
The following rules
apply when you select and edit collapsed segments:
-
Selecting a line from the margin that includes a collapsed segment includes all text within the collapsed segment.
-
Selecting a line of text by dragging the mouse over the text or by using the keyboard selects only that line of text.
-
Selecting text from above a collapsed section and pasting it into a collapsed signature line copies text from the start of the selection to the end of the selection. The selection includes any hidden lines above the signature line up to the signature line of the collapsed section.
-
Selecting text on a signature line down into another section marks text from the beginning of the selection to the end of the selection and includes hidden text below the signature line.
-
Any keystroke on a signature line expands the section.
-
Pasting into a signature line or section expands the section.
-
Entering something above a section that affects the section, such as comments or quotation marks, expands the section.
-
Pressing Enter at the beginning of a signature line adds code at the beginning of the section.
-
Pressing Enter at the end of a signature line adds code at the end of the section.
-
Selecting Undo does not undo the Collapse and Expand commands.
-
When you search for text and the text is found within a collapsed segment, the segment expands.
-
When text within a collapsed segment is to be replaced, the segment expands.
-
When text within a collapsed segment is to be replaced and you select Replace All, collapsed sections do not expand.
Creating Your Own Keywords
In addition to the many SAS program file elements that you can format within the
Enhanced Editor, you can create user-defined keywords for programming elements such
as SAS procedure
statements, variables, and user-defined formats. The appearance of user-defined keywords
overrides the appearance of identical keywords that are defined in the SAS language.
Use the following rules
for naming keywords:
-
The first letter must be a letter ( A, B, C, ... Z) or an underscore ( _ ).
-
Subsequent characters can be letters, numeric digits ( 0, 1, ... 9) or underscores.
-
You can use uppercase or lowercase letters. Keywords are not case-sensitive.
-
Blanks are not allowed in keyword names.
To create and format
user-defined keywords, use the Enhanced Editor Options dialog
box as follows:
-
Make an Enhanced Editor window the active window.
-
Select ToolsOptionsEnhanced
Editor
-
From the General tab, click User-Defined Keyword.
-
Click Add.
-
Replace NewKeyword with your keyword.
-
Click OK.
-
Select the Appearance tab.
-
In the File elements box, select User-defined keyword.
-
Select a font, foreground color, and background color.
-
Click OK.
To rename a keyword
from the User-Defined Keywords dialog box
-
Select the keyword.
-
Click Rename.
-
Rename the keyword.
-
Click OK.
To delete a keyword
from the User-Defined Keywords dialog box
-
Select the keyword.
-
Click Delete.
-
Click OK.
Associating File Extensions with File Types
The following table lists the default file extensions for the types of files that
are recognized by the Enhanced Editor.
|
File Type
|
Default File Extension
|
|---|---|
|
SAS Program File
|
.sas
|
|
SCL Program File
|
.scl
|
|
HTML Document
|
.htm, .html, .xml
|
To associate other file extensions with SAS and SCL programs, and HTML and XML documents,
do the following:
-
Open the Enhanced Editor Options dialog box by selecting ToolsOptionsEnhanced
Editor
-
Click the General tab.
-
Select a file type from the File type box.
-
Click File Extensions and then click Add.
-
Type the file extension and press Enter.
To rename a file extension
-
Select the file extension.
-
Click Rename.
-
Type the new file extension and press Enter.
To delete a file extension, select the file extension and click Delete.
To revert to the default
file extensions, click Default.
Setting Enhanced Editor Options
Opening the Enhanced Editor Options Window
To open the Enhanced Editor Options window
from the menu, ensure that an Enhanced Editor window
is the active window and select ToolsOptionsEnhanced Editor
Click the tabs that
are located along the top of the dialog box to navigate to the settings
that you want to change, and then select the options that you want.
When you are finished, click OK.
Note: The enhanced editor options
are stored in the Microsoft Windows Registry. The options are not
stored in a file on the machine or in the SAS Profile catalog. The
user must have operating system rights and permissions to edit the
windows registry if they want to make changes.
Editor Options Dialog Box
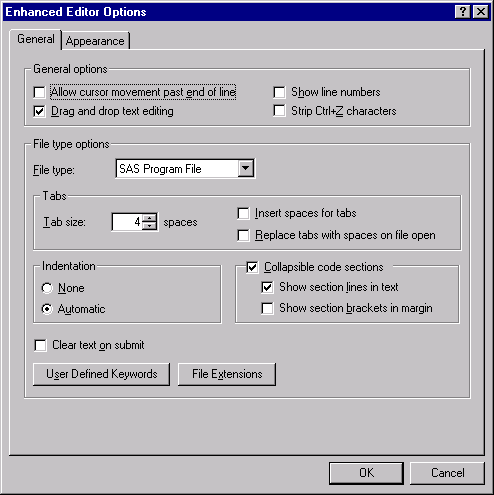
General Editor Options
From the General tab that you can specify the following options that control how the Enhanced Editor
works.
Allow cursor movement past end of line
specifies where the
insertion point is positioned when you click the mouse pointer after
the last text character on a line. If it is selected, the insertion
point is positioned where you click the mouse pointer. If it is not
selected,by default, the insertion point is positioned immediately
after the last text character on the line.
Drag and drop text editing
specifies whether selected
text can be moved by using drag-and-drop editing. If it is selected,
selected text can be moved. If it is not selected, selected text cannot
be moved.
Show line numbers
specifies whether to
display line numbers in the margin. When line numbers are displayed,
the current line number is red.
Strip Ctrl+Z characters
specifies to remove the Ctrl+Z end-of-file characters that might be included in files
that were created in a DOS editor.
File type
specifies the type of file to which tabs, indention, and collapsible code sections
apply. File types include HTML documents, SAS programs, SCL programs, and text documents.
Tab size
specifies the number
of spaces to indent.
Insert spaces for tabs
specifies whether to
insert the space character or the tab character when you press the
Tab key. If it is selected, the space character is used. If it is
not selected, the tab character is used.
Replace tabs with spaces on file open
specifies whether to
replace all tab characters in a file with the space character when
the file is opened.
Indention
specifies the type
of indention to use. When None is selected,
no indention is used. When Automatic is selected,
the next line is automatically indented by the same amount of space
that the previous line is indented.
Collapsible code sections
specifies whether to
enable the expansion and contraction of code sections. If it is selected,
the collapsible code sections can be collapsed or expanded. If it
is not selected, all code appears in the editor window. The following
settings are active when the Collapsible code sections setting
is selected:
-
When Show section lines in text is selected, a line appears after each section of text.
-
When Show section brackets in margin is selected, brackets are displayed around each section in the margin.
Clear text on submit
specifies whether to
clear the contents of the Enhanced Editor window
after you submit a program for processing. If it is selected, the Enhanced
Editor window is cleared when you submit the program.
If it is not selected, the program remains in the editor window. If
this setting is selected, you can recall the last submitted program
by using the F4 key.
User-Defined Keywords
opens the User-Defined
Keywords dialog box that you use to create user-defined
keywords.
File Extensions
opens the SAS
Extensions dialog box. Use the SAS Extensions dialog box to define file extensions that are recognized by the Enhanced Editor.
Appearance Options
The following appearance options enable you to specify foreground and background
colors, and font styles for file elements. You can also create and save color schemes.
For more information
about using these appearance options, see Setting Appearance Options
and Using Schemes .
File type
specifies the type of file whose elements you want to color-code. You can color-code
file elements for SAS programs, SCL programs, HTML and XML documents, and text documents.
To color-code an XML document, select HTML
Document. The default is the file type of the file that
you are editing when you invoke the Editor Options dialog
box.
Scheme
is a name that represents
a saved set of appearance options for the specified file type.
Name
specifies the name of the font for the scheme.
Size
specifies the font size for the scheme.
Script
lists the character sets available for the specified font. The character set that
is used by the default script is determined by the Windows
regional options.
File elements
lists the elements
of the specified file type that can be color-coded.
Foreground
specifies the text
color that is to be applied to the selected file element.
Background
specifies the background
color that is to be applied to the selected file element.
Font Style
specifies whether Normal, Bold, Italic,
or Bold Italic font is to be applied to the file element.
Underlined
specifies whether the
file element is to be underlined.
Preview
displays a sample of the selected file element colors and font.
Setting Appearance Options
When you set appearance options,
you set them for the elements of the file type that you specified
in the File type box. As you make your selections,
the Sample box displays your selected formatting. The formatting options that you specify are
applied to all opened Enhanced Editor windows of that file type. When you start SAS,
the formatting options that are applied
to the Enhanced Editor files are the formatting options that were in effect when the
last SAS session ended.
To specify appearance
options
-
Open the Editor Options window by selecting ToolsOptionsEnhanced EditorAppearance
-
Select a file type from the File type box.
-
You can also select a saved formatting scheme from the Scheme box. For more information about using schemes, see Using Schemes .
-
From the Name box, select a font.
-
From the Size box, select a font size.
-
From the Script box, select a script that is appropriate for the language that your computer uses. The Default script is determined by the Windows regional options.
-
For each file element that you want to format:
-
Select a file element.
-
Click in the Foreground box and select a color for the file element. To create a custom color, select Custom and create a color from the Color dialog box.
-
Click the Background box and select a color for the background of the file element. To create a custom color, select Custom and create a color from the Color dialog box.Note: Changing the background color for Normal text changes the Enhanced Editor window to the specified color.
-
From the Font Style box, select Normal, Bold, Italic, or Bold Italic.
-
If you want the element to be underlined, select the Underlined box.
-
-
Review your selections in the Sample box. Click on a file element in the sample to see its color and font assignment. When you have finished formatting all file elements, click OK.
Using Schemes
A scheme is a saved set of formatting options, such as font, font size, and script.
You can set your appearance options by selecting a file type
and a scheme instead of setting individual file elements. SAS provides several schemes
which you can select from the Scheme box.
Schemes provided by SAS use the Default script.
To create a scheme
-
Select a file type from the File type box.
-
Select a font, font size, and a script.
-
For each file element, select a color for the foreground and background, a font style, and the underlining option.
-
Click Save As and enter a scheme name in the Save Scheme dialog box.
-
Click OK.
To modify a scheme
-
Click in the File type box and select a file type.
-
Click in the Scheme box and select a scheme.
-
Make the font and file element changes that you want.
-
Click Save As. The selected scheme name appears in the Scheme name entry box.
-
Click OK.
To delete a scheme
-
Click in the File type box and select a file type.
-
Click in the Scheme box and select the scheme name that you want to delete.
-
Click Delete.
Using Keyboard Shortcuts to Customize the Enhanced Editor
Assigning Keyboard Shortcuts
When you open the Enhanced Editor Keys dialog
box, you can choose to view only commands that have been assigned
keyboard shortcuts, or you can view all commands. To see only the
commands that are assigned keyboard shortcuts, ensure that the Show
all commands check box is not selected. To see all commands,
including the commands that have no key assignment, check the Show
all commands check box.
To assign keyboard shortcuts
-
Select ToolsOptionsEnhanced
Editor Keys
-
Select a category from the Categories box. Macros are listed in the User Defined category.
-
Select a command from the Commands box. If a keyboard shortcut is already defined for the command, it is displayed in the Keys column.
-
Click Assign keys.
-
Place the insertion point in the Press new shortcut key field.
-
Press a key sequence for the selected command. The sequence is displayed in the Press new shortcut key field, and the assignment status for that key appears at the bottom of the dialog box. If the value in the Currently assigned to field is None, then no other command is assigned to this keyboard shortcut.
-
To assign the keyboard shortcut, click Assign.Note: Assigning a keyboard shortcut to a key sequence that is assigned to another command deletes the shortcut for that command. For example, if you assign the Backspace key to the Add a new abbreviation command, pressing the Backspace key displays the Add Abbreviation dialog box, and you can no longer backspace by using the Backspace key.
Deleting Keyboard Shortcuts
To delete a keyboard shortcut
-
Select ToolsOptionsEnhanced
Editor Keys.
-
Click Assign keys.
-
Select the category in the Categories box. Macros are listed in the User Defined category.
-
Select the command in the Commands box.
-
Select the key sequence in the Keys currently assigned to command box.
-
Click Remove.
Resetting Keyboard Shortcuts to the Enhanced Editor Defaults
Resetting keyboard
shortcuts to the default keyboard shortcuts deletes all macro keyboard
shortcuts. See Keyboard Shortcuts within the Enhanced Editor for a list of the default keyboard shortcuts.
To reset keyboard shortcuts to the Enhanced Editor default:
-
Select ToolsOptionsEnhanced
Editor Keys.
-
Click Assign keys and then reset the key.
-
You can also click Reset All to reset all shortcuts.
Accessing the Enhanced Editor
By default, the Enhanced Editor is the active editor when you start SAS.
Access the Enhanced Editor by using the Use Enhanced Editor setting
on the Preferences dialog box Edit tab
or by issuing the WEDIT command. For more information, see WEDIT Command: Windows. If you do not want to access the Enhanced Editor when you start SAS, issue the NOENHANCEDEDITOR
system option. For more information, see ENHANCEDEDITOR System Option: Windows.
If you do not access the Enhanced Editor, all Enhanced Editor windows remain available,
and you can launch new Enhanced Editor
windows by using the View menu
or the WEDIT command. If the Enhanced Editor is not accessed when
you start SAS, the Enhanced Editor window
does not appear.
When the Enhanced Editor is accessed and you issue the Text Editor command in the
Tools menu,
the Enhanced Editor window appears. When
the Enhanced Editor is not accessed, the Text Editor command opens
SAS NOTEPAD.
Copyright © SAS Institute Inc. All Rights Reserved.