ENTRY Statements: Additional Control
Features Available for ENTRY Text
Positioning ENTRY Text
By default, any ENTRY
statement that is defined within a 2-D overlay-type layout and does
not specify a location is placed in the center of the graph wall (HALIGN=CENTER
VALIGN=CENTER).
If you know where you
want to place the text, one way to position it is to use the HALIGN=
and VALIGN= options, as shown in the following example:
layout overlay;
  scatterplot x=height y=weight;
  entry halign=left "NOBS = 19" /
        valign=top border=true;
endlayout;
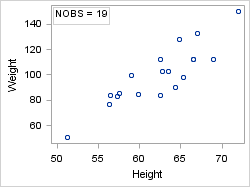
Whenever you add text
within the graph wall, you have to consider the possibility that the
text might appear on top of or behind data markers and plot lines.
For this reason, you should consider using the AUTOALIGN= option
rather than the HALIGN= and VALIGN= options for positioning the text.
The AUTOALIGN= option
enables you to set a priority list that restricts the entry location
to certain locations. The priority list can include any of the keywords
TOPLEFT, TOP, TOPRIGHT, LEFT, CENTER, RIGHT, BOTTOMLEFT, BOTTOM,
and BOTTOMRIGHT.
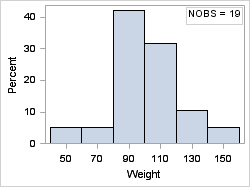
In the following histogram,
we know that the best location for an entry is either TOPLEFT or TOPRIGHT,
depending on the skewness of the data. With the following coding,
if the data were skewed to the right so the entry text overlaps with
the histogram, the text would automatically appear at TOPLEFT.
layout overlay;
  histogram weight;
  entry  "NOBS = 19" /
    autoalign=(topright topleft)
    border=true;
endlayout;
When the parent layout
contains only scatter plots, the ENTRY statement can use the AUTOALIGN=AUTO
setting to automatically position the text where it is the farthest
away from any scatter points. In all cases, even one like the following
example where many positions are available that might minimize data
collision, the AUTO specification selects the position for you and
you have no further control over the text position.
layout overlay;
  scatterplot x=height y=weight;
  entry halign=left "NOBS = 19" /
        autoalign=auto border=true;
endlayout;
Rotating ENTRY Text
ENTRY statements can
appear in most layout types. For example, ENTRY statements can be
used to define the text that appears in a CELLHEADER block in a LATTICE
layout. You can also use ENTRY statements in SIDEBAR, ROWHEADERS,
and COLUMNHEADERS blocks.
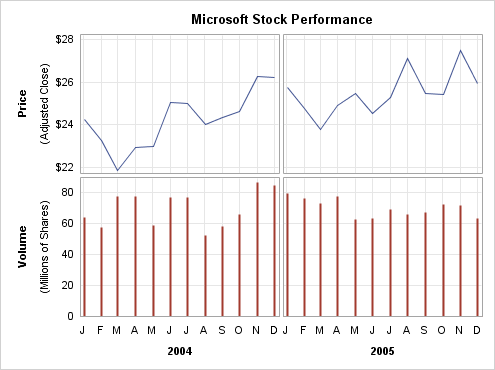
In the following example,
the ROWHEADERS block shows how to define rotated row headers for a
lattice layout. The complete code for this example is shown in Defining a Lattice with Additional Features.
   rowheaders;
     layout gridded / columns=2;
       entry "Volume" / textattrs=GraphLabelText rotate=90 ;
       entry "(Millions of Shares)" / textattrs=GraphValueText rotate=90 ;
     endlayout;
     layout gridded / columns=2;
       entry "Price" / textattrs=GraphLabelText rotate=90 ;
       entry "(Adjusted Close)" / textattrs=GraphValueText rotate=90 ;
     endlayout;
  endrowheaders;