Managing the Groups in the Graph Gallery

Main Steps for Managing Groups

Here are the main steps for managing the groups that appear as tabs in the Graph Gallery:
  1. Open the Graph Gallery if it is not already open. For instructions, see Open and Use the Graph Gallery.
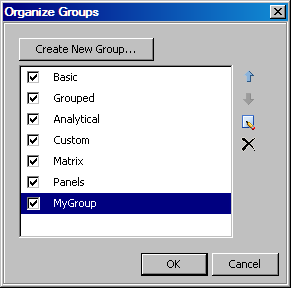
  2. Click Organize, and then Groups. The Organize Groups dialog box appears.
    Organize Groups dialog box
  3. When you are finished with your management tasks, click OK to close the Organize Groups dialog box.
Note: If you customized Graph Gallery groups in the previous production release (the third maintenance release of 9.2) of ODS Graphics Designer, there is a one-time task that you must perform to migrate your custom groups to the designer's new 9.3 location. For more information, see Manual Tasks for Upgrading to SAS 9.3 ODS Graphics Designer.
Create a New Group

Each group that you create is represented as a tab in the Graph Gallery.
To create a new group:
  1. In the Organize Groups dialog box, click Create New Group. The New Group dialog box appears.
  2. In the Name text box, enter a name for the group.
  3. Click OK.

Change the Order in Which the Groups Appear in the Graph Gallery

To change the order in which the groups appear in the gallery:
  1. In the Organize Groups dialog box, click the name of a group to highlight it in the list.
  2. Click the up arrow Up arrow or the down arrow Down arrow to move the group up or down in the list. The first group in the list appears as the first tab in the Graph Gallery.

Rename a Group

You can change the names of groups that you have created.
To rename a group:
  1. In the Organize Groups dialog box, click the name of a group to highlight it in the list.
  2. Click the Rename icon Rename icon. The group name box becomes editable.
  3. Enter the name that you want for the group.

Hide or Delete a Group

You can delete a group that you have created. You can also temporarily hide a group's tab in the Graph Gallery.
To remove a group:
  1. In the Organize Groups dialog box, click the name of a group to highlight it in the list.
  2. Click the Delete icon Delete icon. The group name is removed from the list.
To hide a group, clear the check box next to the name of the group that you want to hide. When you want the group's tab to appear again in the gallery, select the check box for the group.