Configuring a SELECT Clause
Problem
You want to configure the SELECT clause for an SQL query that is used in a SAS Data
Integration Studio job. This clause defines which columns are read from the source tables and which columns are saved in the query result tables. You must review the
automappings for the query, and you might need to create one or more derived expressions
for the query.
Solution
You need
to use the Select tab in the Designer window for the SQL Join transformation.
Tasks
Configure the SELECT Clause with the Select Tab
Perform
the following steps to configure the SELECT clause for the SQL query:
-
Click Select in the Navigate pane to access the Select tab.
-
Review the automappings to ensure that the columns in the source table are mapped to corresponding tables in the target table. If some columns are not mapped, right-click in an empty area between the Source table and Target table fields. Then, click Map All in the pop-up menu.
-
Perform the following steps if you need to create a derived expression for a column in the target table for the sample query:
-
Click the drop-down menu in the Expression column in the Target table field, and click Advanced. The Expression Builder window displays. For information about the Expression Builder window, see Expression Builder.
-
Enter the expression that you need to create into the Expression Text field. (You can use the Data Sources tab to navigate to the column names.) Click OK to close the window.
-
Review the data in the row that contains the derived expression. Ensure that the column formats are appropriate for the data that is generated by the expression. Change the formats as necessary.
To highlight the code for the Select object, right-click the object in the Navigate pane and click Find In. Then, click Code in the submenu. The following display depicts a sample Select tab.Sample Select Tab Settings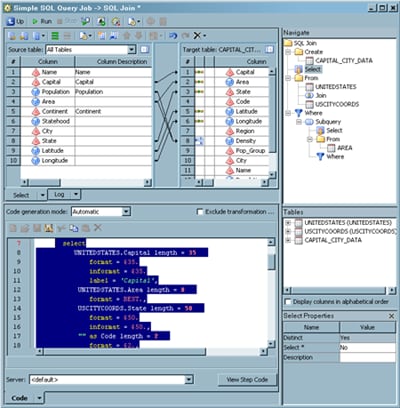
-
-
Review the data tables in the Source table field and the Target table field to avoid mapping errors. For example, the Name column in the US source table uses the full names of the states, such as California. However, the State column in the CITY target table uses the two-letter state abbreviation (CA). In this case, the column width for the State column must be increased to 50 in order to accommodate the data in the Name column. Also, the Distinct property in the Select Properties pane is set to Yes. This property determines that only the first matching record for each matching condition is included in the output. Note that the SQL code for the SELECT clause is highlighted on the Code tab.
Copyright © SAS Institute Inc. All Rights Reserved.
Last updated: January 16, 2018