Creating a Simple SQL Query
Problem
You want to add a simple SQL query to a SAS Data Integration Studio job.
Solution
Use the SQL Join transformation to create an SQL query that runs in the context of
a SAS job. The transformation features a graphical interface that enables you to build
the
statements and clauses that constitute queries. This example describes how to use
the transformation to create a job that uses an SQL query to select data from two
SAS tables. The data is merged into a target table.
Perform the following
tasks:
Tasks
Create and Populate the Job
Perform the following steps to create and populate the job:
-
Create an empty job.
-
Select and drag an SQL Join transformation from the SQL folder in the Transformations tree. Then, drop it in the empty job on the Diagram tab in the Job Editor window.
-
Select and drag the source tables out of the Inventory tree. Then, drop it before the SQL Join transformation on the Diagram tab. Drag the cursor from the source tables to the input port of the SQL Join transformation. This action connects the sources to the transformation.
-
Because you want to have a permanent target table to contain the output for the transformation, right-click the temporary work table that is attached to the SQL Join transformation and click Replace in the pop-up menu. Then, use the Table Selector window to select the target table for the job. The target table must be registered in SAS Data Integration Studio. (For more information about temporary work tables, see Working with Default Temporary Output Tables.)Note: If you keep the worktable, you must add the Table Loader transformation to the job in order to connect the target table into the job flow. The Table Loader provides additional load options and combinations of load options, but it is not needed for many jobs. The extra processing that is required for the Table Loader can degrade performance when the job is run. In addition, you should not use a temporary output table and a Table Loader step if you use pass-through processing when your target table is a DBMS table and your DBMS engine supports the
Create as Selectsyntax.The following display shows a sample SQL job.Sample SQL Job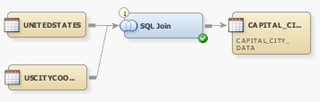
Note: The source tables for the
sample job are UNITEDSTATES and USCITYCOORDS. The target table is
named CAPITAL_CITY_DATA. Now you can create the SQL query that populates
the target table.
Create the SQL Query
Perform the following steps to create the SQL query that populates the target table:
-
Double-click the SQL Join transformation to open the Designer window.
-
Click SQL Join in the Navigate pane. The right-hand side of the Designer window contains a Navigate pane, an SQL Clauses/Tables pane, and a properties pane. You might need to resize the horizontal borders of the panes to see all three of them. For more information, see Using the Designer Window.You can enter options that affect the entire query. Note that the SQL Join Properties pane displays at the bottom of the tab. For example, you can limit the number of observations that are output from the job in the Max Output Rows field.
-
Click Create in the Navigate pane to display an initial view of the query on the Diagram tab. Note that the sample query already contains an INNER join, a SELECT statement, and a WHERE clause. These elements are created when you drop source tables on the transformation template. The joins shown in the query process flow are not necessarily joined in the order in which the SQL optimizer actually joins the tables. However, they do reflect the SQL syntax.You can click the tables that are included in the query and set an alias in the properties pane for each. These aliases help simplify the SQL code that is generated in the query. Aliases are set for the source tables in the sample job. The Designer window is shown in the following display.Sample Designer Tab
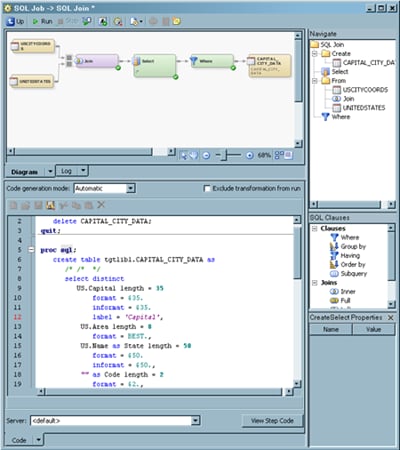 Note: The query is shown in the Navigate pane, complete with the aliases that were set for the source tables. The process flow for the query is displayed on the Create tab. You can review the code for the query in the SQL Join properties pane. You can see the SQL code for the query on the Code tab.
Copyright © SAS Institute Inc. All Rights Reserved.
Last updated: January 16, 2018