Adding a Join to an SQL Query on the Designer Tab
Problem
Solution
You can
drop the join on the Diagram tab in the Designer window. You can easily tie this new join into
the existing query flow.
Tasks
Add a Join to the Diagram Tab
Perform
the following steps to add a join to the Diagram tab:
-
Select one of the join objects in the Joins folder in the SQL Clauses pane, and drop it in a blank space on the Diagram tab.
-
Disconnect the existing join from the Select object. Click on the arrow between the Join and the Select object. Then, press DELETE to remove the arrow. The new join and the original join are displayed in the query flow, as shown in the following display.Initial Job Flow
-
Move the new join to an appropriate location. Then, complete the following actions:
-
Connect the original join to one input port of the new join.Note: If you select a Join node on the diagram, then the new join node will be inserted after the join that you selected.
-
Drop the source table for the new join onto the Diagram tab.
-
Connect the table to the remaining input port of the new join.
-
Connect the new join to the input port of the Select object.Note: If you select the Select node on the diagram, then the join is automatically connected or inserted between the Select node and the Join node.
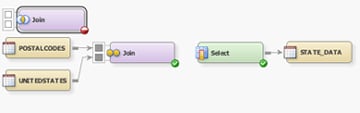
A sample job that includes an added join is shown in the following display.Added Join
-
Note: You can add
the source and target tables directly to the process flow diagram
for the job in the Diagram tab for the Job Editor window. You can also add a table, join, or
subquery to a job by dragging and dropping it on the Diagram tab in the Designer window for the SQL
Join transformation.
Copyright © SAS Institute Inc. All Rights Reserved.
Last updated: January 16, 2018