Inserting Rows into a Target Table
Solution
You can use the Insert
Rows transformation to create an SQL query that will insert the rows
into the target table.
Perform the following
tasks to insert the rows:
Insert Rows is one of
the specialized transformations that are provided in the SQL folder
in the SAS Data Integration Studio transformation tree.
These specialized transformations
enable you to perform basic SQL tasks in SAS Data Integration Studio
jobs. You can use the transformations to create tables, insert, merge,
and delete rows, update columns, and execute custom SQL code. You
can use the transformations in jobs in the same way that Insert Rows
is used in the job described in this topic.
Tasks
Create and Populate the Job
Perform the following
steps to create and populate a job that includes the Insert Rows transformation:
-
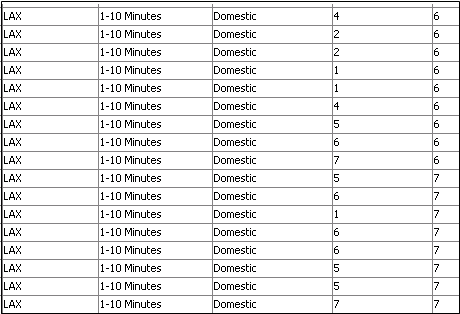
Select and drag the source table out of the Inventory tree. Then, drop it before the Insert Rows transformation on the Diagram tab. For example, you could add the flightdelays table, which contains data about delayed airlines flights, as the source table. The flightdelays table is a SQL Server table.
-
You want to have a permanent target table to contain the output for the transformation. Right-click the temporary work table that is attached to the Insert Rows transformation and click Replace in the pop-up menu. Then, use the Table Selector window to select the target table for the job. In this case, you want to insert selected rows into the SQL Server table flightdelays, so select it as the target table.Note: If you need to use explicit pass-through, the source table and the target table must come from the same database management system. When you use implicit pass-through, the source table and the target table can come from different databases. You must use explicit pass-through if you need to sort the table on the Filter and Sort tab.

Filter and Sort the Data
Perform the following
steps to filter and sort the rows that you want to insert:
-
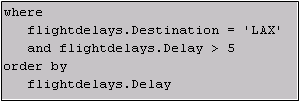
Click New row above the Filter (WHERE) table to add a row to the table. Then, enter your filter conditions.This target table will contain only those rows that have a destination of LAX and a delay of more than five minutes. Note that the operand ‘LAX’ is enclosed in single quotation marks. SAS Data Integration Studio cannot successfully generate code for a job that includes a database management system table in which the double quotation mark is used in the table name or the column names. The table that serves as the source and target for this job is a SQL Server table.

Copyright © SAS Institute Inc. All rights reserved.