Working with Change Management
Solution
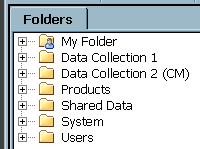
Have an administrator
set up a change-managed folder in the Folders tree, such as the Data
Collection 2 (CM) folder shown in the following display.
Under change management,
most users are restricted from adding or updating the metadata in
a change-managed folder in the Folders tree. Authorized users, however,
can add new metadata objects and check them in to the change-managed
folder. They can also check out metadata objects from the change-managed
folder in order to update them. The objects are locked so that no
one else can update them as long as the objects are checked out. When
the users are ready, they check in the objects to the change-managed
folder, and the lock is released.
If you are authorized
to work in a change-managed folder, a Checkouts tree is added to your
desktop in SAS Data Integration Studio. The Checkouts tree displays
metadata in your project repository, which is an individual work area
or playpen.
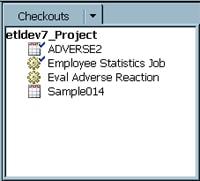
To update a metadata
object in the change-managed folder, check out the object. The object
is locked in the change-managed folder, and a copy is placed in the
Checkouts tree. Metadata that has been checked out for update has
a check mark beside it, such as the first two objects in the following
display.
You can modify the
copy in the Checkouts tree. When ready, check in the updated object
to the change-managed folder. Any lock on that object is released
and any updates are applied.
To add a new metadata
object to the change-managed folder, add the object as usual. The
metadata is added to the Checkouts tree. New metadata objects that
have never been checked in do not have a check mark beside them, such
as the last two objects in the preceding display. When ready, check
in the new object to the change-managed folder.
Note: Users who are working under
change management should not use My Folder in
the Folders tree. They should use the Checkouts tree and the change-managed
folder instead.
For, example, when you
add a new metadata object, verify that the folder path in the Location field
for the object goes to the appropriate, change-managed folder. For
information about setting up change management, administrators should
see the “Administering SAS Data Integration Studio”
chapter of the SAS Intelligence Platform Desktop Application
Administration Guide.
See also Usage Notes for Change Management.
Tasks
Create a Connection Profile for a User under Change Management
Create a Connection Profile for an Administrator under Change Management
The
standard set of privileges that enable you to work in a change-managed
folder do not enable you to perform administrative tasks such as the
following:
In order to perform tasks such as these, you must
use a connection profile that has appropriate privileges in the change-managed
folder. Ask an administrator for a logon ID and password that has
the privileges that you need for these tasks. Then create and use
the connection profile as usual.
Add New Metadata
-
Add the metadata as usual. Verify that the folder path in the Location field for the object goes to the appropriate, change-managed folder. To specify a different path in the Folders tree, click Browse and select the desired path. The new object appears in the Checkouts tree on the desktop. The new object is not displayed in other trees until it is checked in for the first time.
Check In Metadata
-
In the Check In Wizard, enter a title and an optional description for the changes that you are about to check in. The text entered here becomes part of the history for all objects that you are checking in. If you do not enter meaningful comments, the history is less useful. When you are finished describing your changes, click Next. The Select Objects to Check In page displays.You can use the Select Objects to Check In page to identify any checked-out objects that depend on an object that you selected for check-in. For example, suppose that you had checked out a job and also a table that was in the process flow for that job. If you selected the job for check-in, the Select Objects to Check In page would indicate that a table in that job was also checked out. In that case, you might want to check it in along with the job.
-
Otherwise, select an object in the Select Objects to Check In page. Any checked-out objects that depend on the object that you just selected are displayed on the Dependencies tab. Use the Dependencies and other tabs on this page to determine whether you want to check in a dependent object along with the parent object. When finished, click Next to display the Finish window.
Check Out Metadata
-
In the change-managed folder, right-click the metadata that you want to check out and select Check Out. Alternatively, you can left-click the metadata that you want to check out, and then go the menu bar and select Check Outs
 Check Out. The metadata is checked out and displays in your
Checkouts tree.
Check Out. The metadata is checked out and displays in your
Checkouts tree.
Delete Metadata
You
can use the Delete option to permanently
remove selected metadata objects from the metadata server. Metadata
objects that have never been checked in are simply deleted from the
Checkouts tree. Metadata objects that are checked out are deleted
from the metadata server.
Undo Checkouts
You
can use the Undo Checkout option to discard
any changes to selected metadata objects that have been checked out.
The objects are removed from the Checkouts tree, and the original
objects are unlocked in the change-managed folder. Any changes made
to the metadata since it was checked out are lost. Perform the following
steps to undo checkouts:
Clear All Metadata from Your Project
You
can use the Clear option to delete all new
objects and unlock all checked-out objects in your Checkouts tree.
You can use this option any time you want to discard all new and updated
metadata in your Checkouts tree. You can
also use this option when a metadata object fails to check in due
to technical problems. When you clear a project, all changes that
have not been checked in are lost. Perform the following steps to
use this option:
Clear All Metadata from a Project That You Do Not Own
Some
problems require an administrator to clear all metadata from a user's
project repository, which is the metadata repository that populates
the Checkouts tree. For example, suppose a user checked out metadata
objects but forgot to check them back in before going on a long vacation.
In the meantime, other users need to update the checked-out metadata.
As another example, suppose an administrator accidentally deletes
a user's project repository that contains checked-out objects. These
objects would remain locked and unavailable for update until they
were unlocked.
If problems such as
these occur, an administrator can perform the following steps to clear
all metadata from one or more project repositories:
-
Start SAS Data Integration Studio. Select a connection profile for an unrestricted user, as described in Create a Connection Profile for an Administrator under Change Management.
Usage Notes for Change Management
Under change management,
there is limited support for the following types of objects: Stored
Processes, Information Maps, Web Services, Deployed Jobs, Deployed
Flows, Mining Results, Reports, and Prompts. You can add these objects
and check them in once. You can import these objects and check them
in once. However, some actions might not be supported for these objects.
Users who are working
under change management should not run the Import Metadata Wizard
with the Compare import metadata to repository option
selected. The import and comparison can fail when metadata is imported
to a folder that is under change management. For more information,
see Solution.
Copyright © SAS Institute Inc. All rights reserved.