Importing Updated Metadata with a SAS Metadata Bridge
Solution
You can
use the Import Metadata Wizard and select the Compare
import metadata to repository option on the Import Selection
page. This option specifies that metadata in the selected file is
imported and compared to existing metadata. Differences in tables,
columns, indexes, and keys are detected. Imported metadata is compared
to the metadata in the default repository that is associated with
the selected library. Differences are stored in a comparison result
library. You can view the changes in the Differences window.
Note: Users who are
working under change management should not run the Import Metadata
Wizard with the Compare import metadata to repository option selected. The import and comparison can fail when metadata
is imported to a folder that is under change management.
If you
want to use the Compare import metadata to repository option to import metadata to a folder that is under change management,
an administrator with write privileges to the change-managed folder
must perform the steps that are described in Import the Metadata to be Compared. After the
metadata has been imported by an administrator, users who are working
under change management can view differences and apply changes.
Tasks
Import the Metadata to be Compared
The following
preparation makes it easier to import the metadata that you need to
compare to existing metadata:
-
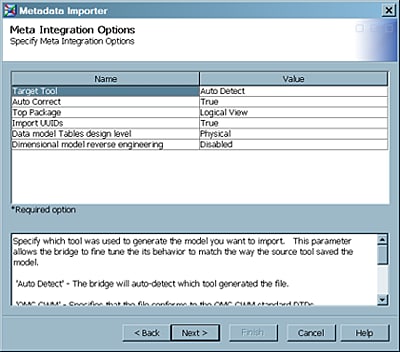
Review the information on the Meta Integration Options page. Typically, you accept the default values.Note: The Meta Integration Options page enables you to specify how the wizard imports various kinds of metadata in the source file. To see a description of each option, select the option in the Name field, and a description of that option appears in the pane at the bottom of the page. Typically, you can accept the defaults on this page. The following display shows the Meta Integration Options page for the sample job.
-
The Import Selection page enables you to select whether the metadata is imported as new or compared to existing metadata in the target environment. Because the sample job compares the imported metadata to existing metadata, select Compare import metadata to repository.Note: If the wizard detects that the metadata to be imported is similar to existing metadata in the folder that you selected when you began the import, it selects Compare import metadata to repository by default. If this option is not selected, select it now. The Comparison results library field becomes active.
-
The Metadata Location page enables you to specify the library in the target environment that should contain the imported metadata. You should select the same library that contains the existing metadata that is compared to the imported metadata. If necessary, you can click the ellipsis button in the Library field to select the library. Note that the content in the DBMS and Schema fields is based on the library that you select. Click Next to access the Finish page.
Compare the Imported Metadata to the Existing Metadata
-
Select Tools
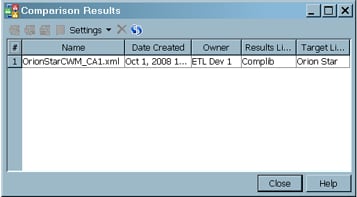
 Comparison Results from the menu bar on the desktop to access the Comparison Results window. The following display shows
the Comparison Results window for a sample
job.
The Comparison Results window enables you to select the results of a compare import metadata to repository operation. There is one record for each successful comparison operation. Select the desired comparison record. Then, click the View differences found icon in the toolbar to access the Differences window.
Comparison Results from the menu bar on the desktop to access the Comparison Results window. The following display shows
the Comparison Results window for a sample
job.
The Comparison Results window enables you to select the results of a compare import metadata to repository operation. There is one record for each successful comparison operation. Select the desired comparison record. Then, click the View differences found icon in the toolbar to access the Differences window. -
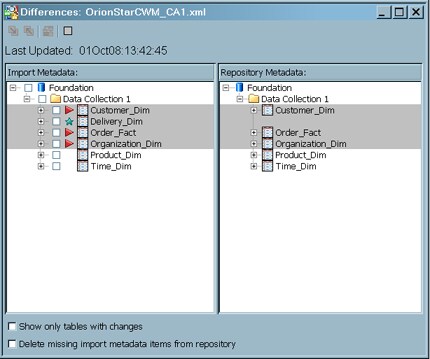
Expand the folders in the Differences window to determine whether any metadata has changed. A sample Differences window is shown in the following display.Continue to expand folders and view the metadata until you are satisfied that you understand the differences between existing metadata and the imported metadata. To perform impact analysis or reverse impact analysis on an item, select the check box by that item, and then click the Impact Analysis or Reverse Impact Analysis icons on the toolbar on the Differences window. (For a detailed description of all options and controls in the Differences window, press F1.) In this example, the triangle icons in the next display indicate that the imported metadata contains updates to three tables. The star icon indicates that the imported metadata contains one new table.
Applying Changes to Tables with Foreign Keys
Restoring Metadata for Foreign Keys
When you apply changes from
imported metadata, a warning message is displayed if foreign key metadata
is about to be lost. At that time, you can cancel or continue the
apply operation. However, if you accidentally lose foreign key metadata
as a result of an apply operation, it is possible to restore this
metadata.
Assuming
that the imported metadata correctly specifies the primary keys or
foreign keys for a set of tables, you can compare the imported metadata
to the metadata in the repository. In the Comparison Results window,
select the icon for the appropriate comparison result. Then, click Redo the comparison in the toolbar. In the Differences window, accept all changes, or select the
primary key table and all related foreign key tables together and
apply changes to them.
Deleting an Invalid Change Analysis Result
When you perform change analysis on imported metadata,
it is possible to import the wrong metadata or compare the imported
metadata to the wrong current metadata. If this happens, the comparison
result metadata in the Comparison Result tree are not valid, as well
as the data sets for this comparison in the comparison result library.
If you
are working under change management, perform the following steps to
delete an invalid change analysis result:
Copyright © SAS Institute Inc. All rights reserved.