Creating a Hive Job
Solution
You can create a SAS
Data Integration Studio job that contains the Hive transformation.
Hive is a data warehouse system for Hadoop. You can easily summarize
data, run ad hoc queries, and generate the analysis of large data
sets stored in Hadoop compatible file systems. Hive also enables you
to project structure onto this data and query the data by using an
SQL-like language called HiveQL. For more information about Hive,
see
https://cwiki.apache.org/confluence/display/Hive/.
Perform the following
tasks.
Tasks
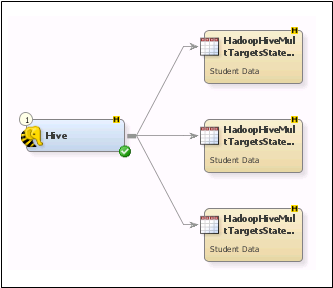
Create a Hive Job
The Hive job for this
example contains the Hive transformation and three target tables.
This job structure enables the submission of multiple Hadoop Hive
statements to multiple Hive target tables.
Perform the following
steps to create and populate the job:
-
Note that the source table for this particular job is specified in the HiveQL statements described in the next section. You can also create a job that includes a source table that you add to the Diagram tab and connect to the input port of the Hive transformation. The source table for the Hive transformation must be a Hadoop table.
Configure the Job
The configuration needed
for the Hive transformation varies from job to job. This sample job
requires that you add two SELECT statements and one SHOW TABLES statement
to the table on the HiveQL tab.
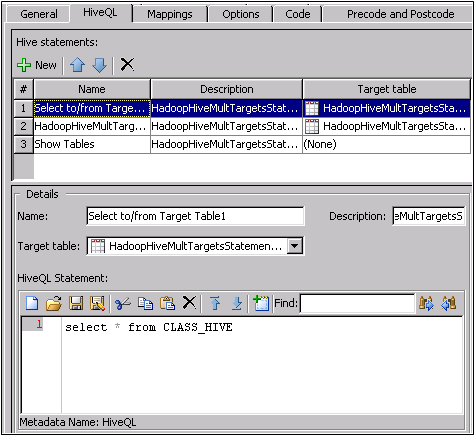
Note that the Hive statements
are listed in the Hive statement field at
the top of the tab. The code for the selected statement is displayed
in the HiveQL Statement field at the bottom
of the tab. For this job, the first two statements select the contents
of the CLASS_HIVE table and specify a target table. The third row
adds a SHOW TABLES statement with no target table.
Run the Job and Review the Output
Run the job and verify
that the job completes without error. Then, review the output. Based
on the HiveQL statements specified in the Hive transformation,
the first two tables should contain the same output and the third
table should contain no observations.

Note: This table can take an unexpectedly
long time to close. The delay is longer when row counts are enabled.
Therefore, consider clearing the Enable row count on basic
properties for tables check box on the General tab
of the Options window. (You can access the Options window
from the Tools menu.)